DIY: How to fix Navi disk read errors
 11-11-2012, 10:40 AM
#1
Racer
Thread Starter
DIY: How to fix Navi disk read errors
Before I begin, let me just say im not responsible for any damage you cause to your car. Make sure you are confident with the procedure before just diving in. There is a little but of supplimentary info that I wrote on this thread: https://acurazine.com/forums/showthr...8#post14154808
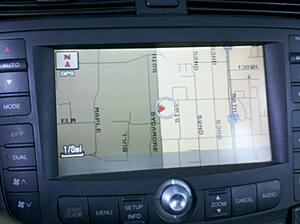
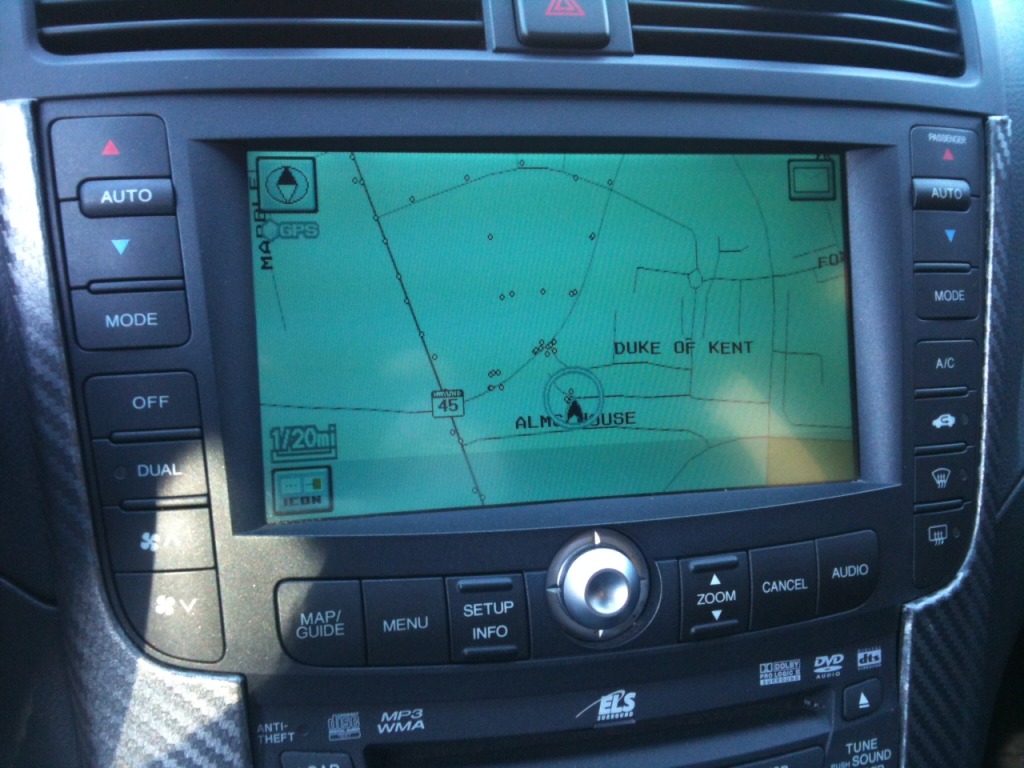
Im sure alot of people are aware of the issues that the Navi dvd Drive eventually develops. for anyone who hasn't happen yet, it is just a variation of a disk read error when starting up the navigation. In my case, the problem developed. I started out with disk read errors every now and then, to consistently every time I went in my car. Sometimes the navi would manage to boot, but as of recent, it just refused to. I had disconnected the battery the other day, and when I reconnected it, the navi tryed to download the software off the disk. As you can imagine, it didnt work, so I was stuck with a black screen that said "Please Check Disk" on it at all times. My screen was 100% useless.
So I decided to dig around. Alot of people just ended up sending their units to Alpine which they repaired for 158$. As of this year, their prices jumped up to 358$ which is pretty ridiculous. I honestly did not feel like paying that and I figured it would be worth trying a small repair since I am comfortable repairing small electronics
So lets get to the good stuff.
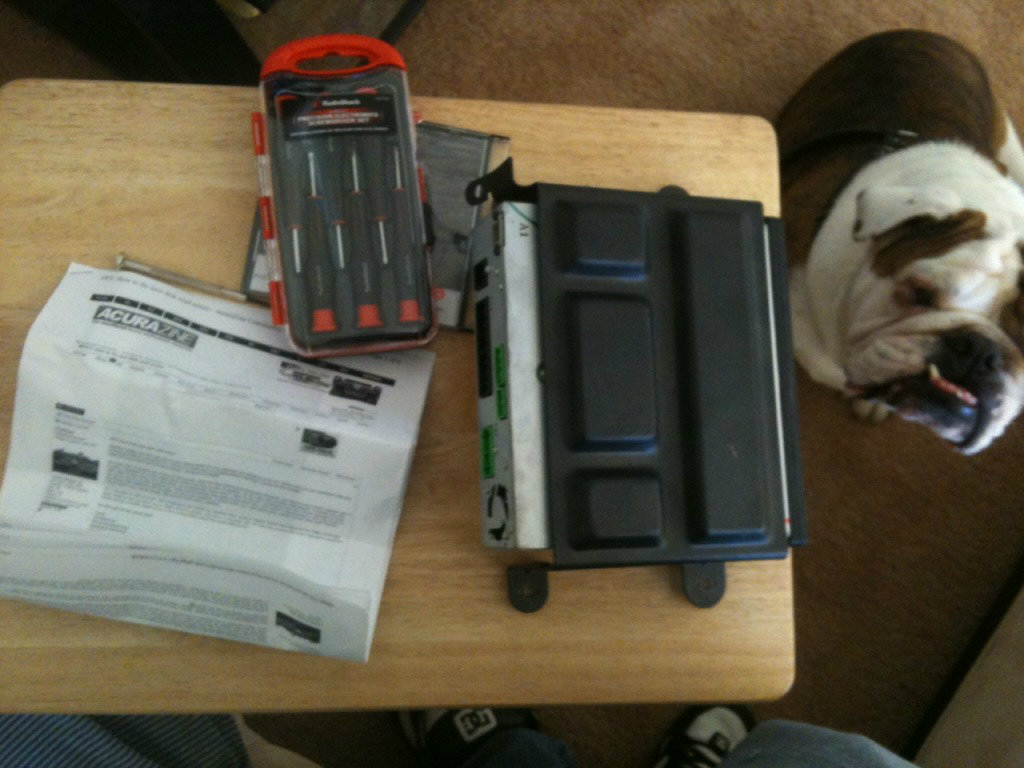
Tools
Screwdriver
Micro-Screwdrivers
Isopropyl Alchohol
Q-tips
Paper Towel
1. Remove the DVD from the drive (I forgot this the first time around. Felt really stupid at my desk ready to work and then having to start all over).
2. Disconnect the battery (Make sure your trunk is open)
3. Remove the Navi DVD drive. there is about 5 knob type screws and a push fastner stopping you from peeling back the fabric. I also had to remove the hard plastic panel at the rear of the trunk. Just pull up on that and it should come loose. Make sure you know where each knob came from. Several of them are different. Once you peel back the fabric, there are 4 screws that hold down the dvd drive bracket. you'll see them in pictures below. There are 5 clips attached in the back
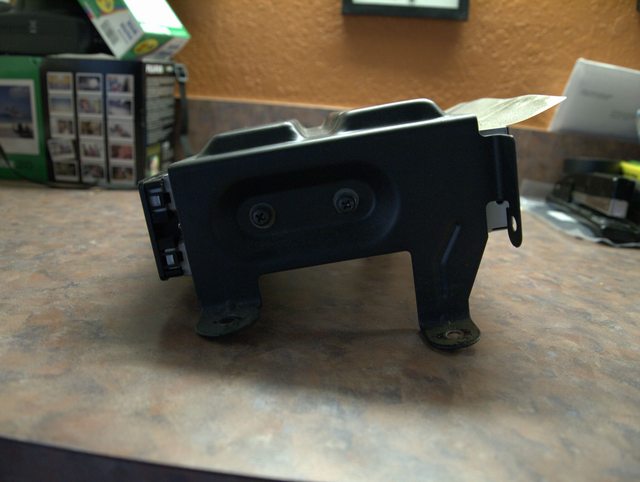
4. So now you should have the navi drive sitting on your desk, with the bracket attached. there are 2 screws on each side of the bracket. Remove those and the navi will be free.

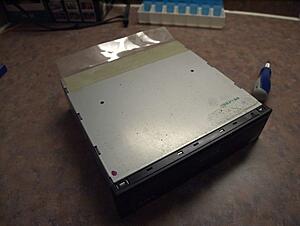
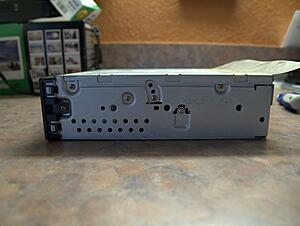
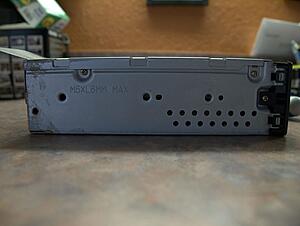
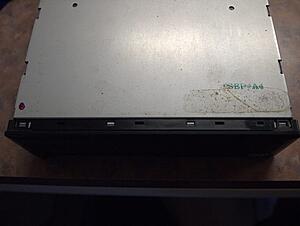
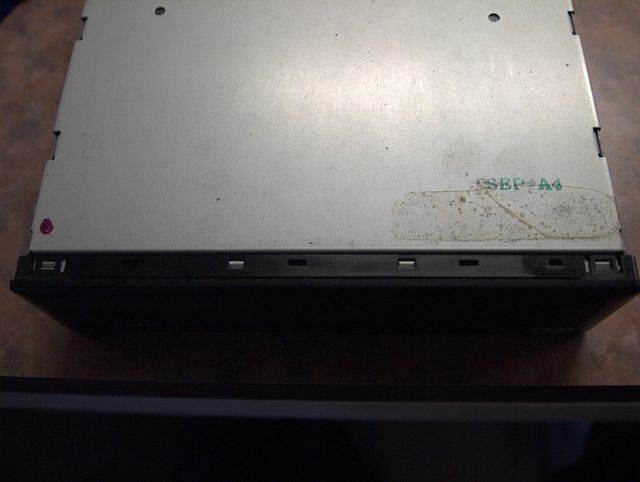
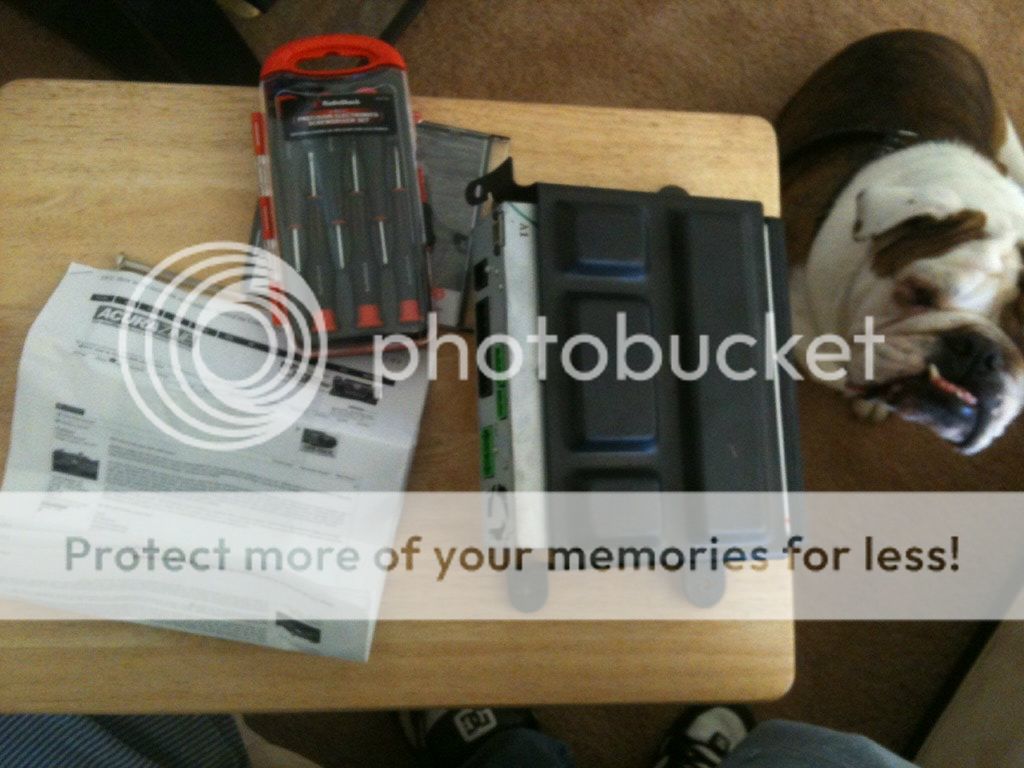
5. I took a few pictures of each side so you can familiarize yourself with the unit before you tackle this. One thing I noticed was the it was filthy. I took some isoproply alcohol and wiped down the entire unit to clean the dust. the paper towl was filthy after. Also, check out the production date. December 2003! 9 years till fill the lens with dust is actually pretty decent IMO.
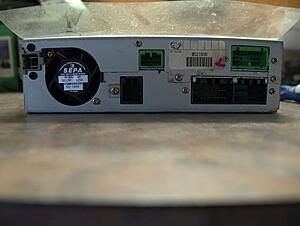
6. Next step is to remove the screws holding the top lid. there are six screws, all of the rear of the unit, that need to be removed. 1 black screw, at the top left of the rear, and another 5 golden screws that are located along the top of the backside. its pretty obvious which ones are holding the top lid down. you only need to remove those 6. Nothing more.
7. Now lift the top metal piece upwards from the rear of the unit. you shouldnt need a ton of force. Maybe a bit to break it loose. the thing hasnt moved in 9 years. Once the lid begins to move, start paying attention the the 4 clips holding it on (picture below). this is all thats holding the unit on. It takes a little of moving around to get it free but its possible without removing the faceplate. the 2 center ones are a bit trickier. I used small screw driver to convince it a bit. I saw no signs of cracking or stress in the plastic, but still take caution to not break the plastics clips. After that, simply remove the top.

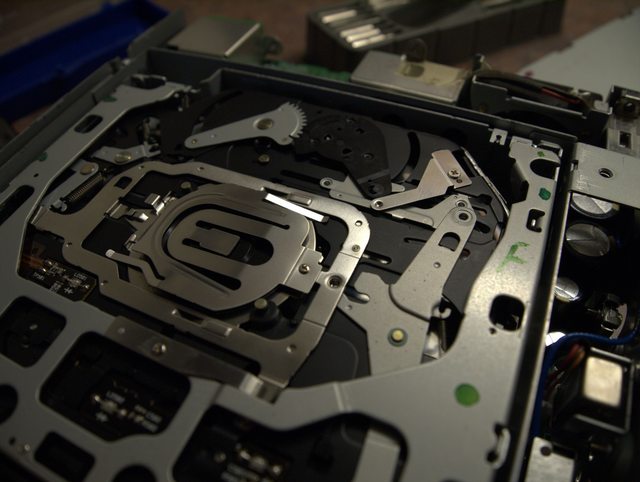
8. Now is the tricky part. Cleaning the laser. Originally, my plan was to remove the little screw holding in the center spring clamp. it gives you direct access to clean the lens. Unfortunately, none of my screw drivers were the right size, and its difficult to unscrew since that part is sprung (it moves up and down, making it possible to use any force to unscrew it). Anyways, I took a picture of the lens in the first picture below. its that little tiny shiny sparkle coming from right above the center screw from the clamp. At this point, its up to you how you want to clean your lens. Heres what I did. A regular q-tip was far to big to fit in the hole. I stripped alot (most) of the cotton off, and made sure there was no strands hanging out by rolling the tip in between my fingers (kind of how you used to roll your buggers before you flicked them as a kid). then I dipped the qtip in the isoproply alcohol. It still was a pretty tight fit to get it in, but it manages. you then have to angle it towards the lens since the hole is not directly above it. look at my second picture down to see my angle. I shined a light to get the best view I could of the lens. It is really (very) difficult to see from any angle, but you can occassionally see a glimpse. the lens moves up and down so dont worry about damaging by hitting it to hard, but make sure to be gentle with. After my first wipe, I looked at the lens, and actually noticed some crud on it towards the back. about 75% of it was sparkling clean. Went back and made sure to clean it all.


9. You are pretty much done at this point. Slide the top back on. It goes back on much easier then taking it off. Put the 6 screws on in the back. put the 4 screws on holding the unit to the bracket. Go back to your car. Attach all the connectors. Mount the drive back to the car with the 4 screws. hook up your battery, and put in the disk. and give it a shot.
Where my dash would almost instantly read an error, it now immediately went to downloading the software. After it downloads, turn on your car and let it run for several minutes while it acquires satellite location. I took this time to put my trunk back together properly. by the time I was done, the navi was all done and waiting for me to press "ok"
All in all, the job took about 30 minutes on my desk. figuring out how to remove the trunk panel to get access to the drive was actually the most time consuming. the job took a little over an hour. I could honestly probably do it again in under 30 minutes. the job is pretty simple but requires a delicate hand and a patient eye once you actually get to the important step. It was honestly worth my time versus paying 358 to ship out my unit to alpine for them to charge me for some guying cleaning the lens. If you have any questions, feel free to ask me. Im not on the forums that often, so drop me a PM if im failing to reply to the thread. Also, if the images no longer show up, feel free to bug me and ill rehost them somewhere.
Also, just as an added note. this should work for alot of the cars having this problem but is not always 100% the issue. Sometimes certain power electronics may die. It could be a variety of things. this is just a virtually free solution, that could correct your issue.
Hope this helps someone out.
Im sure alot of people are aware of the issues that the Navi dvd Drive eventually develops. for anyone who hasn't happen yet, it is just a variation of a disk read error when starting up the navigation. In my case, the problem developed. I started out with disk read errors every now and then, to consistently every time I went in my car. Sometimes the navi would manage to boot, but as of recent, it just refused to. I had disconnected the battery the other day, and when I reconnected it, the navi tryed to download the software off the disk. As you can imagine, it didnt work, so I was stuck with a black screen that said "Please Check Disk" on it at all times. My screen was 100% useless.
So I decided to dig around. Alot of people just ended up sending their units to Alpine which they repaired for 158$. As of this year, their prices jumped up to 358$ which is pretty ridiculous. I honestly did not feel like paying that and I figured it would be worth trying a small repair since I am comfortable repairing small electronics
So lets get to the good stuff.
Tools
Screwdriver
Micro-Screwdrivers
Isopropyl Alchohol
Q-tips
Paper Towel
1. Remove the DVD from the drive (I forgot this the first time around. Felt really stupid at my desk ready to work and then having to start all over).
2. Disconnect the battery (Make sure your trunk is open)
3. Remove the Navi DVD drive. there is about 5 knob type screws and a push fastner stopping you from peeling back the fabric. I also had to remove the hard plastic panel at the rear of the trunk. Just pull up on that and it should come loose. Make sure you know where each knob came from. Several of them are different. Once you peel back the fabric, there are 4 screws that hold down the dvd drive bracket. you'll see them in pictures below. There are 5 clips attached in the back
4. So now you should have the navi drive sitting on your desk, with the bracket attached. there are 2 screws on each side of the bracket. Remove those and the navi will be free.
5. I took a few pictures of each side so you can familiarize yourself with the unit before you tackle this. One thing I noticed was the it was filthy. I took some isoproply alcohol and wiped down the entire unit to clean the dust. the paper towl was filthy after. Also, check out the production date. December 2003! 9 years till fill the lens with dust is actually pretty decent IMO.


6. Next step is to remove the screws holding the top lid. there are six screws, all of the rear of the unit, that need to be removed. 1 black screw, at the top left of the rear, and another 5 golden screws that are located along the top of the backside. its pretty obvious which ones are holding the top lid down. you only need to remove those 6. Nothing more.
7. Now lift the top metal piece upwards from the rear of the unit. you shouldnt need a ton of force. Maybe a bit to break it loose. the thing hasnt moved in 9 years. Once the lid begins to move, start paying attention the the 4 clips holding it on (picture below). this is all thats holding the unit on. It takes a little of moving around to get it free but its possible without removing the faceplate. the 2 center ones are a bit trickier. I used small screw driver to convince it a bit. I saw no signs of cracking or stress in the plastic, but still take caution to not break the plastics clips. After that, simply remove the top.
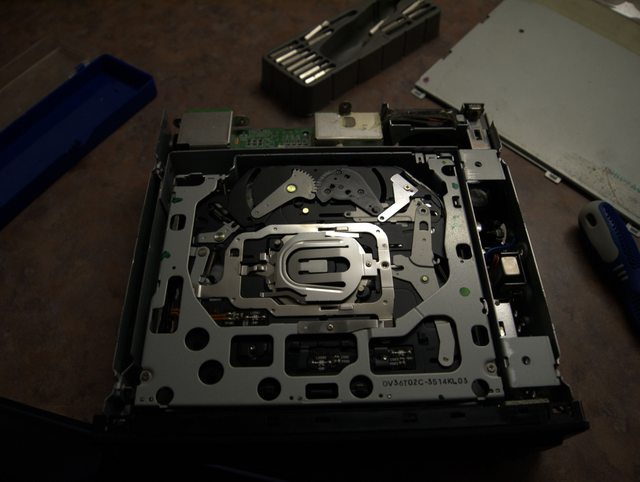
8. Now is the tricky part. Cleaning the laser. Originally, my plan was to remove the little screw holding in the center spring clamp. it gives you direct access to clean the lens. Unfortunately, none of my screw drivers were the right size, and its difficult to unscrew since that part is sprung (it moves up and down, making it possible to use any force to unscrew it). Anyways, I took a picture of the lens in the first picture below. its that little tiny shiny sparkle coming from right above the center screw from the clamp. At this point, its up to you how you want to clean your lens. Heres what I did. A regular q-tip was far to big to fit in the hole. I stripped alot (most) of the cotton off, and made sure there was no strands hanging out by rolling the tip in between my fingers (kind of how you used to roll your buggers before you flicked them as a kid). then I dipped the qtip in the isoproply alcohol. It still was a pretty tight fit to get it in, but it manages. you then have to angle it towards the lens since the hole is not directly above it. look at my second picture down to see my angle. I shined a light to get the best view I could of the lens. It is really (very) difficult to see from any angle, but you can occassionally see a glimpse. the lens moves up and down so dont worry about damaging by hitting it to hard, but make sure to be gentle with. After my first wipe, I looked at the lens, and actually noticed some crud on it towards the back. about 75% of it was sparkling clean. Went back and made sure to clean it all.

9. You are pretty much done at this point. Slide the top back on. It goes back on much easier then taking it off. Put the 6 screws on in the back. put the 4 screws on holding the unit to the bracket. Go back to your car. Attach all the connectors. Mount the drive back to the car with the 4 screws. hook up your battery, and put in the disk. and give it a shot.
Where my dash would almost instantly read an error, it now immediately went to downloading the software. After it downloads, turn on your car and let it run for several minutes while it acquires satellite location. I took this time to put my trunk back together properly. by the time I was done, the navi was all done and waiting for me to press "ok"

All in all, the job took about 30 minutes on my desk. figuring out how to remove the trunk panel to get access to the drive was actually the most time consuming. the job took a little over an hour. I could honestly probably do it again in under 30 minutes. the job is pretty simple but requires a delicate hand and a patient eye once you actually get to the important step. It was honestly worth my time versus paying 358 to ship out my unit to alpine for them to charge me for some guying cleaning the lens. If you have any questions, feel free to ask me. Im not on the forums that often, so drop me a PM if im failing to reply to the thread. Also, if the images no longer show up, feel free to bug me and ill rehost them somewhere.
Also, just as an added note. this should work for alot of the cars having this problem but is not always 100% the issue. Sometimes certain power electronics may die. It could be a variety of things. this is just a virtually free solution, that could correct your issue.
Hope this helps someone out.
Last edited by Sutitan; 11-11-2012 at 10:51 AM.

The following 49 users liked this post by Sutitan:
05TLnubee (04-26-2016),
A SiQ TL (04-07-2013),
Acura31 (11-22-2013),
ahcrawford (06-13-2016),
Airblizzard (05-24-2020),
and 44 others liked this post.
11-12-2012, 08:52 AM
#2
Nice write up! Thank you for taking the time to put this together with the pictures. Question: Did you try one of the cleaning discs before deciding to pull the DVD drive and cleaning it manually? Based on what you saw, do you think they would even help?
The following users liked this post:
RegguyXIII (04-26-2020)
11-12-2012, 10:47 AM
#3
Racer
Thread Starter
One of my concerns with using a cleaner disk was damaging the lens surface. If there were any hard grains kind of stuck on their, I was worried that the disk might forcibly remove it, and scratch the lens. this is completely speculative by the way. I just felt that the soft tip from the qtip as well as the moisture from the alcohol safely removed any dust. Its kind of how the say dont try to wipe pollen off your car with a rag. It will leave micro scratches in your pain. I was applying to same mentality to the lens. Also, Ive seen a few people on the forum who have tried the disk with limited success
As I mentioned in my other thread, Quite a few people in Europe were having success with jamming things like thin rulers or thin spatulas wrapped in eye glass cleaner wipes. It seems a little barbaric, but supposedly it works. id prefer to see the damage im doing as I do my work .
.
I think the issue is that the lens gets quite dirty. At first, I actually didn't notice that the lens was dirty. I actually begin to doubt that the lens was the issue. After my first wipe with the qtip, I reinspected it and notice part of it was much shinier then the further, backside which was harder to reach. Since its so hard to see, I can only speculate that it was still dirty, but after going in again and trying to get to the back, I noticed the whole lens became extremely shiny.
As I mentioned in my other thread, Quite a few people in Europe were having success with jamming things like thin rulers or thin spatulas wrapped in eye glass cleaner wipes. It seems a little barbaric, but supposedly it works. id prefer to see the damage im doing as I do my work
.I think the issue is that the lens gets quite dirty. At first, I actually didn't notice that the lens was dirty. I actually begin to doubt that the lens was the issue. After my first wipe with the qtip, I reinspected it and notice part of it was much shinier then the further, backside which was harder to reach. Since its so hard to see, I can only speculate that it was still dirty, but after going in again and trying to get to the back, I noticed the whole lens became extremely shiny.
11-12-2012, 10:58 AM
#4
BANNED
iTrader: (33)

dude...if this works, you are my hero. i'm going to attempt this very soon. mines been acting up for many months.
question for you. was your disc scratched to the point that it would no longer read even after the repair? did you have to get a new disc?
question for you. was your disc scratched to the point that it would no longer read even after the repair? did you have to get a new disc?
11-12-2012, 11:08 AM
#5
Racer
Thread Starter
My current disk is beyond old. It is the original that came with the car back from early 04. But its still working. Unless your disc is seriously scratched, like to the point where you can feel the scratches depth with your finger nail, I wouldn't worry that.
Basically, I doubt its your disc. it would be a convenient solution, since you wouldn't have to open up the drive or risk much of anything, but chances are, its the lens.
The following users liked this post:
SharksBreath (11-12-2012)
11-12-2012, 05:25 PM
#6
Instructor

Have been having the same issue as you the past few months (system requiring a few mins to recognize dvd upon starting car) and this past weekend after disconnecting battery, am stuck with a "please check disk" message. Gonna tackle this ASAP and dont think i've seen a more perfectly timed post. Thanks! 

Trending Topics
01-04-2013, 03:27 PM
#8

I tried this. My 08 drive is a bit different. Very easy to remove the top cover of the drive, and the Lens is clearly expose for cleaning. Cleaned it, plugged everything back in, but sadly it did not fix my disc read error message.
Also, if you look at the back of the drive, can someone verify that there is an open spot for another black connector? I double and triple checked to make sure all my connectors are plugged in, but i still have an extra spot next to my other black connector (next to the bigger of the black connectors).
Also, if you look at the back of the drive, can someone verify that there is an open spot for another black connector? I double and triple checked to make sure all my connectors are plugged in, but i still have an extra spot next to my other black connector (next to the bigger of the black connectors).
The following users liked this post:
Ho9984 (01-14-2013)
01-06-2013, 10:54 AM
#11

In tried this on my 04 TL A-Spec today. I had been experiencing intermittent problems with occasional error messages, and then eventually it wouldn't work at all, and I got the error message 100% of the time, so it was either time to ship the thing off to Alpine and pay $358 or do it myself.
So, I removed it myseld and tried to clean the lens by your instructions. I wanted to make sure that the lens was thoroughly cleaned because I sure didn't want to have to do this again, so I decided to remove the little center screw as well so I could have better access. With that, it removes the little springy metal cover, the black round thingy, and another metal piece below it too. If you can avoid removing that screw, I would recommend that too, but by removing those parts, you can be sure you have good access. Putting it back on was the hard part. Thankfully my husband and I have lots of little tweezers and goodies like that due to his line of work because without those types of things, putting that center screw back on would have really been difficult. It actually took me holding the parts up in place and him screwing the screw back in.
Anyway, I finally popped the CD back in and waited a few minutes and it booted up right away. I am SO excited! Thank you so much for this DIY!
The following users liked this post:
Airblizzard (07-06-2020)
01-07-2013, 02:36 AM
#12
01-21-2013, 08:37 AM
#14
BANNED
iTrader: (33)
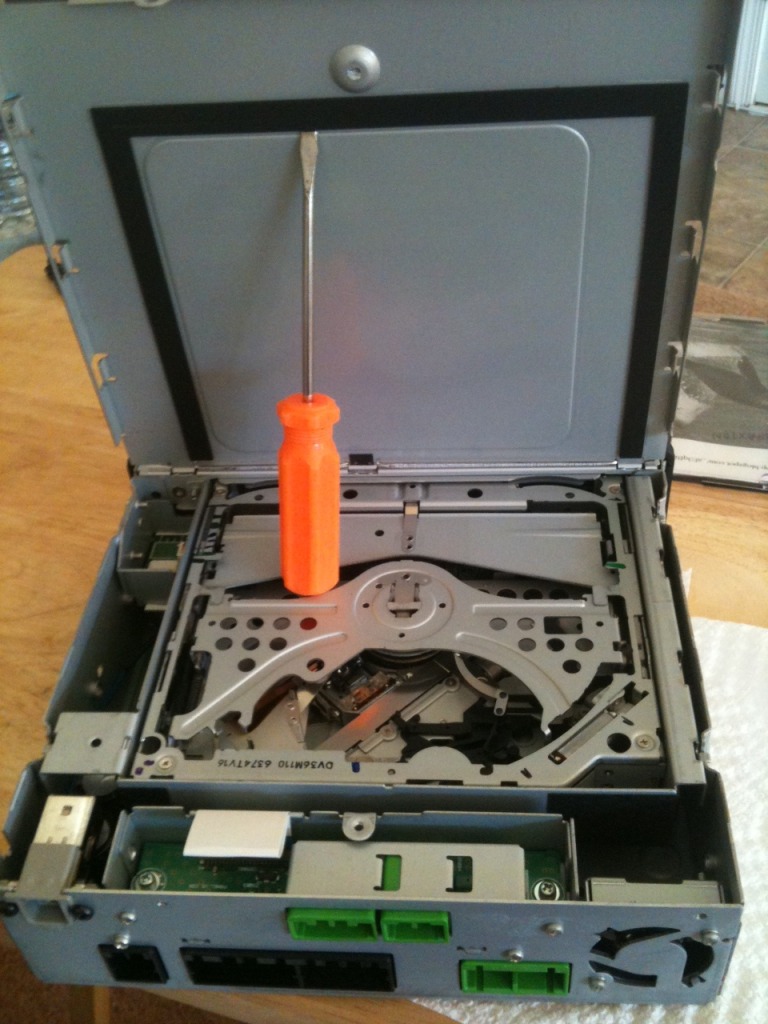
so i went ahead and did this to my 07 TL-S nav drive. i've had the dreaded 'disc read error' message for many months. so i got the unit out of the trunk and brough it inside, i had this thread printed out already for reference. i immediately noticed that my nav drive is not the same as OP's. i assume the type-s models had different ones and/or different years had different ones.
so here is how the inside of mine looks, and the next picture is the laser lense i found. it was easily accessible. you can see the screwdriver pointing at it. (sorry for pic quality)

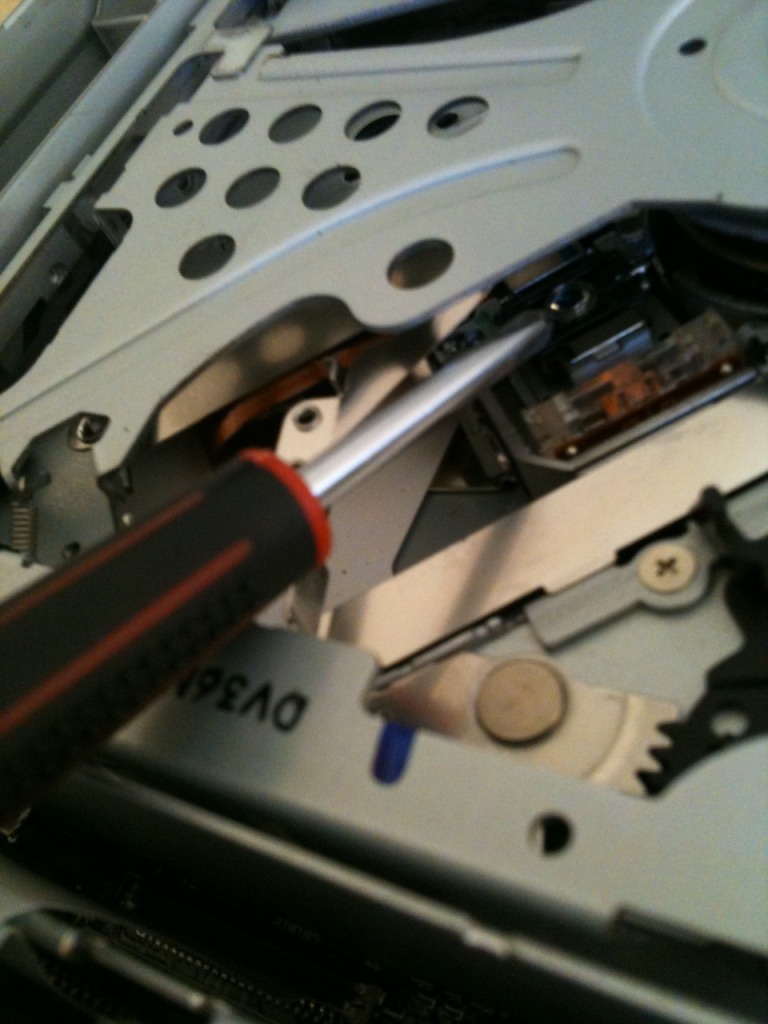
after i cleaned off the lense with rubbing alcohol and a q-tip...i reinstalled everything and fired it up.
worked like a charm, tho i think i will still replace my current nav disc soon...it is very scratched up. just wanted to thank the OP for creating this thread and saving me $360...it's nice to have my nav working again.
so here is how the inside of mine looks, and the next picture is the laser lense i found. it was easily accessible. you can see the screwdriver pointing at it. (sorry for pic quality)
after i cleaned off the lense with rubbing alcohol and a q-tip...i reinstalled everything and fired it up.
worked like a charm, tho i think i will still replace my current nav disc soon...it is very scratched up. just wanted to thank the OP for creating this thread and saving me $360...it's nice to have my nav working again.
Last edited by SharksBreath; 01-21-2013 at 08:39 AM.
The following 4 users liked this post by SharksBreath:
01-21-2013, 09:45 AM
#15
Racer
Thread Starter
Glad to see so many people have been having success ! I dread reading this thread, worrying that someone will irreparably damage there unit.
Also, thanks for the small write up on the TL-S. Im curious to see if the 07-08 base TL's are the same. I would assume so. anyways, the laser looks way more accessible, which probably makes the job a breeze. Easier to see any build up or debris on the lens.
! I dread reading this thread, worrying that someone will irreparably damage there unit.Also, thanks for the small write up on the TL-S. Im curious to see if the 07-08 base TL's are the same. I would assume so. anyways, the laser looks way more accessible, which probably makes the job a breeze. Easier to see any build up or debris on the lens.
so i went ahead and did this to my 07 TL-S nav drive. i've had the dreaded 'disc read error' message for many months. so i got the unit out of the trunk and brough it inside, i had this thread printed out already for reference. i immediately noticed that my nav drive is not the same as OP's. i assume the type-s models had different ones and/or different years had different ones.
so here is how the inside of mine looks, and the next picture is the laser lense i found. it was easily accessible. you can see the screwdriver pointing at it. (sorry for pic quality)


after i cleaned off the lense with rubbing alcohol and a q-tip...i reinstalled everything and fired it up.
worked like a charm, tho i think i will still replace my current nav disc soon...it is very scratched up. just wanted to thank the OP for creating this thread and saving me $360...it's nice to have my nav working again.

so here is how the inside of mine looks, and the next picture is the laser lense i found. it was easily accessible. you can see the screwdriver pointing at it. (sorry for pic quality)
after i cleaned off the lense with rubbing alcohol and a q-tip...i reinstalled everything and fired it up.
worked like a charm, tho i think i will still replace my current nav disc soon...it is very scratched up. just wanted to thank the OP for creating this thread and saving me $360...it's nice to have my nav working again.
01-21-2013, 09:48 AM
#16
BANNED
iTrader: (33)
^yup its like, right there. very easy to get to.
anyone wanna sell me a new nav disc? white disc or higher version?
PM me!
anyone wanna sell me a new nav disc? white disc or higher version?
PM me!
02-03-2013, 11:24 PM
#21
TLicious Type S
A tip for those of you with scratched DVD disks--you might try taking your disk to a place that sells used CDs and games like Game Stop or Vintage Stock. They have sophisticated CD / DVD polishing systems that will fix your disk perfectly for just $3.
The following users liked this post:
JCash23 (04-18-2022)
02-16-2013, 11:38 AM
#22

ruler option
thanks for the instruction to take apart nav system. I had the same problem you did but I am not to good at taking stuff apart and putting it back together so I took a risk and tried the ruler method and it worked like a charm. I bought a thin plastick ruler and some windex wipes. I wrapped a thin layer around the ruler and inserted it gently into the player going from right to left and left to right slowly. When I removed it the wipe was filthy! I did it slowly 3 more times. started car and nothing but I waited and started car again and I was uploading and in business. I know it was a risk but I figured I would try. If this is only a temp solution and I start to have the same problem I will bite the bullet and take it out and clean it the proper way. Thanks for the instructions!
The following users liked this post:
TerriKC (05-21-2013)
03-08-2013, 04:23 PM
#23
Intermediate

Thanks for the post. Just got my 05 TL running and first thing I saw was the check disk error. I will see how bad the disk is and then try the cleaning and let you know how it goes.
03-08-2013, 06:45 PM
#24
Burning Brakes
What if you disc is stuck. My navigation drive hasnt worked in over a year now.
I really want to try this but I am clueless as to what the lens is suppose to look like. The description doesnt help me when it get to that portion of it.
I am debating to leave it alone or just pay Alpine for the repair.
I really want to try this but I am clueless as to what the lens is suppose to look like. The description doesnt help me when it get to that portion of it.
I am debating to leave it alone or just pay Alpine for the repair.
03-13-2013, 08:18 PM
#25
Intermediate
 04-05-2013, 05:42 PM
#27
10th Gear

Join Date: Mar 2005
Location: Northern California
Age: 48
Posts: 12
Likes: 0
Received 0 Likes
on
0 Posts
Thank you OP for saving me $350+ dollars... Decided to dig a little today and just did what you said to the "T" and my navi now works again!!! I already in the past have removed the drive and sent it to Alpine for repair once.. this was the 2nd time it stopped working correctly.
So.. as i said.. Thanks again!
G
So.. as i said.. Thanks again!
G
04-06-2013, 01:52 PM
#28
Racer
Thread Starter
Im glad to see that this is working for a lot of people. I wasnt sure if anyone was going to go through with my DIY. There is always the risk that this isnt the issue and you will end up with an un-useable navi screen until the drive is repaired. I do believe for that this is the issue for the majority of the users though.
04-06-2013, 02:19 PM
#29
Im glad to see that this is working for a lot of people. I wasnt sure if anyone was going to go through with my DIY. There is always the risk that this isnt the issue and you will end up with an un-useable navi screen until the drive is repaired. I do believe for that this is the issue for the majority of the users though.
I did this on my 08 TLS and before it would not read the disc and now it reads it sometimes so I think my drive needs to be sent in what do you think?
04-07-2013, 07:49 PM
#30
Racer
Thread Starter
So you have the newer style drive where the lens is more accessible? Id try giving it another good cleaning. The fact that it began working is a sign of improvement.
04-07-2013, 09:42 PM
#31
Safety Car
sub'd
I see you mentioned that yours started "every now and then". In the last three weeks I've gotten the error 3 times. The first two times I restarted the car and it worked, the third it fixed itself. Looks like mine is eventually going to go, when it does I will give this a try. Thanks OP.
I see you mentioned that yours started "every now and then". In the last three weeks I've gotten the error 3 times. The first two times I restarted the car and it worked, the third it fixed itself. Looks like mine is eventually going to go, when it does I will give this a try. Thanks OP.
04-08-2013, 09:32 AM
#32
Racer
Thread Starter
sub'd
I see you mentioned that yours started "every now and then". In the last three weeks I've gotten the error 3 times. The first two times I restarted the car and it worked, the third it fixed itself. Looks like mine is eventually going to go, when it does I will give this a try. Thanks OP.
I see you mentioned that yours started "every now and then". In the last three weeks I've gotten the error 3 times. The first two times I restarted the car and it worked, the third it fixed itself. Looks like mine is eventually going to go, when it does I will give this a try. Thanks OP.
04-12-2013, 09:39 AM
#34
Racer
Thread Starter
I can only really suggest trying again. Did you see the lens? could you feel the head of the q-tip on the lens? When cleaning the lens, you can try apply a little downward pressure, and you can feel the lens sort of spring. be extremely light with it of course, but the lens does have a little play.
You can also attempt to use eye glass cleaner on a lint free cleaning cloth taped to a very thin ruler, and then putting it in through the dvd slot. having the drive open would make it easier to see where the ruler was going as well. Ive never done this, and I dont think anyone on the forum has attempted either, but the Europeans have plenty of success with it on their various failing Honda drives.
Also, just to be certain, were you having the same issues i.e. disk read error, navi reattempting to read disk. still disk errors, or it eventually working
04-17-2013, 02:09 PM
#35

didnt worked for me, I think I made it worst. before I would get the "dvd error" at least and audio interface will work, but now my screen is stuck on "please check your disk" with a dark screen and audio interface is gone.( tried old disk and new 2013 disk )

Last edited by Marlon; 04-17-2013 at 02:13 PM.
 04-21-2013, 10:50 PM
#37

Thanks Sutitan!!! Pulled mine yesterday on my '05 TSX & the repair worked great! I'm glad I found this post at the last minute before I sent the unit to Alpine. The small screws were a bit tricky to remove without stripping but overall this was a very easy process. I just simply removed the 2 screws on either side of the mounting bracket and took the Navi DVD out instead of removing the whole bracket with DVD attached. Thanks again for the helpful write-up. $aved me some coin!
04-22-2013, 12:27 AM
#38
Racer
Thread Starter
Thanks Sutitan!!! Pulled mine yesterday on my '05 TSX & the repair worked great! I'm glad I found this post at the last minute before I sent the unit to Alpine. The small screws were a bit tricky to remove without stripping but overall this was a very easy process. I just simply removed the 2 screws on either side of the mounting bracket and took the Navi DVD out instead of removing the whole bracket with DVD attached. Thanks again for the helpful write-up. $aved me some coin!
For anyone who continues getting the message, I simply suggest to keep trying! On the European forums, people failed using cleaning disks, and the rulers with glasses wipes, but they claimed there persistence with cleaning there lens eventually paid off. if you are daring, you can undo the middle spring clip which will give you direct access to the lens. My little precision drive set didnt quite have the right bit to remove the screw. Those with the 07-08 drives are a bit luckier than the 04-06 people since they have access, but as soon as you can see the lens, it should be cake
04-22-2013, 10:51 PM
#39
Cruisin'

Join Date: Feb 2010
Location: NC - RTP
Age: 43
Posts: 18
Likes: 0
Received 0 Likes
on
0 Posts
Was getting disc error. Did the above to correct, now I get "Please check disc" on screen. should I wait a certain amount of time after reconnecting the unit before reconnecting the battery?

