DIY: CT-Engineering Ice Box Intake Install
 04-20-2013, 12:59 AM
#1

DIY: CT-Engineering Ice Box Intake Install
Here's a step-by-step of my install of the CT-E Ice Box Intake. Previously, I had installed a Takeda SRI into my car, didn't really like it, and re-installed the stock intake. I'm not a mechanic and like to do light mods and maintenance myself, so do this at your own risk.
Just a few tips for any of you that are going to tackle this on your own.
1. Remove the front bumper. It's preferable that you have some experience with this already. There's a bunch of bolts on the bottom holding the plastic guard to the bumper, and there are several clips and bolts on the top of the plenum grille holding it in. Pull it out and disconnect the fog lights, turn signals, and the outdoor air temperature sensor on the inside of the bumper before completely setting the bumper aside.
031.jpg?t=1366434879
2. Remove the battery cover and battery. In the picture, i put an arrow on the tube that you'll need to force out of the engine bay. That tube is a royal pain to get out.
034.jpg?t=1366434884
3. Remove the stock intake. This is pretty straightforward. There are only 2 or 3 bolts that hold it in. You'll want to unscrew the MAF sensor first and set it aside.
035.jpg?t=1366434946
This shows the brake duct that you'll need to remove.
037.jpg?t=1366435731
4. Undo 2 bolts that hold the brake duct in. There's a bolt hidden in the back that you can get to with an extension.
038.jpg?t=1366435731
5. Remove the stock resonator. There are 2 bolts that hold it in, and you'll need to wiggle this thing out. There is a rubber tube that connects it to the pain in the ass inlet tube that you'll want to reach in and pull out.
040.jpg?t=1366435732
6. Ok, this was the only part of the install that gave me fits. I didn't feel like removing the battery tray because I just didn't want to reach in blindly and try and undo 3 bolts on the bottom of the tray. I thought I could leave this tube in the engine bay, but I found out that it's just dangling in there and would probably make a ton of noise rattling around.
There is a bolt that holds this tube to the tray on the underside of the tray. It was easy for me to reach under blindly and get to this bolt and undo it.
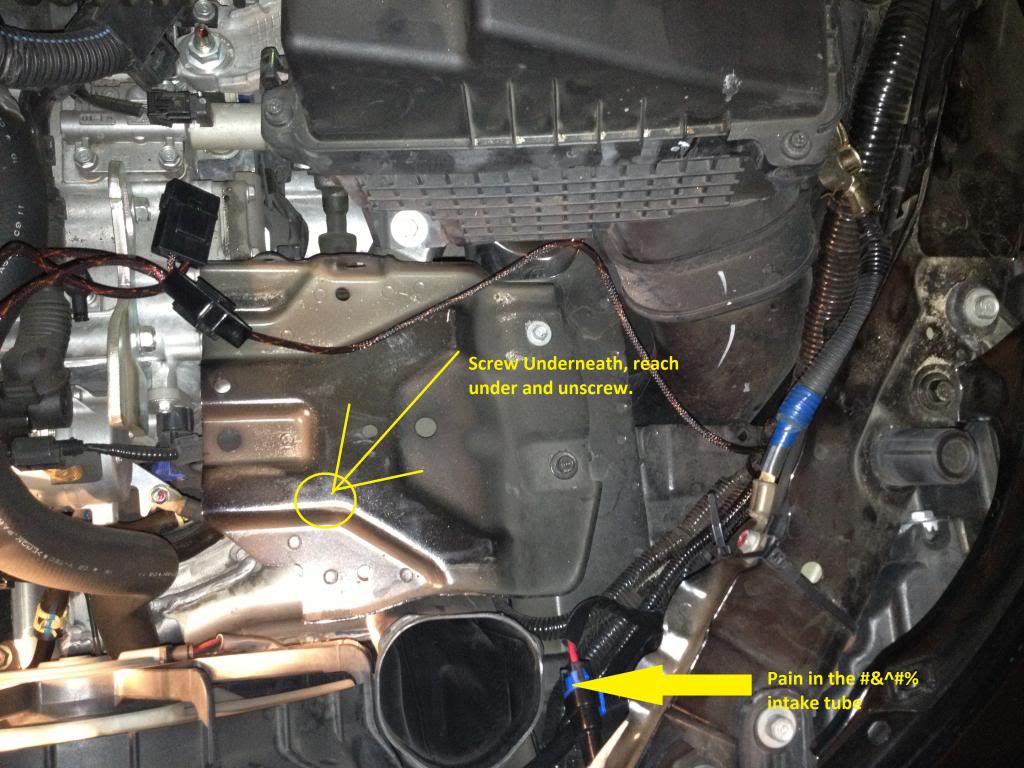
7. I fought with this tube for a while. What worked for me was to push this tube in from the top so that it is underneath the engine. Then work this out the gap in the fender lining, close to where the driver side springs and shocks are. This is where jacking up the front end of the car will help get enough space to work the tube out the gap in the fender lining.
041.jpg?t=1366435734
I was about ready to chuck this thing as far as I could after I got it out .....
042.jpg?t=1366435734
8. The rest of the install was real straightforward. You'll want to undo the clips holding the wiring harness in, and just push it down so that it is lower in the engine bay. I didn't re-clip them.
043.jpg?t=1366435737
9. The CT-E Icebox housing goes in pretty smoothly. You'll need to remove the bracket that the stock intake connects to at the top arrow. Re-tighten all of the screws when everything is in place.
045.jpg?t=1366435737
10. Reconnect the brake duct. CT-E supplies the brackets that you will need to use to mount the brake duct.
046.jpg?t=1366435738
11. Position the air horn and connect it up to the bottom of the CT icebox housing.
047.jpg?t=1366435739
12. Use the supplied brackets to mount the air horn to the frame.
049.jpg?t=1366435740
13. Put the battery and battery cover back and reconnect the positive then ground wire.
050.jpg?t=1366435741
14. Put the engine covers back on.
051.jpg?t=1366435742
Just a few tips for any of you that are going to tackle this on your own.
- The installation instructions say that removing the battery tray is optional. If you want to remove it, the instructions say to remove a few bolts and it'll come out. Well, as CleanCL showed in his other thread, the bolts that you need to remove are on the bottom of the tray, which you'll need to reach in blindly and somehow undo them. I didn't remove the tray and managed to get the tube out and I'll try to explain in this thread.
- If you are not going to remove the battery tray, you'll want to jack up the front end of the car so that the wheels are barely off the ground.
- The install took me 2.5 hours from when I started removing the bumper to when I finished putting the bumper back on. 30 minutes of it was bumper removal and install. Plan for 2 - 3 hours to do this yourself.
1. Remove the front bumper. It's preferable that you have some experience with this already. There's a bunch of bolts on the bottom holding the plastic guard to the bumper, and there are several clips and bolts on the top of the plenum grille holding it in. Pull it out and disconnect the fog lights, turn signals, and the outdoor air temperature sensor on the inside of the bumper before completely setting the bumper aside.
031.jpg?t=1366434879
2. Remove the battery cover and battery. In the picture, i put an arrow on the tube that you'll need to force out of the engine bay. That tube is a royal pain to get out.
034.jpg?t=1366434884
3. Remove the stock intake. This is pretty straightforward. There are only 2 or 3 bolts that hold it in. You'll want to unscrew the MAF sensor first and set it aside.
035.jpg?t=1366434946
This shows the brake duct that you'll need to remove.
037.jpg?t=1366435731
4. Undo 2 bolts that hold the brake duct in. There's a bolt hidden in the back that you can get to with an extension.
038.jpg?t=1366435731
5. Remove the stock resonator. There are 2 bolts that hold it in, and you'll need to wiggle this thing out. There is a rubber tube that connects it to the pain in the ass inlet tube that you'll want to reach in and pull out.
040.jpg?t=1366435732
6. Ok, this was the only part of the install that gave me fits. I didn't feel like removing the battery tray because I just didn't want to reach in blindly and try and undo 3 bolts on the bottom of the tray. I thought I could leave this tube in the engine bay, but I found out that it's just dangling in there and would probably make a ton of noise rattling around.
There is a bolt that holds this tube to the tray on the underside of the tray. It was easy for me to reach under blindly and get to this bolt and undo it.
7. I fought with this tube for a while. What worked for me was to push this tube in from the top so that it is underneath the engine. Then work this out the gap in the fender lining, close to where the driver side springs and shocks are. This is where jacking up the front end of the car will help get enough space to work the tube out the gap in the fender lining.
041.jpg?t=1366435734
I was about ready to chuck this thing as far as I could after I got it out .....
042.jpg?t=1366435734
8. The rest of the install was real straightforward. You'll want to undo the clips holding the wiring harness in, and just push it down so that it is lower in the engine bay. I didn't re-clip them.
043.jpg?t=1366435737
9. The CT-E Icebox housing goes in pretty smoothly. You'll need to remove the bracket that the stock intake connects to at the top arrow. Re-tighten all of the screws when everything is in place.
045.jpg?t=1366435737
10. Reconnect the brake duct. CT-E supplies the brackets that you will need to use to mount the brake duct.
046.jpg?t=1366435738
11. Position the air horn and connect it up to the bottom of the CT icebox housing.
047.jpg?t=1366435739
12. Use the supplied brackets to mount the air horn to the frame.
049.jpg?t=1366435740
13. Put the battery and battery cover back and reconnect the positive then ground wire.
050.jpg?t=1366435741
14. Put the engine covers back on.
051.jpg?t=1366435742

The following 6 users liked this post by deuce415:
carbonTSEX (03-17-2015),
CerberusKy (04-20-2013),
CT-Engineering (04-25-2013),
dragonwang (04-22-2013),
KarKraze (04-20-2013),
and 1 others liked this post.
04-20-2013, 01:02 AM
#2
Also, I tried to take some sound clips within the car of me revving the engine before the intake, and after the intake. The sound quality came out pretty lame so I'm not going to try to post them.
It's slightly louder at idle and revving, but for the most part sounds about the same as the stock intake. Haven't driven it yet, but I'll drive it around tomorrow and will post some reviews afterwards.
It's slightly louder at idle and revving, but for the most part sounds about the same as the stock intake. Haven't driven it yet, but I'll drive it around tomorrow and will post some reviews afterwards.
04-20-2013, 03:03 AM
#3

Awesome write up. So much for having to do one. Will definitely reference it when I install mine. Anxious to see the performance gain (feel) since I'm going to do HPFC, J pipe, and Ice box at one time.
The following users liked this post:
CT-Engineering (04-25-2013)
04-20-2013, 02:11 PM
#5
I had to do about a 40 mile drive this morning (25 miles all highway at 70 - -75 mph, 15 on local roads), so here are some of my initial impressions.
Sound:
1000 - 4000 RPM - it sounds alot like when I had the stock intake. It may be slightly louder with a little more depth to the tone, but nothing that I would notice if I didn't know that I put in a different intake.
4000 - above - louder than stock intake and you can hear the engine more. The sound is similar to how the stock intake sounds, only a little bit louder. Definately not something that is any where near annoying or anything. Compared to the Takeda, the Takeda had a bit of a muffled growl to it IMO which I didn't care too much for.
Performance:
1000-4000 RPM - the torque in this range is defintely noticeable to me over stock intake. As what CleanCL said in his first post, the car doesn't need to work as hard to get up to speed. When the car is coasting around 40 mph or so, and you give it some gas, I find that I do not need to give it as much gas to get up to speed as I did before the intake.
4000 - above - definitely pulls harder than stock intake. Feels like it's getting up to speed quicker than over stock intake.
MPG:
It's still a bit too early to tell what MPG changes this intake will have. The V1 JPipe seems to get you similar power gains (maybe a bit less), and I noticed an average of .3 - .4 increase in MPG overall for me over stock.
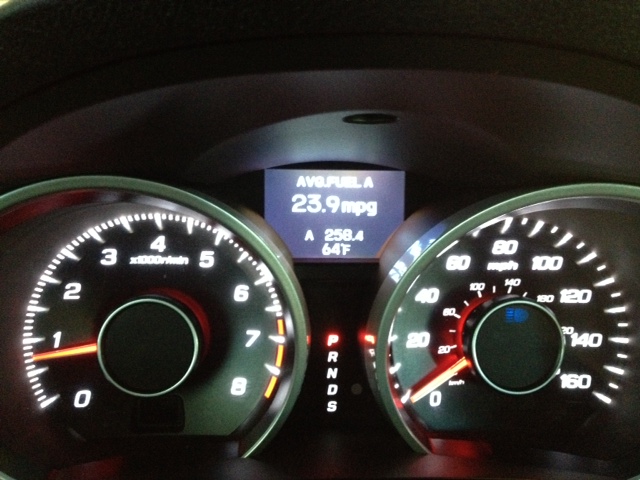
On the 40 mile round trip this morning, I do this round trip quite often and and can say that from when I pull out of my garage and when I pull back into my garage, on average for me, I've been getting about 22.5 - 23.0 MPG. This is what my dash said on my trip A (and this was reset to -- when i started out today because of the battery disconnect that you need to do during the install). 23.9 mpg is well above what I am used to on this round trip.
I would realistically expect another .4 or .5 MPG gain from this intake alone, but this is given what I experienced from the j-pipe and again is still too early to tell.
Should you swap out your Takeda for the CT-E?
This is going to be personal preference for you guys that already have the Takeda SRI. IMO, it's probably not worth it to swap out, even though I truly believe that the CT-E intake is the best intake that you can get for this car. If the Takeda is getting you an additonal 10-12 hp over stock, and the CT-E gets you 15-16 hp over stock, then spending another $500 for another 4-5 hp gain is not cost effective to me. Even if you can sell your Takeda for around $150, that's $350 for 4-5 hp gain.... that'll be your call to make.
But this is given the current state of the intake (not CARB approved yet) and what state you live (I live in CA). If they get CARB approved, then I would probably spend the money to swap out because it will be a royal pain in the ass to put the stock tubing back in. For me, I've taken that plunge so I'm hoping that they get CARB approved on this intake in the next 1 - 2 years before I have to smog my car.
Sound:
1000 - 4000 RPM - it sounds alot like when I had the stock intake. It may be slightly louder with a little more depth to the tone, but nothing that I would notice if I didn't know that I put in a different intake.
4000 - above - louder than stock intake and you can hear the engine more. The sound is similar to how the stock intake sounds, only a little bit louder. Definately not something that is any where near annoying or anything. Compared to the Takeda, the Takeda had a bit of a muffled growl to it IMO which I didn't care too much for.
Performance:
1000-4000 RPM - the torque in this range is defintely noticeable to me over stock intake. As what CleanCL said in his first post, the car doesn't need to work as hard to get up to speed. When the car is coasting around 40 mph or so, and you give it some gas, I find that I do not need to give it as much gas to get up to speed as I did before the intake.
4000 - above - definitely pulls harder than stock intake. Feels like it's getting up to speed quicker than over stock intake.
MPG:
It's still a bit too early to tell what MPG changes this intake will have. The V1 JPipe seems to get you similar power gains (maybe a bit less), and I noticed an average of .3 - .4 increase in MPG overall for me over stock.
On the 40 mile round trip this morning, I do this round trip quite often and and can say that from when I pull out of my garage and when I pull back into my garage, on average for me, I've been getting about 22.5 - 23.0 MPG. This is what my dash said on my trip A (and this was reset to -- when i started out today because of the battery disconnect that you need to do during the install). 23.9 mpg is well above what I am used to on this round trip.
I would realistically expect another .4 or .5 MPG gain from this intake alone, but this is given what I experienced from the j-pipe and again is still too early to tell.
Should you swap out your Takeda for the CT-E?
This is going to be personal preference for you guys that already have the Takeda SRI. IMO, it's probably not worth it to swap out, even though I truly believe that the CT-E intake is the best intake that you can get for this car. If the Takeda is getting you an additonal 10-12 hp over stock, and the CT-E gets you 15-16 hp over stock, then spending another $500 for another 4-5 hp gain is not cost effective to me. Even if you can sell your Takeda for around $150, that's $350 for 4-5 hp gain.... that'll be your call to make.
But this is given the current state of the intake (not CARB approved yet) and what state you live (I live in CA). If they get CARB approved, then I would probably spend the money to swap out because it will be a royal pain in the ass to put the stock tubing back in. For me, I've taken that plunge so I'm hoping that they get CARB approved on this intake in the next 1 - 2 years before I have to smog my car.
04-20-2013, 02:36 PM
#6
 04-20-2013, 03:44 PM
#7
you can always stop by an auto parts store, get a K&N filter and put the sticker that comes with it on the top of the intake box. Don't think anyone will know unless you tell them
Trending Topics
 04-23-2013, 06:39 PM
#10
The CT-E intake is about $550 shipped and is dyno proven to gain 16 HP and TQ. These are gains that I can personally feel during daily driving, and it just makes my car noticeably more responsive overall.
If we're just talking about cost/performance comparisons, you're probably looking at the V2 j-pipe or Rv6 j-pipe to get you about the same gains (I don't think either are dyno proven for the 4G TL) and they would cost roughly the same price.
To me, whether something is worth the money is all subjective and really is up to the person ready to spend the cash. I didn't think the Takeda intake is worth it, and it is half the price as a CT-E.
The following 2 users liked this post by deuce415:
drivinginmy04tl (04-23-2013),
HeartTLs (04-23-2013)
04-23-2013, 08:14 PM
#11
The CT-E intake is about $550 shipped and is dyno proven to gain 16 HP and TQ. These are gains that I can personally feel during daily driving, and it just makes my car noticeably more responsive overall.
If we're just talking about cost/performance comparisons, you're probably looking at the V2 j-pipe or Rv6 j-pipe to get you about the same gains (I don't think either are dyno proven for the 4G TL) and they would cost roughly the same price.
To me, whether something is worth the money is all subjective and really is up to the person ready to spend the cash. I didn't think the Takeda intake is worth it, and it is half the price as a CT-E.
04-24-2013, 05:58 AM
#15
Burning Brakes
Had mine installed yesterday and mind you I've never had an intake on my car, you most def could feel the torque have increased, the car feels like it pulls just a little more than before. Unfortunately I don't have a garage or driveway where I could of done this my self so I had it installed with some other mods, I've would of done a write up but I would of gotton on the way of the guys doing their job. My drive back home was a hour long so I did a couple of pulls and the car responded better at all power bands and the sound is music to my ears. I'm almost done modding the car the only thing needed to compliment this ice box is a long pipe and catback and it should sound sweet.
 04-24-2013, 03:26 PM
#20

Great write up! I guess I'm getting lazy in my 'old' age. 
Not in the slightest. The filter resides where the stock filter resides. CT has always designed their intakes as such to prevent this. Most cold air intakes are long tubes with a filter stuck on the end, making it very easy for the filter to get submerged and eventually ingest water. This is just almost not possible with the design of the CT-E intake. Water would have to reach the engine bay and submerge the filter to ingest into the engine. At that point, I think you have other problems to address.
Not in the slightest. The filter resides where the stock filter resides. CT has always designed their intakes as such to prevent this. Most cold air intakes are long tubes with a filter stuck on the end, making it very easy for the filter to get submerged and eventually ingest water. This is just almost not possible with the design of the CT-E intake. Water would have to reach the engine bay and submerge the filter to ingest into the engine. At that point, I think you have other problems to address.
The following users liked this post:
CT-Engineering (04-25-2013)


 12-08-2014, 08:51 PM
#28
This write up is convincing evidence, to me at least, that the icebox is a must have mod IF modding for more power is on the agenda.
Gonna be ordering the pulley and icebox from XLR8 soon.
Gonna be ordering the pulley and icebox from XLR8 soon.
03-17-2015, 10:07 PM
#30
The Original Shawdy
Just installed mine today. Write up was legit. Made it go a lot smoother.
 03-20-2015, 08:42 PM
#32
The Original Shawdy
I probably got the last one in stock.
07-03-2015, 12:07 PM
#33
Question:
What is the correct size K&N conical filter for the CT-E icebox?
I think the K&N might be better than the CT-E foam one.
I would like to make this change before doing the k-tuner install. As I understand, we should get our long term fuel trims sorted with the mods we plan on sticking with first.
Thanks.
07-05-2015, 12:26 PM
#34
The Original Shawdy
Hmm great question. If it does run better with the k&n filter, I may have to swap mine out for before the tune.
07-06-2015, 12:44 PM
#35

Pay attention to filtration vs flow. K&N has larger pores and depend on the oil for filtration so while it may flow better it will filter less.
This is a debate that has gone on forever, in the end the gains if any will be negligible.
This is a debate that has gone on forever, in the end the gains if any will be negligible.
07-06-2015, 11:46 PM
#36
I was certain K&N filters better plus it's reusable.
In terms of flow, I really don't know.
07-07-2015, 05:04 AM
#37
^^what my brother "ALFAQ" said. Also, both filters are reusable,the difference come in the way you will clean and re oil them. When re oiling the foam filter you can squeeze it to ensure that the oil is more evenly distributed,with the K&N you can't do that so some spots may be more heavily oiled than others. Heavily oiled filters can also spell trouble for your MAF sensor.
There has been a lot of debate about the K&N, many feels that even though it allows more air flow it allows more particulate to enter your engine, some people run a sleeve over it to help capture more dirt.
I have the CTE IceBox atm and the tuning is going well, personally I see no reason to change the filter to another brand.


Thread
Thread Starter
Forum
Replies
Last Post
cycdaniel
1G TSX Performance Parts & Modifications
8
12-17-2019 10:58 AM
Abe_Froman
Car Parts for Sale
1
09-16-2015 01:27 PM