DIY: HID Convert OEM to Aftermarket (Clean Install)
 02-13-2012, 09:07 AM
#1

DIY: HID Convert OEM to Aftermarket (Clean Install)
Not responsible for me blowing your car up. DO AT YOUR OWN RISK.
So I have seen tons of threads but nothing really proper on Doing a HID Conversion from a Acura 3.2tl from OEM to Aftermarket ballasts and all.
Did this on a friends Acura just because of the intermittent HID issues (Car is 10 years old with original ballasts).
Bought the kit from the Forum sponsor HIDextra.
Note I didn't need to buy the $16 harness.
If I did something blatantly wrong and someone here thinks my car will be set on fire go ahead and let me know
First step would be to remove headlights, to do this you need to remove the front end (No way around it). Remove the screw on the wheel well to get access to the bumper. Do this for both sides.
Pull the bumper (it will pop out)
remove the screw behind the corner of the bumper both sides that are right underneath the edge of the headlight. Then remove the 2 bolts underneath the front of the headlight connecting it to the rail (both sides).
Wiggle the lights out and disconnect everything and take the lights to a work bench.
First Remove all the old components.
The bulbs igniters and the ballast (Underneath the headlights you pulled out it will be 3 screws). Note you will have to cut 2 of the wires from the ballast that go thru the rubber gasket to get them out. What do you care the ballast is getting replaced anyways!
1st step is routing the new HID kit into the original headlight.
Take that rubber gasket (bottom of the headlight that you cut the 2 wires from the ballast to remove) and cut it down to size.
This one:


Should look something like this when you are done. Also go ahead and slice it down 1 side to make an opening for the wire.


Next, take the headlight and drill a small notch so that the connector of the aftermarket igniter has enough space to fit thru.
Will look like this:

Next
Route the Igniter thru by starting with the connector that that is the smallest moving to the 2nd connector that you made the notch for, route both them thru from the inside of the ballast to the outside. Use that rubber gasket that you cut up to ensure the wire is sealed decently.

It will look like this when you are done.


Take the bulb install it into the housing and then place the ignitor to the back of the bulb and you are good to go. Now install the stock lid/cap cover (it will install just have to turn it the right way).

Next
Take the Grey connector from the ballast and cut it off fairly in the middle towards the end (closer to the ballast). You will be using these to make your connectors.
Take the 2 9006 Connectors you got in your HID kit and connect the ends to the harness you got from the ballast.
The connector will look like this when you are done (I wire capped them and then wrapped it up in electrical tape)


Connect it all up, the harness you just made goes to the stock connector (You are only chopping off the parts you will never need again). You are good to go, do a test fit as always to make sure your not doing anything wrong.

So I have seen tons of threads but nothing really proper on Doing a HID Conversion from a Acura 3.2tl from OEM to Aftermarket ballasts and all.
Did this on a friends Acura just because of the intermittent HID issues (Car is 10 years old with original ballasts).
Bought the kit from the Forum sponsor HIDextra.
Note I didn't need to buy the $16 harness.
If I did something blatantly wrong and someone here thinks my car will be set on fire go ahead and let me know
First step would be to remove headlights, to do this you need to remove the front end (No way around it). Remove the screw on the wheel well to get access to the bumper. Do this for both sides.
Pull the bumper (it will pop out)
remove the screw behind the corner of the bumper both sides that are right underneath the edge of the headlight. Then remove the 2 bolts underneath the front of the headlight connecting it to the rail (both sides).
Wiggle the lights out and disconnect everything and take the lights to a work bench.
First Remove all the old components.
The bulbs igniters and the ballast (Underneath the headlights you pulled out it will be 3 screws). Note you will have to cut 2 of the wires from the ballast that go thru the rubber gasket to get them out. What do you care the ballast is getting replaced anyways!
1st step is routing the new HID kit into the original headlight.
Take that rubber gasket (bottom of the headlight that you cut the 2 wires from the ballast to remove) and cut it down to size.
This one:
Should look something like this when you are done. Also go ahead and slice it down 1 side to make an opening for the wire.
Next, take the headlight and drill a small notch so that the connector of the aftermarket igniter has enough space to fit thru.
Will look like this:
Next
Route the Igniter thru by starting with the connector that that is the smallest moving to the 2nd connector that you made the notch for, route both them thru from the inside of the ballast to the outside. Use that rubber gasket that you cut up to ensure the wire is sealed decently.
It will look like this when you are done.
Take the bulb install it into the housing and then place the ignitor to the back of the bulb and you are good to go. Now install the stock lid/cap cover (it will install just have to turn it the right way).
Next
Take the Grey connector from the ballast and cut it off fairly in the middle towards the end (closer to the ballast). You will be using these to make your connectors.
Take the 2 9006 Connectors you got in your HID kit and connect the ends to the harness you got from the ballast.
The connector will look like this when you are done (I wire capped them and then wrapped it up in electrical tape)
Connect it all up, the harness you just made goes to the stock connector (You are only chopping off the parts you will never need again). You are good to go, do a test fit as always to make sure your not doing anything wrong.

The following 4 users liked this post by kanundrum:
02-13-2012, 09:59 AM
#2
Drifting
If by "wire capped" you mean wire nuts were used, I wouldn't advise using those. Soldered and heat shrink-covered splices will be much more reliable.
Thanks for sharing.
Thanks for sharing.
 11-14-2012, 10:05 AM
#7

no need to disconnect batt in my opinion,,if you do= make sure you know the radio and nav security codes
the critical safety part is= DO NOT DO WITHIN 8 HOURS OF HEADLIGHT USE
there is a substantial 20,000 volts stored in the capacitor/ignitor that dissipates with time
thats enough to knock you across the street,,and it will !!!!
(dont ask how I know this from other past experience)
you are cutting power leads yes, but the headlight switch is off, so no power going to the wires from relay
those using the hidextra kit that many of us run -can mount the new smaller ballast to the outside of frame rail with zip ties and overlay with gorilla tape
thats never going to move
the extra length of wire from ballast to bulb (contains ignitor inline) loop and slide under the light housing as you slip the unit back into place
a zip tie will secure the loop of extra wire
others have used the included bracket to mount to old ballast or old ballast location directly under housing
since the parts and connectors are waterproof that should be ok
but I choose to remote mount ballast for safety
the old ballast are dead weight,,you will see,,toss them in the recycle bin
The following users liked this post:
miwa (12-03-2012)
Trending Topics
11-16-2012, 02:51 PM
#8

I have the same kit. I mounted the new ballast below the old 1. I used double sided tape, epoxy and wire ties. Didnt really need the wire ties, just put them there just in case..
The following users liked this post:
miwa (12-03-2012)
11-16-2012, 07:28 PM
#9
I agree with zip ties/plastic ties to secure the ballast
the included double stick tape is more a vibration dampener than an attachment (dont ask)
yes mounting new part below old ballast works- but the old oe part is very heavy-
getting rid of weight forward of the axles = better cornering
the autocross racers should be all over this kit!
reminder: new bulbs take 50-100 hours use to get fully burned in to brightness and color
Drive with headlights on all the time to get those hours in!
The following users liked this post:
miwa (12-03-2012)
11-19-2012, 11:05 AM
#10
Hi All,
After a whole DAY of worthwhile struggle (I even polished the lens!), I know have headlights that are ALMOST as good as new!

Man, I had forgotten that 12 years ago, one of the reasons why I fell in love with this car was because of the way it lit up the road before me. It's been so long... far too long since I could see clearly on the road again. Thanks to kanundrum for this awesome thread and always, 01tl4tl, for sound, sensible advice. You've shown me the light several times now and I definitely need to buy you a beer if we ever cross each other. Hit me up if you're ever in south florida.
That being said, I'll contribute what I ended up doing in hopes for a more thorough thread to help future visitors. Thanks hidextra for providing the kit and pointing me to this thread.
I mostly followed kanundrum's advice except for 2 things. I managed to slip the igniter wire through the headlight housing without making the extra notch that kanundrum did. It just took a little bit of creative wiggling.

The ballast situation frustrated me a little and that took a bit of time for me to figure out a "clean enough" way. I ended up removing the old one as per 01tl4tl's advice but I also put the new one in its exact spot because I felt that it was nicer to have everything in one assembly.
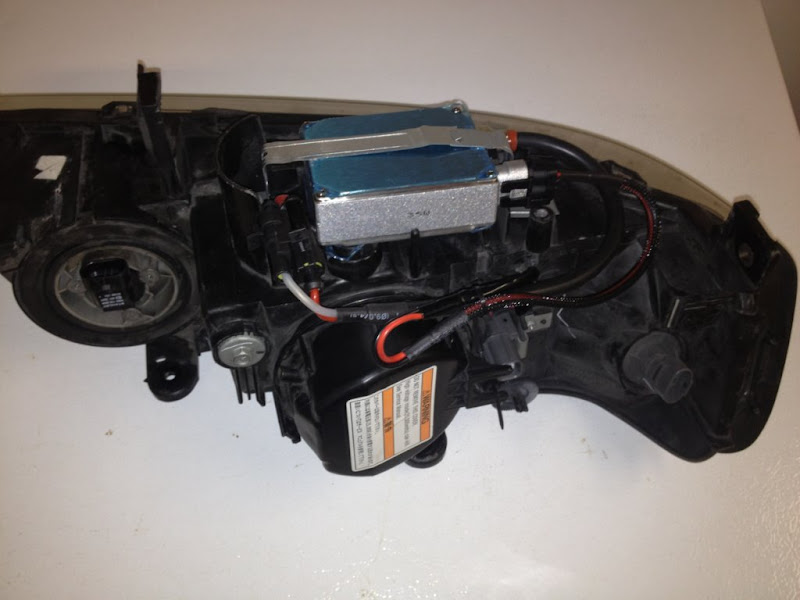
This way, I was able to just remount the assembly and plug in wires from the car exactly where they belonged.
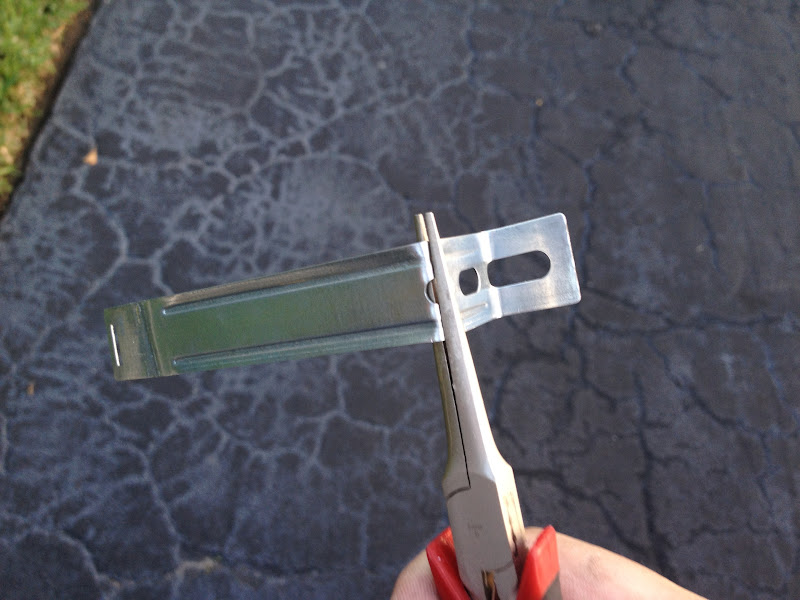
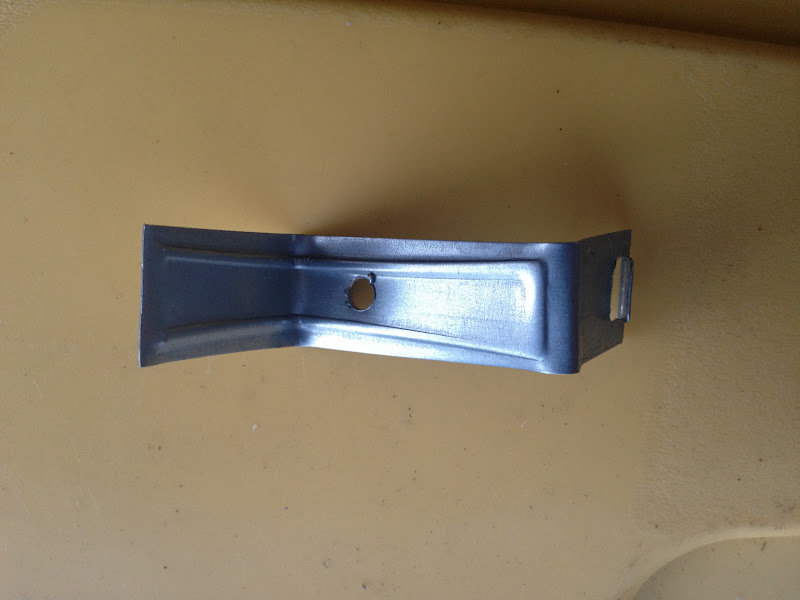
I took some time to "refashion" the provided bracket to screw into one of old ballast screw holes and then I drilled a small hole onto a flap at the bottom of the housing (seems like a wire guide) to screw in the other side.


Thanks again, all!
After a whole DAY of worthwhile struggle (I even polished the lens!), I know have headlights that are ALMOST as good as new!
Man, I had forgotten that 12 years ago, one of the reasons why I fell in love with this car was because of the way it lit up the road before me. It's been so long... far too long since I could see clearly on the road again. Thanks to kanundrum for this awesome thread and always, 01tl4tl, for sound, sensible advice. You've shown me the light several times now and I definitely need to buy you a beer if we ever cross each other. Hit me up if you're ever in south florida.
That being said, I'll contribute what I ended up doing in hopes for a more thorough thread to help future visitors. Thanks hidextra for providing the kit and pointing me to this thread.
I mostly followed kanundrum's advice except for 2 things. I managed to slip the igniter wire through the headlight housing without making the extra notch that kanundrum did. It just took a little bit of creative wiggling.
The ballast situation frustrated me a little and that took a bit of time for me to figure out a "clean enough" way. I ended up removing the old one as per 01tl4tl's advice but I also put the new one in its exact spot because I felt that it was nicer to have everything in one assembly.
This way, I was able to just remount the assembly and plug in wires from the car exactly where they belonged.
I took some time to "refashion" the provided bracket to screw into one of old ballast screw holes and then I drilled a small hole onto a flap at the bottom of the housing (seems like a wire guide) to screw in the other side.
Thanks again, all!
The following users liked this post:
TunaTheFish (03-29-2013)
12-03-2012, 09:18 AM
#11
Hmm. Can't seem to edit my previous post. It's been 2 weeks and things have been going swimmingly except for one thing.
Be warned that if you are going to mount the ballast where I did, beware of carwashes. The headlights behaved erratically for the night after a carwash. I'm not sure about a rainstorm yet. 01tl4tl suspects that I might have a grounding problem somewhere and he suggested that I attach a ground wire from the ballast to the vehicle -- or just follow his advice and attach the ballast on the frame somewhere.
Be warned that if you are going to mount the ballast where I did, beware of carwashes. The headlights behaved erratically for the night after a carwash. I'm not sure about a rainstorm yet. 01tl4tl suspects that I might have a grounding problem somewhere and he suggested that I attach a ground wire from the ballast to the vehicle -- or just follow his advice and attach the ballast on the frame somewhere.
Last edited by miwa; 12-03-2012 at 09:26 AM.
12-26-2012, 05:33 PM
#12
I just bought a retro fit of HID to replace a blown ballast on my 03. I'm worried on the ballast not fitting like the old one. Won't this leak and get wet from the snow and rain? I'm just going to mount it on the body with the cable tie and the 3M tape.
I can't wait to get rid of this car... one thing after another.
I can't wait to get rid of this car... one thing after another.
01-02-2013, 07:22 PM
#13
Pro
so looks like my passenger ballast is starting to go out. Did everyone buy the D2R kit or the D2S kit from HIDEXTRA? and does it include the igniters? the website doesn't really provide much info for the matter
01-03-2013, 08:26 AM
#14
Senior Moderator
01-03-2013, 04:22 PM
#15

Have you tried swapping the bulbs to the opposite side ?
Check for signs of moisture and corrosion within the system's connections.
Check for signs of moisture and corrosion within the system's connections.
02-08-2013, 10:11 PM
#16
Instructor
Join Date: Oct 2006
Location: Bellingham WA
Age: 42
Posts: 109
Likes: 0
Received 0 Likes
on
0 Posts
I got the kit that was recommended on these forums (http://www.hidextra.com/9005/6000k/) and it is a halogen to HID conversion kit. All it has is the ballast and harness. It doesn't appear to have the in-line igniter. Is this normal? Should i splice my old HID bulb connector with or without my old igniter?
07-04-2013, 09:06 AM
#17
Intermediate

From what i understand from post #1 above, we cut the gray connector that goes into the oem ballast and splice together with cable in my HIDextra kit. It says above that "the harness you just made goes to the stock connector"
Where exactly is this stock connector? and what was previously connected to the stock connector?
Thanks.
Where exactly is this stock connector? and what was previously connected to the stock connector?
Thanks.
07-05-2013, 11:49 PM
#18
Intermediate
Any help will be appreciated folks. Where does the grey connector plug into above? I have a 2003 TL. From what i see, the grey connector was pluged into the oem ballast, so where does it plug into once its is chopped off and connected to the aftermarket part?
The only thing that makes sense to me is to cut off the grey connector and just connect the wire to the red and blue leads of the aftermarket cables.

The only thing that makes sense to me is to cut off the grey connector and just connect the wire to the red and blue leads of the aftermarket cables.
07-06-2013, 06:17 PM
#19
Intermediate
So i finally have my HIDs installed. I cut off the grey connectors and spliced the HID to the black and red wires. The headlight unit in the pictures above did not look anything like that in my 03 TL. So i used a solder iron to make a hole to pass the igniter thru. I also made smaller holes to pass the zip ties thru.


Last edited by Djrx; 07-06-2013 at 06:23 PM. Reason: correction
07-06-2013, 06:36 PM
#20
Intermediate
So, both bulbs that came included with my HID kit from HIDextra did not work. I had to use the old bulbs. I will be returning them for a refund. I thought that was strange. I retested several times too.
07-06-2013, 10:33 PM
#21

I got the Morimoto kit from Retrofit Source. That Morimoto kit is bulletproof. $120 was worth it, including bulbs, ballasts, etc. Water can never be an issue with the ballasts. Every mechanic I talked to said nothing would ever be as good as the OEM ballasts and that I should not switch over. That the lights would flicker in the cold and take time to heat up. WRONG. The Morimotos work flawlessly, they are really heavy duty and totally waterproof. No issues in a year.
Also if you want new headlights I put in DEPO brand. Excellent and I got them for $80 each on Amazon. The normal DEPO price is around $200 and of course OEM is just ridiculous. Can easily find DEPO on Ebay or Amazon cheap. BTW, sell your working ballasts on Ebay to pay for the upgrade. I just sold one but I got $200 for it.
Also if you want new headlights I put in DEPO brand. Excellent and I got them for $80 each on Amazon. The normal DEPO price is around $200 and of course OEM is just ridiculous. Can easily find DEPO on Ebay or Amazon cheap. BTW, sell your working ballasts on Ebay to pay for the upgrade. I just sold one but I got $200 for it.
Last edited by Johnny2003TL-S; 07-06-2013 at 10:38 PM.
The following users liked this post:
Djrx (07-06-2013)
07-06-2013, 10:41 PM
#22
Intermediate
Nice, the HIDextra kit is also waterproof and comes with a one year warranty. I also purchased 1 headlight unit off ebay for $75 and found another at the junkyard for $26. I have 2 working oem ballasts i will be listing on ebay. The tested the one that stopped working again and it works now. I think it had some water in it when i pulled it out over a month ago. The other ballast is brand new from the dealership. I paid $185 for it.
07-07-2013, 11:40 AM
#23
6th Gear

Join Date: Jan 2013
Posts: 6
Likes: 0
Received 0 Likes
on
0 Posts
do you have any pics - of your install with the wire splicing?
i am trying to use a DS2 kit - have everything off the car. and cna't figure out the damn wiring and had no luck finding threads that show how to splice the wires
thanks!
i am trying to use a DS2 kit - have everything off the car. and cna't figure out the damn wiring and had no luck finding threads that show how to splice the wires
thanks!
07-07-2013, 12:13 PM
#24
Intermediate
Well, not sure what a DS2 kit looks like. post the link to a picture maybe i can help. If you look at the oem setup, the grey connector plugs into the oem ballast. So since the grey connector cannot plug into the aftermarket ballast, you need to cut it off and splice it with the aftermarket ballast. Try connecting your aftermarket setup according to the instructions in came with, then you will see that the entire setup needs power. They wires from the grey connector you cut off earlier will provide the power.
05-10-2014, 10:56 AM
#25

Hello everyone
I just received my DS2 Xentec kit (ebay). I noticed it did t come with an igniter. Can I still use this kit? Or will I need to purchase an igniter? Also is there a harness I can purchase so no splicing is needed?
Thanks guys!
I just received my DS2 Xentec kit (ebay). I noticed it did t come with an igniter. Can I still use this kit? Or will I need to purchase an igniter? Also is there a harness I can purchase so no splicing is needed?
Thanks guys!
08-07-2014, 09:41 PM
#26
1st Gear

Join Date: Dec 2012
Posts: 1
Likes: 0
Received 0 Likes
on
0 Posts
Well, I installed my HID kit from HID Extra and everything went well for the first week. Then I noticed that one of the lights were out. I suspected that the ballast was bad, since the light flickers once when I turn the lights on. I swapped the ballast to the other side and the problem followed the ballast. The good news is that I contacted the HID Extra they will be shipping a replacement within 24 hours. Nice!
01-10-2015, 07:15 PM
#27

hid
Hi guys so I'm new to this and i bought d2r hid kit from carxenonhid and i thought it would be a plug and play like on my brothers mdx. In this kit it had everything i needed but theres one wire that goes into the positive and negative of the battery. Its not long enough nor do i want to have that connected directly on my battery. How do i connect it? I'm using the factory ballast for my bulbs right now and its not as bright as i thought it would be. Please help, do you think i need to do the same thing as you?
01-29-2015, 05:45 PM
#28
1st Gear

Join Date: Feb 2013
Posts: 1
Likes: 0
Received 0 Likes
on
0 Posts
Hi guys so I'm new to this and i bought d2r hid kit from carxenonhid and i thought it would be a plug and play like on my brothers mdx. In this kit it had everything i needed but theres one wire that goes into the positive and negative of the battery. Its not long enough nor do i want to have that connected directly on my battery. How do i connect it? I'm using the factory ballast for my bulbs right now and its not as bright as i thought it would be. Please help, do you think i need to do the same thing as you?
01-30-2015, 11:12 AM
#29
Is it really so hard to understand `cut off the old connector to ballast power and install new unit direct in its place?` with our diy pics it should be a no brainer
despite the use of `conversion kit` for ease of getting the parts in one package,
we are not converting anything- just swapping in new parts of better quality for old worn out ones
Igniter comes built into the system- don't worry about it!
Note! new bulbs take approx. 50 HOURS of use before full brightness and color stability is attained
Total expected life of bulbs is 2500- 3000 HOURS of use, will probably outlast you!
Note 2- any oils from your fingers will ruin new bulbs in a hurry
Wear rubber or latex gloves when handling bulbs
Rubbing alcohol can be used with a paper towel= if you did touch them already~


 01-27-2016, 01:33 PM
#33
Senior Moderator
01-27-2016, 04:10 PM
#35

No, you completely eliminate the factory ballast and igniter. The 12volt power and ground connect to the new ballast, and the new igniter connects to the bulb. I recently did an 04 tl with parts from The Retrofit Source, and they even provide the connector to plug into the factory wiring. No cutting and splicing, really nice stuff, and knowledgeable, helpful staff.
01-27-2016, 04:14 PM
#36
Senior Moderator
 false...
No, you completely eliminate the factory ballast and igniter. The 12volt power and ground connect to the new ballast, and the new igniter connects to the bulb. I recently did an 04 tl with parts from The Retrofit Source, and they even provide the connector to plug into the factory wiring. No cutting and splicing, really nice stuff, and knowledgeable, helpful staff.

Thread
Thread Starter
Forum
Replies
Last Post
nanos
Car Parts for Sale
26
11-12-2015 08:41 PM
IIDXholic
Car Parts for Sale
23
10-08-2015 07:53 AM
trinikidcl
Car Parts for Sale
2
09-04-2015 12:56 AM

