The JW11 Build, J35A2 Powered MK1 MR2


 10-17-2010, 12:40 AM
#43
Instructor
Thread Starter

Join Date: Aug 2010
Posts: 134
Likes: 0
Received 0 Likes
on
0 Posts
As with most things in the realm of tuning, it's a trade-off one has to consider and make compromises with. I just paid for my ARP rod bolts yesterday and will be turning this thing to 8k or more. I'm happy to lose lots of low end torque in exchange for power up top because the platform will be so light and there are wheel width limits for the AW11 that will restrict traction.
Eng-tips.com and Jenvey's website both have very good information on induction system design.
Right now body work is being done and the whole car will be painted in Dec.; taffeta white
 10-18-2010, 11:38 AM
#44
These are the original horns from the J35a4. A longer intake tract biases an engine to low and midrange torque; thus Honda using the spacers and longer horns on their big SUV's. A short intake tract is better for high end Hp; reference the induction on a formula one engine that makes it's power upward of 10k.
As with most things in the realm of tuning, it's a trade-off one has to consider and make compromises with. I just paid for my ARP rod bolts yesterday and will be turning this thing to 8k or more. I'm happy to lose lots of low end torque in exchange for power up top because the platform will be so light and there are wheel width limits for the AW11 that will restrict traction.
Eng-tips.com and Jenvey's website both have very good information on induction system design.
You and me both! Unfortunately, at this rate I won't be finished by summer or even fall of next year. Who know's really. I don't want to rush anything or cut corners on my original plan. I enjoy the process and will certainly enjoy driving and racing the car when it's finished. Maybe things will pick up and I can get it going in time for some meets next year.
Right now body work is being done and the whole car will be painted in Dec.; taffeta white
10-18-2010, 02:50 PM
#45
Instructor
Thread Starter
Join Date: Aug 2010
Posts: 134
Likes: 0
Received 0 Likes
on
0 Posts
Cams are staying the same. Rods are getting shotpeened and set up with the new ARP bolts. Valesprings and retainers are going to have to be upgraded to ensure safety @ 8k. Crank is going to be balanced and polished. The pistons will remain the OEM cast units, but I will have have smoothed the dome and removed all casting markings and irregularities. I will make some slight modifications to them; bridge the valve pockets, ceramic coat the domes, dry film lubricate the skirts, thermal dispersant coat the underside, and reem and radius the oil channels; they also need to be notched to clear the oil squirters that will be retrofitted.
I might need to do some adjustable cam gears as well.
I might need to do some adjustable cam gears as well.
10-18-2010, 11:44 PM
#46
Instructor
Thread Starter
Join Date: Aug 2010
Posts: 134
Likes: 0
Received 0 Likes
on
0 Posts
Apologies for the iPhone picture quality. Cross buff mandrels and additional cross buffs came in today. Only played with one for a few minutes after work, the following is the result. This is done with a Standard Abrasives medium grit cross buff; am ordering some coarse grit buffs right away, not terribly pleased with the rate of material removal with these.

10-19-2010, 10:14 AM
#47
Senior Moderator
Ever consider knife edging and lightening the crank? There is a fair amount to be removed. 4-7 lbs can be removed off of the J35, I had mine done (before it got damaged by fedex during shipping) Im just waiting to send the new one back in to be redone.
10-19-2010, 03:15 PM
#49
Instructor
Thread Starter
Join Date: Aug 2010
Posts: 134
Likes: 0
Received 0 Likes
on
0 Posts
I had considered mildly knife-edging the crank and I think I probably will still have it done. I don't want anything extreme, but I'm sure it could benefit from losing a few lbs.
10-19-2010, 08:03 PM
#50
Senior Moderator
http://www.honda-performance.com/
10-19-2010, 08:48 PM
#52
Senior Moderator
 460 is the price.
10-20-2010, 06:25 PM
460 is the price.
10-20-2010, 06:25 PM
#53
Instructor
Thread Starter
Join Date: Aug 2010
Posts: 134
Likes: 0
Received 0 Likes
on
0 Posts
Thanks for the tip, I'll keep them in mind.
I was stupid enough to break the hub on my flex shaft grinder (reverse thread ;-)) yesterday, so I'm waiting on a replacement part to show up before I can start grinding away again.
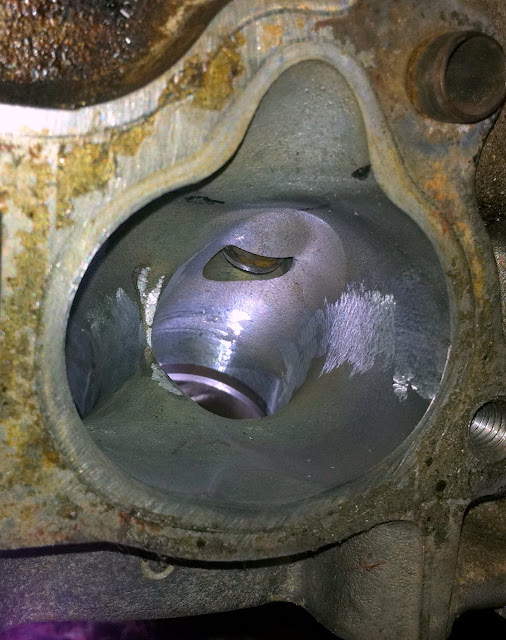
In absence of a powertool to control my burrs,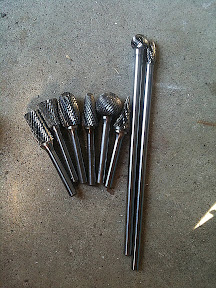 , I played around with the long shank bits in the valve throat for a few minutes, by hand, just doing a little bit of smoothing.

I also noticed that the depth of the quench pad in the chamber is almost exactly 30 thousandths deep. The piston sits perfectly level with the deck, so, since the HG is almost 30 thousandths as well, I shouldn't need to have any weld fill put in the chamber at all; decking the head .030 will will give me a zero clearance scenario, and the .030 of the HG will give room for rod stretch and piston rock at high RPMs.
Taking that material out will remove 4.74cc's from the chamber (~12.5:1)
I was stupid enough to break the hub on my flex shaft grinder (reverse thread ;-)) yesterday, so I'm waiting on a replacement part to show up before I can start grinding away again.
In absence of a powertool to control my burrs,
, I played around with the long shank bits in the valve throat for a few minutes, by hand, just doing a little bit of smoothing.I also noticed that the depth of the quench pad in the chamber is almost exactly 30 thousandths deep. The piston sits perfectly level with the deck, so, since the HG is almost 30 thousandths as well, I shouldn't need to have any weld fill put in the chamber at all; decking the head .030 will will give me a zero clearance scenario, and the .030 of the HG will give room for rod stretch and piston rock at high RPMs.
Taking that material out will remove 4.74cc's from the chamber (~12.5:1)
10-20-2010, 09:52 PM
#54
Senior Moderator
I also noticed that the depth of the quench pad in the chamber is almost exactly 30 thousandths deep. The piston sits perfectly level with the deck, so, since the HG is almost 30 thousandths as well, I shouldn't need to have any weld fill put in the chamber at all; decking the head .030 will will give me a zero clearance scenario, and the .030 of the HG will give room for rod stretch and piston rock at high RPMs.
Taking that material out will remove 4.74cc's from the chamber (~12.5:1)
10-21-2010, 01:16 AM
#56
Rice Patrol
sorry I'm a noob to this stuff, but what exactly does this type of boring do? It seems like it would be a marginal gain at best.
does it just allow more air into the engine? Because if that is the case, would getting a bigger IM be a better choice?
does it just allow more air into the engine? Because if that is the case, would getting a bigger IM be a better choice?
10-21-2010, 06:58 AM
#57
Senior Moderator
The ONE thing i would do after doing this is upgrade the Throttle Body, Im going to be looking at adding a 75mm maybe 80 to mine when the motor work is done.
10-21-2010, 07:12 AM
#58
Instructor
Thread Starter
Join Date: Aug 2010
Posts: 134
Likes: 0
Received 0 Likes
on
0 Posts
You have to realize though that Honda spent a lot of time and money on optimizing the shape of the ports; it's something they have direct control over in the casting process. However, due to economic constraints (remember they are producing these heads by the MILLIONS) they do not have control of the imperfections that arise between the casting and machining processes.
Bigger isn't always better. We all think of air as a very light and nonrestrictive substance. In an engine, where huge amounts of air are being moved, it performs more like a liquid.
Now consider that a good percentage of the time the valves are open, they are only open partially; the area just above the valve seat in the port (the throat), and the short transition into the chamber are the most important when performing port work.
The biggest flow obstruction in the heads are the valves themselves, and that's an inevitability. So addressing the transitions to and from the valve seat are very important.
I'm going to do an 80mm TB as well.
10-21-2010, 10:17 AM
#59
Senior Moderator


 Why haven't I came across this thread yet?
10-22-2010, 12:33 AM
Why haven't I came across this thread yet?
10-22-2010, 12:33 AM
#63
Instructor
Thread Starter
Join Date: Aug 2010
Posts: 134
Likes: 0
Received 0 Likes
on
0 Posts
ARP doesn't retail them, I got them in a group buy over on HT; they did a custom order for us. Who knows, maybe they'll sell them now that they're tooled for them..... I paid $200 shipped for the set of 12.
10-23-2010, 09:57 AM
#64
Instructor
Thread Starter
Join Date: Aug 2010
Posts: 134
Likes: 0
Received 0 Likes
on
0 Posts
Hello iPhone 4 and no longer having to bust out the rig to take a half decent picture for my threads!
Well my Foredom grinder is back up and running. I finished matching the air horns to the manifold and started on the injector bases.
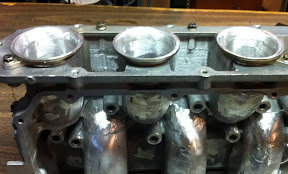
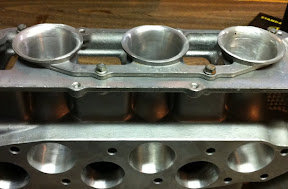
I need to get my hands on some spray ink before I continue so I can properly match these injector bases to the heads. You can see they could be matched better on the sides and around the injector.

Well my Foredom grinder is back up and running. I finished matching the air horns to the manifold and started on the injector bases.
I need to get my hands on some spray ink before I continue so I can properly match these injector bases to the heads. You can see they could be matched better on the sides and around the injector.
10-23-2010, 11:10 AM
#65
Use the gaskets.
Also if the lower runner are not new Their will be marks alreadyy for you to go by on them.
Just put the gasket on them to see the marks that stand out.It looks like a black line like carbon.
And grind away
And holy crap those are some short horns
Also if the lower runner are not new Their will be marks alreadyy for you to go by on them.
Just put the gasket on them to see the marks that stand out.It looks like a black line like carbon.
And grind away
And holy crap those are some short horns
10-23-2010, 11:34 AM
#66
Instructor
Thread Starter
Join Date: Aug 2010
Posts: 134
Likes: 0
Received 0 Likes
on
0 Posts
I don't want to use the gaskets to match them because the gasket is bigger than both openings; doing so will give a small expansion area that will slow down the intake charge. There is a variance of ~.75.. to 1.75mm between the gasket and the head. That doesn't sound like much, but if you consider that the circumference of the port is ~14cm you'll notice that it's actually a relatively big difference in area; ~1-1.5cm2.
10-26-2010, 03:31 PM
#68
Whats up with RDX owners?
iTrader: (9)

I love the detail you are taking with the engine. I can't wait to see this completed.
10-27-2010, 02:18 PM
#69
Instructor
Thread Starter
Join Date: Aug 2010
Posts: 134
Likes: 0
Received 0 Likes
on
0 Posts
Thanks civicdrivr.
Alright then; the fun things accomplished this morning (must spend they evening with the family... fortunately and unfortunately.)
I got one of the injector bases matched to the head (so smooth you can't even see the line on the left):
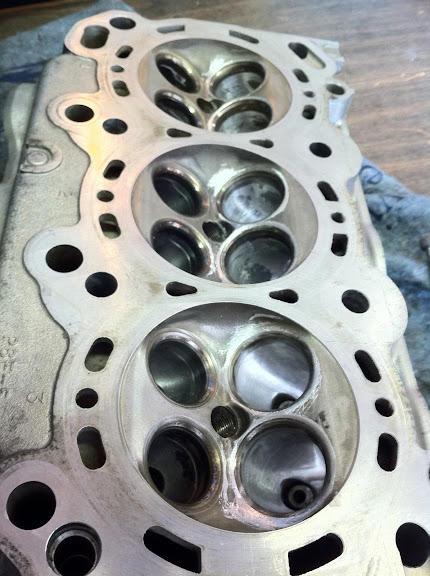
I roughed out all the intake ports on one of the heads:


And I am almost completely finished with one of the ports (This is the finish they will keep ~80grit with scoring perpendicular to the direction of port flow):

The End. (For today of course)
Alright then; the fun things accomplished this morning (must spend they evening with the family... fortunately and unfortunately.)
I got one of the injector bases matched to the head (so smooth you can't even see the line on the left):
I roughed out all the intake ports on one of the heads:
And I am almost completely finished with one of the ports (This is the finish they will keep ~80grit with scoring perpendicular to the direction of port flow):
The End. (For today of course)
10-27-2010, 03:31 PM
#70
Senior Moderator
Awesome
 10-28-2010, 11:58 AM
#73
Whats up with RDX owners?
iTrader: (9)
10-28-2010, 01:58 PM
#74
Instructor
Thread Starter
Join Date: Aug 2010
Posts: 134
Likes: 0
Received 0 Likes
on
0 Posts
A little better I think, but this picture is slightly out of focus. I think I'll set my D80 up on the tripod and take a picture will a better focus depth of field. I kinda like the idea of enlarging it and hanging it on my wall... Haha.
I'll post it later.
I'll post it later.
10-30-2010, 10:10 AM
#75
Instructor
Thread Starter
Join Date: Aug 2010
Posts: 134
Likes: 0
Received 0 Likes
on
0 Posts
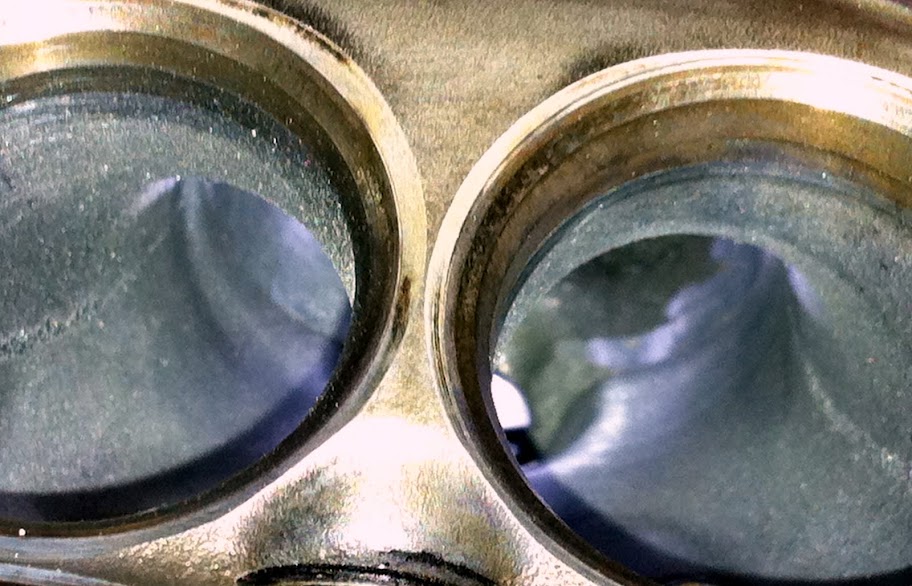
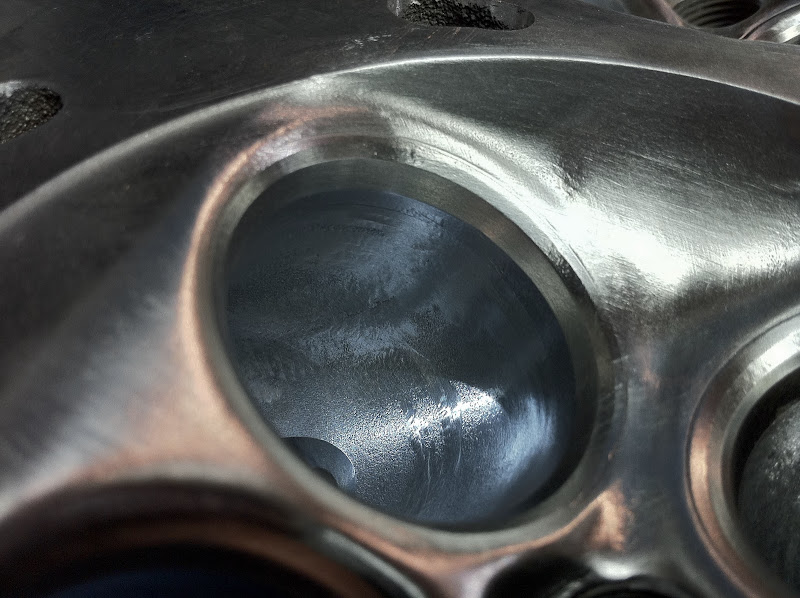
PM me for full res on this one.
You can see here where I started to blend the seats on the chamber face. For this I didn't even use a rotary tool; I feel much safer doing it by hand. Slower, yes, but much more controllable.
Last edited by IDon'tKnow; 10-30-2010 at 10:22 AM.
10-30-2010, 10:52 AM
#76
I did not do my chambers with a rotary tool either.
Wa to close to the cylinder shape and the seat .
One wrong move and the head could end up all done or totally trashing the seats.
Some people bang them out with the valve in there but you will trash them that way.
best way is by hand
Wa to close to the cylinder shape and the seat .
One wrong move and the head could end up all done or totally trashing the seats.
Some people bang them out with the valve in there but you will trash them that way.
best way is by hand
11-03-2010, 02:00 PM
#79
Instructor
Thread Starter
Join Date: Aug 2010
Posts: 134
Likes: 0
Received 0 Likes
on
0 Posts
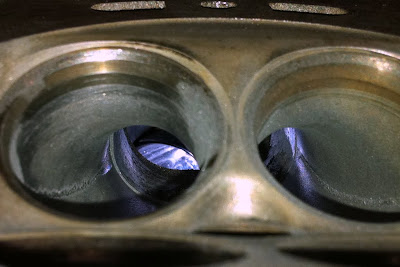
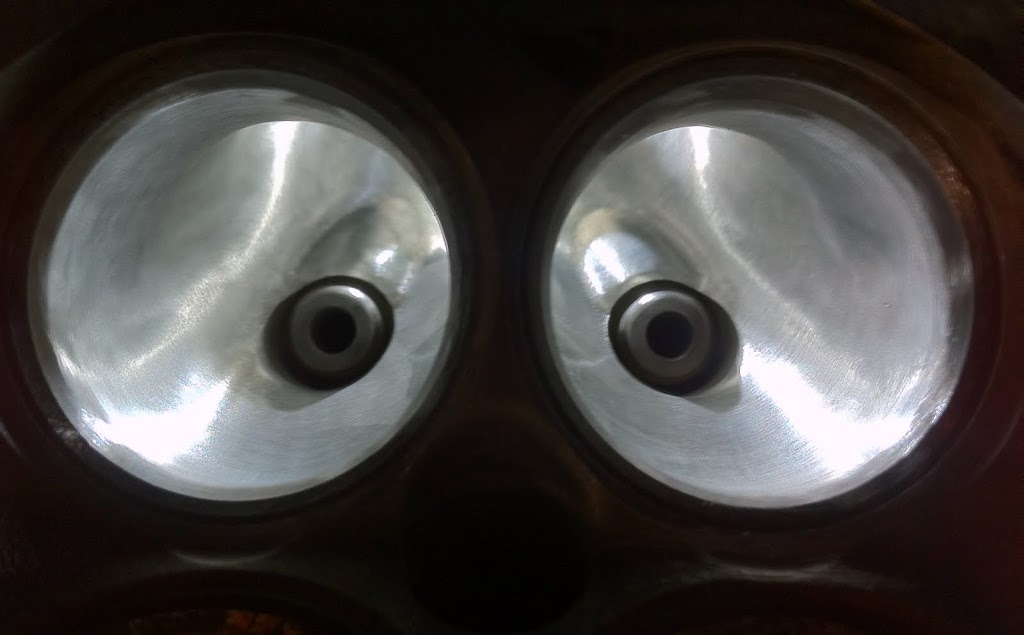
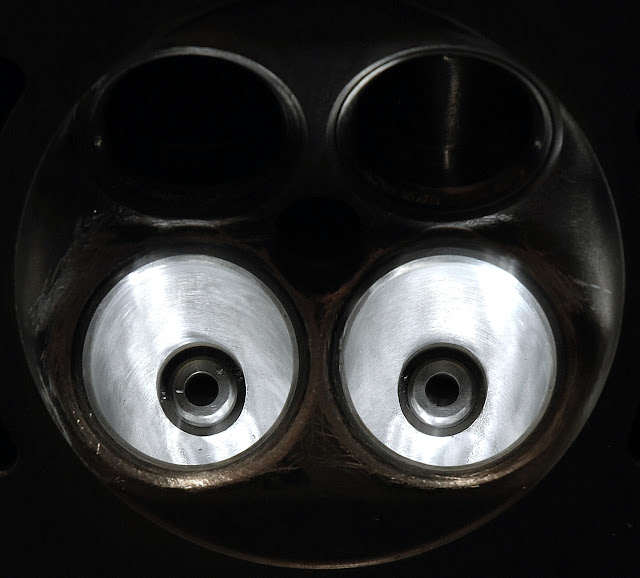
I almost finished doing the chambers on the head I've been working on. You can see in these before, during, and after pictures that there is a marked decrease in obstructions to the flow path:


I need to have a single angle valve job done on these to ensure the valve seals properly.

Seeing them polished like this makes me wonder if I will trouble with ceramic coating them.....
I need to have a single angle valve job done on these to ensure the valve seals properly.
Seeing them polished like this makes me wonder if I will trouble with ceramic coating them.....