
DIY: Replacing Cabin Air Filter 3G Garage DIY F-130
 10-01-2005, 11:44 PM
#1
Pro
Thread Starter
So I hit the Big 20K on my 04 and decided to replace the Cabin Air Filter and I think it was a wonderful decision after looking @ the old Filter. Although the 3G Garage gave good info it did not have step by step instructions compiled in a thread so I decided to take pics during the procedure. One of the most simple things I had to do on the TL and saved me ~85 bucks as quoted by my dealer and took ONLY 20 - 25 minutes of my time.
I got the ATP filter from Rock Auto for $13.78 ($20 with shipping) All of ATP's cabin filters are charcoal activated. Bosch also has one but it is about $25 more then ATP. If you want to know more about difference between Particulate (stock and most aftermakets) and the charcoal activated (atp,bosch) you can go to http://www.boschusa.com/AutoParts/Filters/ and they have explained it. Basically the only difference is that the charcoal activated filter prevents odors.(3 layer design for the particulate filter whereas a 5 layer design for the charcoal activated)
you can buy it from: http://www.rockauto.com/ for $13.78
ATP Part # HA5
Category: Cabin Air Filter
Item Price: $13.78
edit by mod Ron A: (Apologies to scrb09 for jumping into his excellent thread) Posting this here in case someone doesn't read the whole thread. This is posted in Post #48 by AdamNJ:
Start with removing the 2 clips on the inside of the glove box.

I inserted a flat head screw-driver behind the clip and slowy popped the clip out.

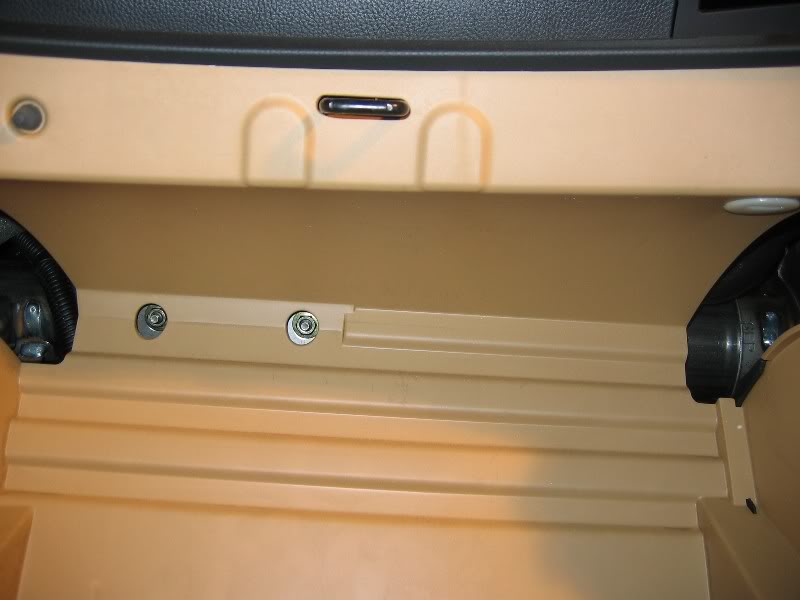
After the 2 clips there is a small lever on the right hand side of the glove box that prevents it from falling down, detach that (I dont have a picture for this)Once these 3 things are out the glove box will fall out. Unscrew the two screws on the far left (marked in red in the picture below)

There are two push pins on the top of the glove box housing (the one on the right is marked in red in the picture below). Push the center hole in these pins to unlock them and pull them out. Once these pins are out slowly start pulling the housing from the right hand side. There are close to 10 clamp pins that will come out one by one.

Detach the two harnesses and the housing is off..

Push the two clips (marked in red) on the side of the air filter housing and pull it out.

The Old Filter with 20K around 12 K hwy and 8K city driving.

Reverse the procedure and enjoy some fresh clean AIR
I got the ATP filter from Rock Auto for $13.78 ($20 with shipping) All of ATP's cabin filters are charcoal activated. Bosch also has one but it is about $25 more then ATP. If you want to know more about difference between Particulate (stock and most aftermakets) and the charcoal activated (atp,bosch) you can go to http://www.boschusa.com/AutoParts/Filters/ and they have explained it. Basically the only difference is that the charcoal activated filter prevents odors.(3 layer design for the particulate filter whereas a 5 layer design for the charcoal activated)
you can buy it from: http://www.rockauto.com/ for $13.78
ATP Part # HA5
Category: Cabin Air Filter
Item Price: $13.78
edit by mod Ron A: (Apologies to scrb09 for jumping into his excellent thread) Posting this here in case someone doesn't read the whole thread. This is posted in Post #48 by AdamNJ:
It looks like I must be the first person who ordered the Bosch C3600. That is the one that the BOSCH web site says fits a 2004 tl, and the same one that the rockauto.com site says fits the 2005 TL.
It does not fit, at all. It is 11.5 in x 3.75 x 1.25 inches. 2 come in the box along with a paper that says "This cabin filter fits: Honda Accord, model year 1998-2002; Acura TL, from model year 1999; and Acura CL, model years 2001-2003."
It does not fit, at all. It is 11.5 in x 3.75 x 1.25 inches. 2 come in the box along with a paper that says "This cabin filter fits: Honda Accord, model year 1998-2002; Acura TL, from model year 1999; and Acura CL, model years 2001-2003."
Start with removing the 2 clips on the inside of the glove box.
I inserted a flat head screw-driver behind the clip and slowy popped the clip out.
After the 2 clips there is a small lever on the right hand side of the glove box that prevents it from falling down, detach that (I dont have a picture for this)Once these 3 things are out the glove box will fall out. Unscrew the two screws on the far left (marked in red in the picture below)
There are two push pins on the top of the glove box housing (the one on the right is marked in red in the picture below). Push the center hole in these pins to unlock them and pull them out. Once these pins are out slowly start pulling the housing from the right hand side. There are close to 10 clamp pins that will come out one by one.
Detach the two harnesses and the housing is off..
Push the two clips (marked in red) on the side of the air filter housing and pull it out.
The Old Filter with 20K around 12 K hwy and 8K city driving.
Reverse the procedure and enjoy some fresh clean AIR

The following 6 users liked this post by scrb09:
Anthony3 (03-14-2012),
HoRneDieSeL (04-21-2012),
LoveMyTL-S (09-29-2013),
Toddy (09-01-2011),
triax37 (11-30-2011),
and 1 others liked this post.
10-02-2005, 12:16 AM
#2
Burning Brakes

Thanks man! That was am amazing DIY tuturial! I hope it will be included in either the Garage section or as a sticky. I am almost at 20K myself and you just saved me some hard earned cash. Did you notice an improved air flow and cleaner smelling air with the new filter? Thanks.
dsc8888
dsc8888
10-02-2005, 08:10 AM
#5
Great thread. Thanks very much for posting this.
Added to 3G Garage.
The thing on the right side that keeps the door from falling is easier to get loose than I thought. I was a little worried about it, but then I looked closely at it and there is a rounded area with grooves, so you just push on that and the lever will detach, allowing the door to be opened fully.
The second thing I was worried about was the two clips on the inside of the box, but your picture made it very clear how to detach them.
 10-02-2005, 09:11 AM
#6
Registered User
just a FYI, the 05 TL does not have those 2 black clips holding the box up that you have pictured here
also you do not need to remove the glove box to do this, you could have left it attached, and let it hang down
also you do not need to remove the glove box to do this, you could have left it attached, and let it hang down
Trending Topics
10-02-2005, 09:43 AM
#8

Originally Posted by rbf351
just a FYI, the 05 TL does not have those 2 black clips holding the box up that you have pictured here
also you do not need to remove the glove box to do this, you could have left it attached, and let it hang down
also you do not need to remove the glove box to do this, you could have left it attached, and let it hang down
These pictures are great!
10-02-2005, 11:02 AM
#9
Senior Moderator
Regions Leader
Regions Leader
Originally Posted by rbf351
just a FYI, the 05 TL does not have those 2 black clips holding the box up that you have pictured here
also you do not need to remove the glove box to do this, you could have left it attached, and let it hang down
also you do not need to remove the glove box to do this, you could have left it attached, and let it hang down
cool thanks for the update rbf...
10-03-2005, 08:59 AM
#10
Pro
Thread Starter
Originally Posted by dsc888
Did you notice an improved air flow and cleaner smelling air with the new filter? Thanks.
dsc8888
dsc8888
I did notice the air being a bit crisp and fresh with a new type of smell...I went with the carbon activated filter so there was a different smell to it.
 10-03-2005, 12:48 PM
#13
Weapon X
Join Date: Oct 2004
Location: San Diego, CA
Age: 52
Posts: 182
Likes: 0
Received 0 Likes
on
0 Posts
I looked up the part and got this:
WIX Part # 24815
{Cabin Air Filter} $12.77
ATP Part # HA5
{Vent Filter} $14.05
Im thinking its the (vent Filter) based on part number. Hmm is there a difference between the two?
WIX Part # 24815
{Cabin Air Filter} $12.77
ATP Part # HA5
{Vent Filter} $14.05
Im thinking its the (vent Filter) based on part number. Hmm is there a difference between the two?
10-03-2005, 12:55 PM
#14
Pro
Thread Starter
Originally Posted by GRich4u
I looked up the part and got this:
WIX Part # 24815
{Cabin Air Filter} $12.77
ATP Part # HA5
{Vent Filter} $14.05
Im thinking its the (vent Filter) based on part number. Hmm is there a difference between the two?
WIX Part # 24815
{Cabin Air Filter} $12.77
ATP Part # HA5
{Vent Filter} $14.05
Im thinking its the (vent Filter) based on part number. Hmm is there a difference between the two?
ATP's cabin filters are charcoal activated. Wix is Particulate. The difference is that the charcoal activated filter prevents odors. 3 layer design for the particulate filter whereas a 5 layer design for the charcoal activated.
So for $1.28 more you go with ATP and get a better filter
You can go to http://www.boschusa.com/AutoParts/Filters/ and they have explained the difference between the 2 types.
10-03-2005, 01:02 PM
#15
I paid $50.00 labor to have mine replaced on my CL. Nice work!!!
It did not eliminate the chemical odor that pervades the interior of my car when left out in the sun though.
I lysoled the intake ducts and cleaned the carpeting which worked for a couple of weeks and then boom the smell was back.
It smells like two robots spent their honeymoon in my back seat.
Any suggestions on what it could be. The stealership was no help at all of course.
10-03-2005, 02:47 PM
#16
Instructor

Did mine this weekend with the ATP HA-5. Went smoothly but a little scary pulling the plastic off behind glove box. It went right back into place. Next time I will leave the dash hanging - good idea to not take those screws off.
My filter was toast after 21,000 miles. Could not believe all the stuff in there. Air must come directly from the vents in front of the windshield so leaves, dead bugs, whatever ends up right in the filter.
I'm now ready to attack my wifes SL which is 2 screws and 2 clips right under the hood!
VERY well done thread.
10-03-2005, 05:12 PM
#17
an Acura has-been
Originally Posted by Oakroadsteve
I paid $50.00 labor to have mine replaced on my CL. Nice work!!!
It did not eliminate the chemical odor that pervades the interior of my car when left out in the sun though.
I lysoled the intake ducts and cleaned the carpeting which worked for a couple of weeks and then boom the smell was back.
It smells like two robots spent their honeymoon in my back seat.
Any suggestions on what it could be. The stealership was no help at all of course.
It did not eliminate the chemical odor that pervades the interior of my car when left out in the sun though.
I lysoled the intake ducts and cleaned the carpeting which worked for a couple of weeks and then boom the smell was back.
It smells like two robots spent their honeymoon in my back seat.
Any suggestions on what it could be. The stealership was no help at all of course.
10-05-2005, 12:32 AM
#19
Burning Brakes
Originally Posted by scrb09
I did noticed the air flow being a bit improved and a bit less noisy (maybe because the the fan is running @ one lower speed to throw the same amount of air) and It would just make sense looking @ the old filter...the picture does not do full justice of how dirty the filter was, there were dry leaves and opening up the filter slots there was a whole bunch of dirt in it.
I did notice the air being a bit crisp and fresh with a new type of smell...I went with the carbon activated filter so there was a different smell to it.
I did notice the air being a bit crisp and fresh with a new type of smell...I went with the carbon activated filter so there was a different smell to it.
dsc888
10-05-2005, 03:59 PM
#20
Pro
Thread Starter
Originally Posted by rbf351
also you do not need to remove the glove box to do this, you could have left it attached, and let it hang down
Originally Posted by mxtt
Good suggestion as repeated removal of those two screws will definitely eat up the plastics around them and make the glove box rattle.
Also it would be a pain to pull the housing while the glove box is hanging, I think that would have more chances of eating up the plastic around it. I would rather just have it out of the way.
But you guys are correct, If you are comfortable with pulling the housing while the glove box is hanging, then there is no compulsion of removing it.
10-05-2005, 07:07 PM
#21
Safety Car
Here are some pics of my installation. The original poster saved me some $$.
The entire job took me about 30 mins, thats cause I was taking my time.
The scariest part was when pulling the glove box holder out of its place. There are about 10 clips, but you don't know when they will pop out. I was hoping I didn't break anything. The whole assembly went back in pretty easy. I'll find out tomorrow morning if there are any rattles that I started.
 10-30-2005, 08:40 PM
#24
No pushpins?????
So I got myself an ATP filter, took my laptop out to the car, and started following this DYI. Took out the glove box quite easily and it was time to take off the housing. Looked for the two push pins described in the DYI, and gues what - they are not there!!!!
 Anyone seen this before? How do I get the housing off now?
Anyone seen this before? How do I get the housing off now?
10-30-2005, 11:22 PM
#25
Post #6 in this thread tells you where they went and what to do next.
You can also check out the other threads in the 3G Garage.
F-130: DIY: Replacing Cabin Air Dust & Pollen Filter
https://acurazine.com/forums/showthread.php?t=87494
https://acurazine.com/forums/showthread.php?t=108345
https://acurazine.com/forums/ramblings-12/best-place-buy-snowboarding-pants-jackets-122290/
10-31-2005, 07:30 AM
#26
Team Anthracite Member
Join Date: Apr 2004
Location: NJ
Posts: 2,366
Likes: 0
Received 0 Likes
on
0 Posts
Wow - so different than my '02. At least it looks like I do not have to cut anything away like on the '02 you had to snip a panel open to get in there. Are these 10 pins wrecked after you pull them out? - ya know how sometimes they are one-timers?
Anyone buy the filter from Acura - or know how much it is?
Looks like only one filter too - is that correct? The '02s had two. Cool - more savings!
Thanks for all the pics and instructions. That is how I did the '02 (from pics on this site) and since I have 27k+ all highway I bet my '04 is a mess.
Thanks.
10-31-2005, 07:49 AM
#27
Team Anthracite Member
Join Date: Apr 2004
Location: NJ
Posts: 2,366
Likes: 0
Received 0 Likes
on
0 Posts
wow - one month later and the price of these things has already gone up - now they are $14.05 before shipping.... must be the increased number of them being purchased as a result of this thread
10-31-2005, 09:51 AM
#28
Advanced

Join Date: Sep 2004
Location: bixby, Ok.
Posts: 88
Likes: 0
Received 0 Likes
on
0 Posts
Kandyman I don't have the push pins on my o4 TL. If you get a mirror and flashlight you can see the clips. You just have to give a hard tug and the clips will release. It's a little scary the first time, but it will come loose. I believe screws would have been better because after the filter gets changed out a few times I bet it starts to rattle.
11-14-2005, 08:33 AM
#29
Team Anthracite Member
Join Date: Apr 2004
Location: NJ
Posts: 2,366
Likes: 0
Received 0 Likes
on
0 Posts
Guys -
I try not to run around too much and say this car is this or this car is that...but when something is simply dumb - not poor - but dumb design, I gotta say something. The lack of accessibitlity to a part of the car that requires regular maintenance - is really absurd.
I did this DIY over the weekend and I also do not have the push pins things on my '04 - weird how some do and some don't. I took the advice here and just pulled and eventually the clips gave way - without breaking, which was a bonus.
Man, this car has never been in for glove box rattles, but you should see all the rigging inside there!! A couple clips had black felt all around them, one was covered in white grease - also saw that the two screws that hold the glove box door on - one was silver with a spacer washer (probably cause it was longer) and the other one was black...totally rigged!! It has never rattled so I guess I do not care - but anyway - seeing all this and the potential for wearing or braking these clips or screw holes from repeated removals and the fact my filter was sooo filthy after only 1.5 years (28k miles) complete with two dead flies (least they had each other in the end)....I decided to make this a one time dash disassembly.
After taking out the piece behind the glove box, much to the delight of my 3 year old - I whipped out a jig saw and simply cut a nice rectangle in the back of that housing. (If I heard one more time "why you cutting your car apart Daddy" - I thought I was gonna lose it!)
I had to cut a pretty wide rectangle and was nervous about cutting all the way to the right for fear that there would be lack of support or rattles, but neither was an issue and I put it all back together and now when I change my filter in the future, all I need to do is un-clip the two stoppers in the actual glove box, disconnect the plastic arm on r-side of box and lower the box down out of the way - not having to unscrew glove box door or take apart the lower dash etc. Filter is easily accessible now - the way Acura should have done it in the beginning. Drove to work today - no new rattles etc.
I recommend this to anyone who will be doing frequent filter changes - it will make my next filter change take approximately 3 minutes.
11-14-2005, 05:22 PM
#30
CEO, Team Anthracite
Join Date: May 2003
Location: Bear Territory
Posts: 2,899
Likes: 0
Received 0 Likes
on
0 Posts
Originally Posted by TBone2004
I had to cut a pretty wide rectangle and was nervous about cutting all the way to the right for fear that there would be lack of support or rattles, but neither was an issue and I put it all back together and now when I change my filter in the future, all I need to do is un-clip the two stoppers in the actual glove box, disconnect the plastic arm on r-side of box and lower the box down out of the way - not having to unscrew glove box door or take apart the lower dash etc. Filter is easily accessible now - the way Acura should have done it in the beginning. Drove to work today - no new rattles etc.
I recommend this to anyone who will be doing frequent filter changes - it will make my next filter change take approximately 3 minutes.
I recommend this to anyone who will be doing frequent filter changes - it will make my next filter change take approximately 3 minutes.
Pictures?!
11-14-2005, 06:57 PM
#31
Originally Posted by TBone2004
Guys -
- also saw that the two screws that hold the glove box door on - one was silver with a spacer washer (probably cause it was longer) and the other one was black...totally rigged!!
- also saw that the two screws that hold the glove box door on - one was silver with a spacer washer (probably cause it was longer) and the other one was black...totally rigged!!
11-14-2005, 07:57 PM
#32
Team Anthracite Member
Join Date: Apr 2004
Location: NJ
Posts: 2,366
Likes: 0
Received 0 Likes
on
0 Posts
I know, I know - I wasn't 100% sure how this one was gonna turn out - ya know that sweaty feeling you get like Oh crap - should I have done this?! I took a couple pics at the end. It worked sweet. I found a couple on the camera....sorry its all I got.
No filter in yet....

With filter hanging out....

No filter in yet....
With filter hanging out....
Originally Posted by Lore
Pictures?!
11-26-2005, 07:52 AM
#34
Registered Member
I did mine last March, using the Acura Service Manual, and frankly I found this task to be a royal pain in the ass.. as in BIG TIME.
While Acura (Honda?) may have done some good things in the design of the TL, this is one area where they failed horribly. It took me about an hour to do the job, mostly out of fear of breaking something while removing the glove compartment housing to get to the filter door. I just does not feel "right" to be having to pull that housing out. A much better design would have been to have an "outter" access panel in the housing, that would be fully accessable once the glove box has been dropped down. You then remove that panel to expose the filter door itself to change the filter.
I know that some Acura technicians are cutting just such an access opening in the housing the first time a customer comes in for this filter change. Then the next time, the job is so much easier.
Just my thoughts on this topic. I really think Acura dropped the ball on this one. I've had three other cars with in-cabin filters (1996 Contour SE, 2000 SVT Contour, and a 2002 Altima SE) and all of those had design far superior than our TL's in this department. This is not rocket science.
Sorry for the bashing, but really, this is a pain in the butt task.
11-26-2005, 08:02 AM
#35
Registered Member
Originally Posted by TBone2004
Guys -
I try not to run around too much and say this car is this or this car is that...but when something is simply dumb - not poor - but dumb design, I gotta say something. The lack of accessibitlity to a part of the car that requires regular maintenance - is really absurd.
I did this DIY over the weekend and I also do not have the push pins things on my '04 - weird how some do and some don't. I took the advice here and just pulled and eventually the clips gave way - without breaking, which was a bonus.
Man, this car has never been in for glove box rattles, but you should see all the rigging inside there!! A couple clips had black felt all around them, one was covered in white grease - also saw that the two screws that hold the glove box door on - one was silver with a spacer washer (probably cause it was longer) and the other one was black...totally rigged!! It has never rattled so I guess I do not care - but anyway - seeing all this and the potential for wearing or braking these clips or screw holes from repeated removals and the fact my filter was sooo filthy after only 1.5 years (28k miles) complete with two dead flies (least they had each other in the end)....I decided to make this a one time dash disassembly.
After taking out the piece behind the glove box, much to the delight of my 3 year old - I whipped out a jig saw and simply cut a nice rectangle in the back of that housing. (If I heard one more time "why you cutting your car apart Daddy" - I thought I was gonna lose it!)
I had to cut a pretty wide rectangle and was nervous about cutting all the way to the right for fear that there would be lack of support or rattles, but neither was an issue and I put it all back together and now when I change my filter in the future, all I need to do is un-clip the two stoppers in the actual glove box, disconnect the plastic arm on r-side of box and lower the box down out of the way - not having to unscrew glove box door or take apart the lower dash etc. Filter is easily accessible now - the way Acura should have done it in the beginning. Drove to work today - no new rattles etc.
I recommend this to anyone who will be doing frequent filter changes - it will make my next filter change take approximately 3 minutes.
As for the pushpins; earlier model year '04's did not have them. My '04 was built in July of '04 and does have them.
There are two ways in which Acura could have made this job a hell of a lot easier. One I outlined in my post - a removable panel (or door) in the housing to allow access to the filter door. The other way would be to have the housing removable much like the glove box. That is, you remove the glove box, then remove perhaps a series of clips or screws (preferred) to remove the housing itself to expose the filter housing and door. Either way would be one heck of a lot better than what they came up with. "Gee, let's see how dumb we can make this to really frustrate the techs and backyard mechanic customers".
11-26-2005, 05:44 PM
#36
WDP Director of R & D

TBone,
Could one cut that access hole without taking the entire box out of the car first??
IE just remove the glove box door or let it hang down then dremel out the access hole??
Definitely looks like a pain in the arse...
Thanks.
Could one cut that access hole without taking the entire box out of the car first??
IE just remove the glove box door or let it hang down then dremel out the access hole??
Definitely looks like a pain in the arse...
Thanks.
11-27-2005, 07:55 AM
#37
Registered Member
Originally Posted by KJSmitty
TBone,
Could one cut that access hole without taking the entire box out of the car first??
IE just remove the glove box door or let it hang down then dremel out the access hole??
Definitely looks like a pain in the arse...
Thanks.
Could one cut that access hole without taking the entire box out of the car first??
IE just remove the glove box door or let it hang down then dremel out the access hole??
Definitely looks like a pain in the arse...
Thanks.
Doing what TBone did makes the job perhaps a 10 minute task.. and simple at that.
11-28-2005, 06:57 AM
#38
Team Anthracite Member
Join Date: Apr 2004
Location: NJ
Posts: 2,366
Likes: 0
Received 0 Likes
on
0 Posts
There might be enough clearance - especially for a dremel - keep it shallow and I bet you could do it. But there are some wires back there so it may not be worth the risk. I pulled my dash apart as per the instructions in this thread and nothing broke or cracked - but there was no way I was doing that on a regular basis. Its funny what designs/features are kept from year to year and which ones are completely re-done. On my wife's '02 TL, there was a little plastic "hatch" that you had to snip out with some pliers to get to the filter and then re-use this plate as the cover. At the time I thought that was really dumb, but now seeing what they did in the 2004, I did not realize how good we had it.
Smitty, I bet you could do it - lay on your back and put your head under the dash and shine up with a light - you will get a good look as to what is behind there and how much clearance you have.
Smitty, I bet you could do it - lay on your back and put your head under the dash and shine up with a light - you will get a good look as to what is behind there and how much clearance you have.
Originally Posted by KJSmitty
TBone,
Could one cut that access hole without taking the entire box out of the car first??
IE just remove the glove box door or let it hang down then dremel out the access hole??
Definitely looks like a pain in the arse...
Thanks.
Could one cut that access hole without taking the entire box out of the car first??
IE just remove the glove box door or let it hang down then dremel out the access hole??
Definitely looks like a pain in the arse...
Thanks.
11-28-2005, 05:39 PM
#39
WDP Director of R & D
Thanks TBone/SouthernBoy,
I'm sure my filter needs replaced and even though confident I could perform the entire/"book" procedure, the less one has to take apart the better. Especially when we all know the filter will have to be replaced again and again..
Like SouthernBoy, I am hesitant to go chopping/cutting up structure under the dash... But given the issue it definitely "is" something that should have been designed in to begin with... Like you said T, I'll look under the dash and ensure I won't damage anything behind the panel. I will probably try to slide a shield of sorts up in their prior to any "dremeling".
Thanks men/all for the words of wisdom / posting your filter changing experience/techniques.
Cheers
12-04-2005, 08:14 PM
#40
Race Director
Originally Posted by Kandyman
So I got myself an ATP filter, took my laptop out to the car, and started following this DYI. Took out the glove box quite easily and it was time to take off the housing. Looked for the two push pins described in the DYI, and gues what - they are not there!!!!

Anyone seen this before? How do I get the housing off now?
Anyone seen this before? How do I get the housing off now?
Originally Posted by Ron A
Post #6 in this thread tells you where they went and what to do next.
You can also check out the other threads in the 3G Garage.
F-130: DIY: Replacing Cabin Air Dust & Pollen Filter
https://acurazine.com/forums/showthread.php?t=87494
https://acurazine.com/forums/showthread.php?t=108345
https://acurazine.com/forums/showthread.php?t=122290
You can also check out the other threads in the 3G Garage.
F-130: DIY: Replacing Cabin Air Dust & Pollen Filter
https://acurazine.com/forums/showthread.php?t=87494
https://acurazine.com/forums/showthread.php?t=108345
https://acurazine.com/forums/showthread.php?t=122290
For anyone with an '04 (at least an early model vin#, i.e 10,xxx), as Kandyman says, there are no push pins on the housing. I tried pulling on the housing as suggested by Chas22, but was afraid that something was about to break/rip/tear.
Wasn't really an issue for me because out came Mr. Dremel (with flexi-shaft drive) and 60 seconds later, using TBone2004's picture in post# 32 of this thread as a guide, the filter housing was exposed. Next time I have to replace the filter, it's a 5 minute job. Great job TBone! There is a wire bundle about 1/2 - 1" to the left of the left most vertical cut. Be careful of that.
One more thing. It looked to me like the glove box does have to be removed to get the housing off. Looked like those 2 screws go right through the housing.