
3G TL cabin filter replacement- LOTS of pics
 04-30-2009, 12:06 PM
#1
C05TLY
Thread Starter
Join Date: Oct 2008
Location: Manitoba, Canada
Age: 38
Posts: 33
Likes: 0
Received 3 Likes
on
1 Post
3G TL cabin filter replacement- LOTS of pics
Just changed my cabin air filter today on my 2005 acura tl. It was easy to figure out and the only necessary tool was a ratchet with 8mm socket. A philips(some people call it "star" tipped) screwdriver will also work.
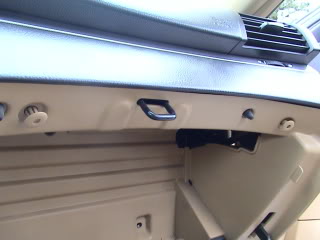
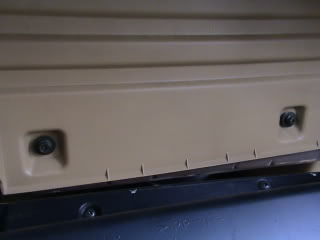
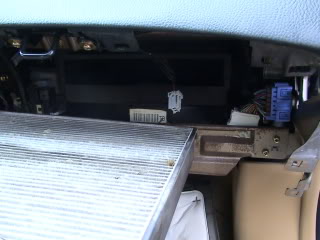
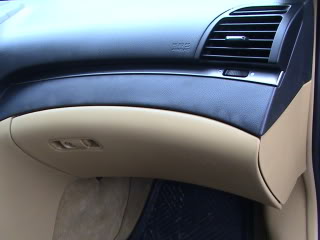 So you have your glove box as you see here...
Open the glove box and gently push the little black plastic rod towards the front of the vehicle, it should pop off with minimal effort.
Then lightly compress the outside of the gray felt piece of the glovebox so the tabs are cleared and the glovebox can then drop down freely.
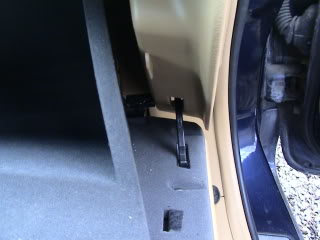
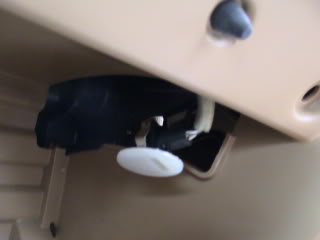
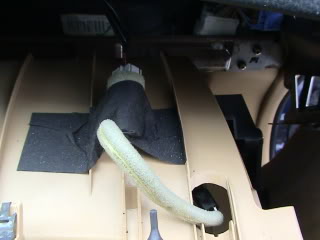
Now reach behind and gently pop the black switch out and disconnect from the blue plug.

Now you will see a small white circle with a slot in it. That is the glovebox light. It should easily pry down.
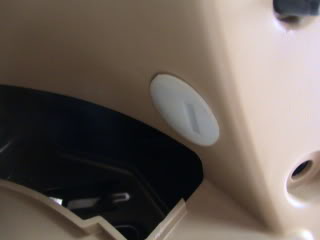
Now gently twist the exposed lightbulb socket a 1/4 turn to remove the bulb.
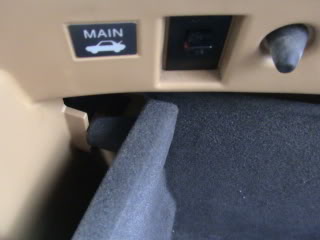
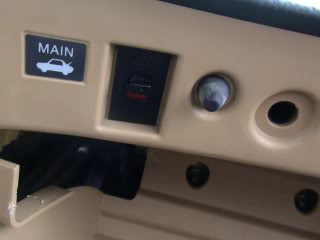
You will see 2 trim coloured round clips.
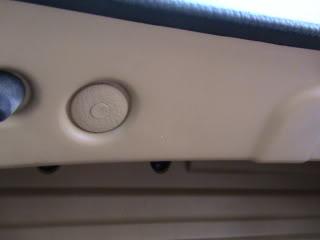
Poke the small inner circle of both clips(even a key works here) until the clips are loose. They should pop out very easily.
Then remove the two 8mm bolts(screwdriver works here too).
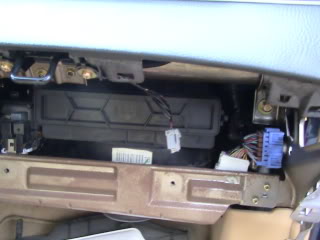
Now the piece that the glovebox attaches to is ready for removal. Safely pry down on the assembly to work the metal clips free. Might take more effort on the top portion by the latch but it will go. There is also a plastic tab on the outside of the assembly and can only be accessed with the passenger side front door fully open....dont forget about clearing this tab. Once it drops down a little as the clips are free, disconnect the white plug(in pic below) and then you can let the whole assembly hang.
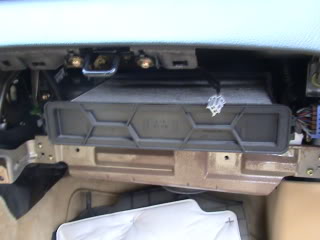
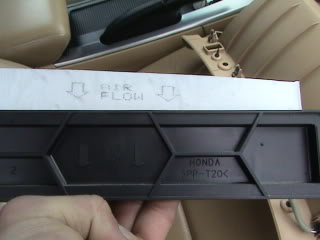
You will finally see a black rectangular piece which is the tray where the cabin filter resides. Sqeeze the outside tabs and remove.
Mine was super dirty.
Pop out old filter from tray and insert the new one. Then simply slide the tray back into its housing and the outside clips should click when its in place.
Now for final reassembly.
-Hold up the g.-box assembly and connect the white plug that you just unplugged. Also make sure the blue plug is fed through its provided space before reassembly.
-Now hold up the glove box assembly and first make sure the outside tab(far side of passenger side- door must be open) is fed through its slot. Then position the assembly in place and bump it evenly to make sure all the clips go back in their slots.
-Make sure the round plastic clips have the inside circle portion popped out but still connected. Then with all the holes aligned, push the round clips through and finally pop the inside circle tabs so everything is flush.
-Now finger thread the two 8mm bolts and then when flush tighten with a ratchet(1/8 of a turn) or with a screwdriver being careful not to overtighten.
-Connect the lightbulb socket to its housing and then pop the white round piece back in its place so its flush.
-Connect the blue plug to the black switch and pop the little switch in its place.
-Now swing the glovebox up and make sure you sqeeze the outside of the gray felt tabs to clear them.
-Connect the black plastic rod with light pressure towards the rear of the vehicle...it should click/snap into place.
THATS IT!
So you have your glove box as you see here...Open the glove box and gently push the little black plastic rod towards the front of the vehicle, it should pop off with minimal effort.
Then lightly compress the outside of the gray felt piece of the glovebox so the tabs are cleared and the glovebox can then drop down freely.
Now reach behind and gently pop the black switch out and disconnect from the blue plug.
Now you will see a small white circle with a slot in it. That is the glovebox light. It should easily pry down.
Now gently twist the exposed lightbulb socket a 1/4 turn to remove the bulb.
You will see 2 trim coloured round clips.
Poke the small inner circle of both clips(even a key works here) until the clips are loose. They should pop out very easily.
Then remove the two 8mm bolts(screwdriver works here too).
Now the piece that the glovebox attaches to is ready for removal. Safely pry down on the assembly to work the metal clips free. Might take more effort on the top portion by the latch but it will go. There is also a plastic tab on the outside of the assembly and can only be accessed with the passenger side front door fully open....dont forget about clearing this tab. Once it drops down a little as the clips are free, disconnect the white plug(in pic below) and then you can let the whole assembly hang.
You will finally see a black rectangular piece which is the tray where the cabin filter resides. Sqeeze the outside tabs and remove.
Mine was super dirty.
Pop out old filter from tray and insert the new one. Then simply slide the tray back into its housing and the outside clips should click when its in place.
Now for final reassembly.
-Hold up the g.-box assembly and connect the white plug that you just unplugged. Also make sure the blue plug is fed through its provided space before reassembly.
-Now hold up the glove box assembly and first make sure the outside tab(far side of passenger side- door must be open) is fed through its slot. Then position the assembly in place and bump it evenly to make sure all the clips go back in their slots.
-Make sure the round plastic clips have the inside circle portion popped out but still connected. Then with all the holes aligned, push the round clips through and finally pop the inside circle tabs so everything is flush.
-Now finger thread the two 8mm bolts and then when flush tighten with a ratchet(1/8 of a turn) or with a screwdriver being careful not to overtighten.
-Connect the lightbulb socket to its housing and then pop the white round piece back in its place so its flush.
-Connect the blue plug to the black switch and pop the little switch in its place.
-Now swing the glovebox up and make sure you sqeeze the outside of the gray felt tabs to clear them.
-Connect the black plastic rod with light pressure towards the rear of the vehicle...it should click/snap into place.
THATS IT!

The following 3 users liked this post by wpg_tl:


Trending Topics
 04-30-2009, 01:24 PM
#10
One or Two?
Join Date: Jul 2008
Location: Bay Area, CA
Age: 46
Posts: 329
Likes: 0
Received 0 Likes
on
0 Posts
04-30-2009, 01:35 PM
#11
C05TLY
Thread Starter
Join Date: Oct 2008
Location: Manitoba, Canada
Age: 38
Posts: 33
Likes: 0
Received 3 Likes
on
1 Post
haha I know its strange, I guess someone tells them early on and then the bad habit sticks.
-cabin airfilter part number I had was HN03104P.
Unfortunately the glovebox lightbulb didn't have a number on it, all it read was "4", maybe the 7 rubbed off...this bulb is extremely small.
-cabin airfilter part number I had was HN03104P.
Unfortunately the glovebox lightbulb didn't have a number on it, all it read was "4", maybe the 7 rubbed off...this bulb is extremely small.
04-30-2009, 01:59 PM
#12
Pretty good, no need to actually pull the bulb cover off, once you pull the whole thing out, the connector will be back there, just undo the connector and you ready to rock and roll
 04-30-2009, 08:29 PM
#14
1st Gear

Join Date: May 2008
Age: 47
Posts: 1
Likes: 0
Received 0 Likes
on
0 Posts
Good write up...one warning
Very good write up.
I did this last weekend and only have one warning...
The metal clips that are along the top of the glove box are sometime very sticky. I made the mistake of pulling or wiggling the compartment cause I had the right side free. This resulted in partially breaking the plastic part of the left most clip.
The warning is when you're pulling the plastic part behind the glove box out, make sure you pull it directly towards you if you are sitting in the passenger seat, don't pull from the right side.
04-30-2009, 10:51 PM
#15
Road Racer / Solo Addict
Thanks! Subscribed to have it handy..
11-07-2009, 11:37 AM
#16
Instructor
I'm getting stuck at
"Now gently twist the exposed lightbulb socket a 1/4 turn to remove the bulb."
I popped the light bulb out but how do you turn the lightbulb socket 1/4 turn? Is that the white part we're turning or the black part switch?
"Now gently twist the exposed lightbulb socket a 1/4 turn to remove the bulb."
I popped the light bulb out but how do you turn the lightbulb socket 1/4 turn? Is that the white part we're turning or the black part switch?
 :
12-31-2009, 12:45 PM
:
12-31-2009, 12:45 PM
#18
10th Gear

Join Date: Dec 2006
Posts: 10
Likes: 0
Received 0 Likes
on
0 Posts
Cabin Filter replacement video
Check out the UTube video. A video is worth a thousand pictures.
http://www.flurl.com/video/44365933_...nac_filter.htm
http://www.flurl.com/video/44365933_...nac_filter.htm
12-31-2009, 01:08 PM
#19
Intermediate
Join Date: Oct 2005
Location: lakewood, washingto biizzzieee
Age: 40
Posts: 40
Likes: 0
Received 0 Likes
on
0 Posts
i needed to replace the filter in ma cabin soooo badly...82k and still hasn't been replace...
this helps much much mucho!!!!!
thanks mang!
this helps much much mucho!!!!!
thanks mang!
02-19-2010, 05:38 PM
#21
1st Gear

Join Date: Feb 2010
Posts: 1
Likes: 0
Received 0 Likes
on
0 Posts
3G cabin filter replacement help needed
In regard to your 3G tl cabin filter replacement-Lots of pics, I can't "safely pry down on the assembly to work the metal clips free". Where do I pry, and what direction? In general the post is done very well.
02-19-2010, 07:04 PM
#22
J Bill
Join Date: Feb 2005
Location: Tulsa, OK
Age: 54
Posts: 122
Likes: 0
Received 0 Likes
on
0 Posts
There is one difference between the original poster and the video. The guy in the video, as his first step, removes a piece from underneath the glove box. Is this necessary or not?
 02-20-2010, 01:10 PM
#25
10th Gear

Join Date: Dec 2008
Posts: 14
Likes: 0
Received 0 Likes
on
0 Posts
I was at the dealer yesterday to get a new battery under warranty. Asked about the filter replacement. $20 for the filter... $100 for the installation. I followed the above post and did it in 15 minutes. Be careful pulling out the assembly, the left side on mine was very stubborn.
@ProjectX, mine has 35K on it.
@ProjectX, mine has 35K on it.
02-20-2010, 05:03 PM
#27
J Bill
Join Date: Feb 2005
Location: Tulsa, OK
Age: 54
Posts: 122
Likes: 0
Received 0 Likes
on
0 Posts
This post motivated me to change my own cabin filter this weekend on my '04 TL. Between the pictures the OP took and the video that was linked in post #18 this was a piece of cake. I'm not mechanically inclined and this took me no longer than 20 minutes. It will only take 5 to 10 the next time.
Thanks for sharing the pics!
Thanks for sharing the pics!
 02-21-2010, 08:15 PM
#30
I did mine a couple of days ago and took pics to do a write up but I see we already have one. I used a Purolator cabin filter, I got it for like $18 at pepboys. Might I also add the filter is the same for the 2004 Accords but the install is way easier on the Accord. All you have to do is lower the glove box door and the tray is right there no need to remove the glove box like on the TL's. I was miffed about that.
02-22-2010, 02:12 AM
#33
Pro
Join Date: Jul 2008
Location: New York
Age: 40
Posts: 539
Likes: 0
Received 0 Likes
on
0 Posts
02-22-2010, 12:59 PM
#36
Full of water...
And be VERY careful if its cold out. Plastic breaks much easier when cold. If you need to do it in the winter let the car warm up a bit inside before you tear things down.


