
Valve Adjustment Pics
 04-14-2012, 01:30 PM
#1
Valve Adjustment Pics
First, this post is NOT intended to be a DIY or procedure for doing a valve adjustment.
This is the first time I have done a valve adjustment on this engine so I do not consider myself an expert and do not want to misguide anyone.
However, in researching the procedure before starting the work, I found very little quality info on the subject - so I wanted to post this info for anyone else who needs quality pics and shop manual pages.
Here are a few things I learned through the process:
1. Do NOT overtighten the valve cover bolts - they will break. I used the recommended torque from the manual and broke one of the bolts and stretched a few others. Very disappointing when I was about 30 min from completing the job without any mistakes...you know how it goes sometimes.
2. I don't feel that replacing any of the gaskets was necessary on my particular engine - even though I did end up replacing them all since I had already ordered them and had them available. All of the gaskets are metal except for the valve cover gaskets - which are thick rubber and fit in a grove on the valve cover. Most people would probably recommend replacing the valve cover gaskets and not replacing the upper & lower intake's metal gaskets - I would agree. This is subject to debate and I'm sure different people will have different opinions.
3. The engine knock sensor wiring harness is very brittle and the wire sheathing broke on mine when I moved it around. I replaced it for $5 so that I wouldn't have to worry about going back in to get it later if it ever failed - it is way in there under the lower intakes.
4. I cleaned all the intake passages very will with B-12 carb cleaner. Special attention should be give to the EGR tube and passages. I think cleaning these is what smoothed my idle out drastically.
5. To remove the lower intake 'plenums' you must disconnect the fuel lines. This is done easily by removing the (brown or aqua) cover and then squeezing the fitting. I just put a rag around the fitting when I was doing it so that in case it squirted all over it wouldn't shoot me in the eye. Since the engine had been sitting over night, there was actually very little pressure.
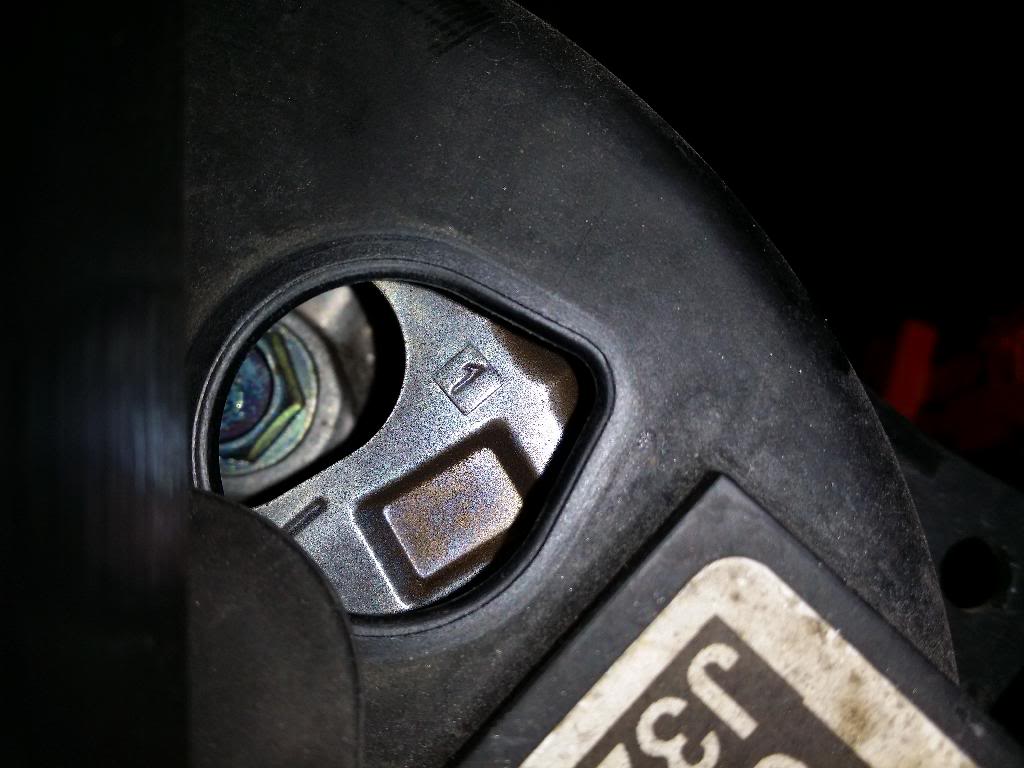
6. There are some rumors that you need to remove the timing belt cover to see the alignment marks for setting TDC. This is incorrect advice. Leave the timing belt cover on and there is a little arrow inside the peep hole for aligning the cylinder to TDC on the pulley - the manual shows it correctly.
7. I got the special valve adjustment tool and it seemed to go really well. All of my valves required tightening of about 1/8 turn on the screw - this was not expected.
My valve train is now much quieter and the engine runs very smooth now. My car has 185,000 mi and the engine runs like new again.
So here's the pics/resources:
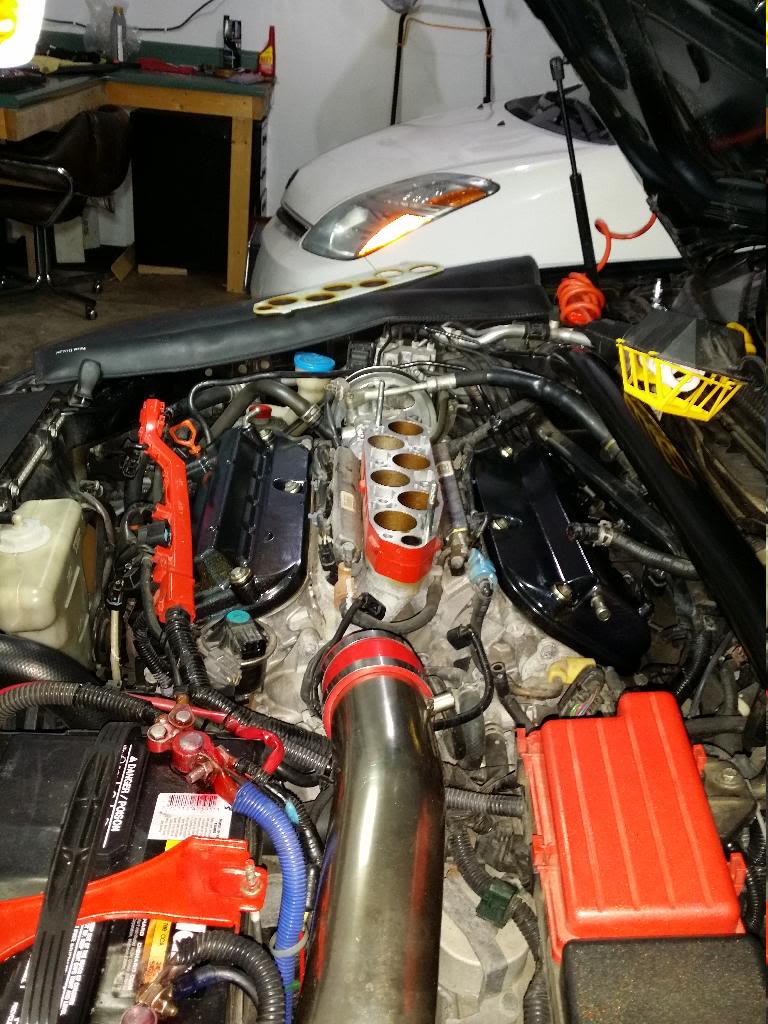
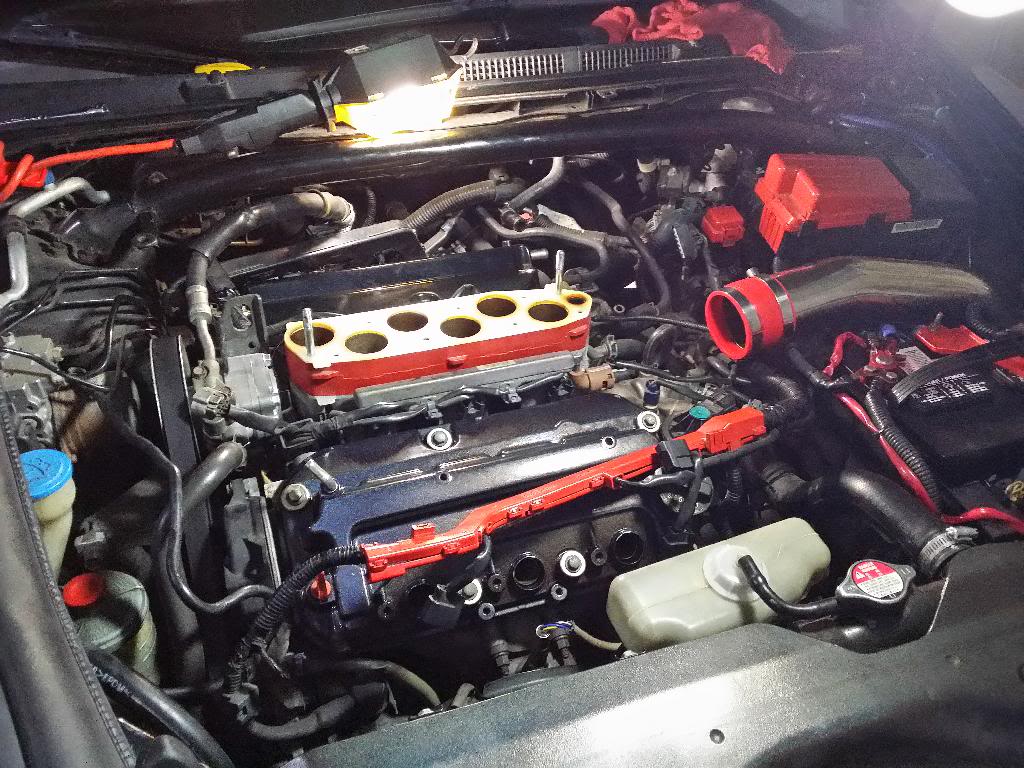
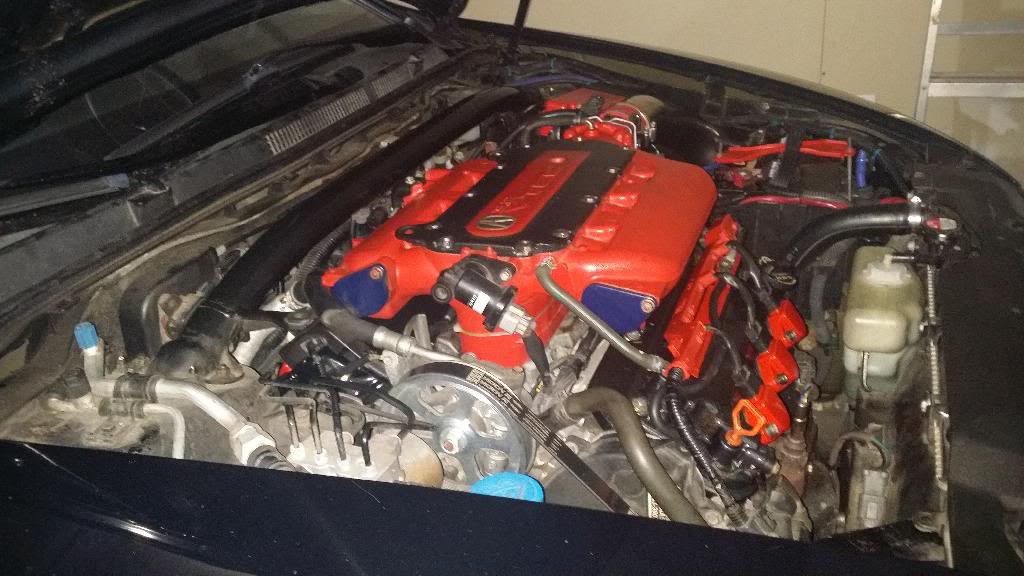
Complete engine (in case you can't figure out how something goes back together):

Intake cover removed with all the gunk:

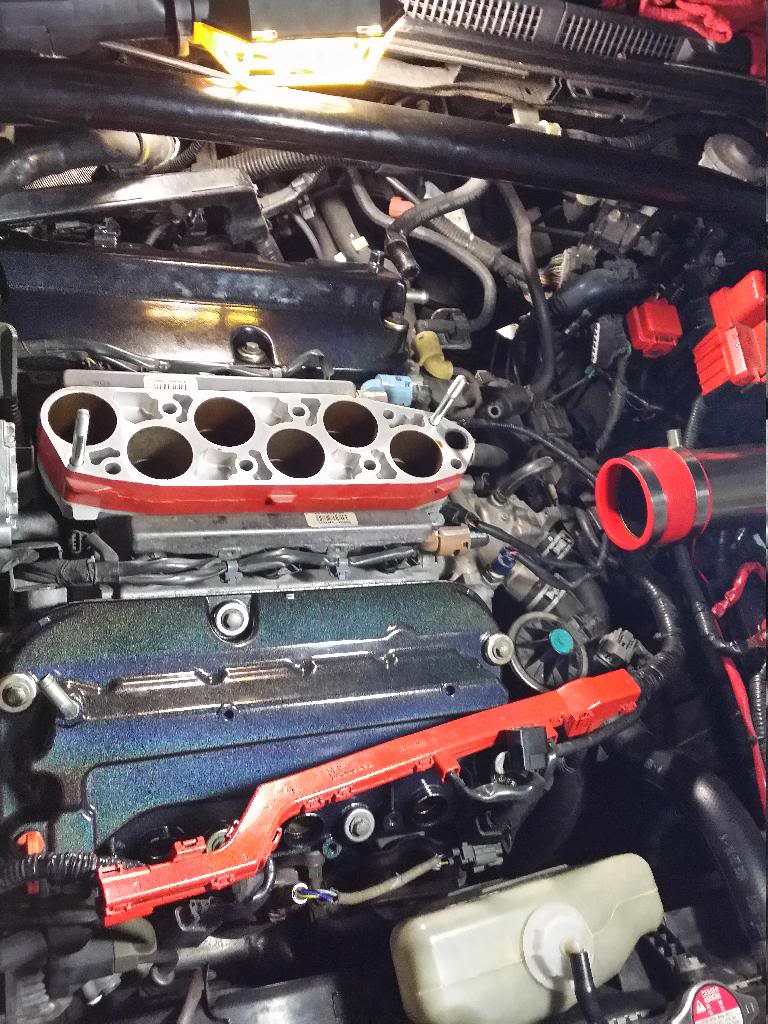
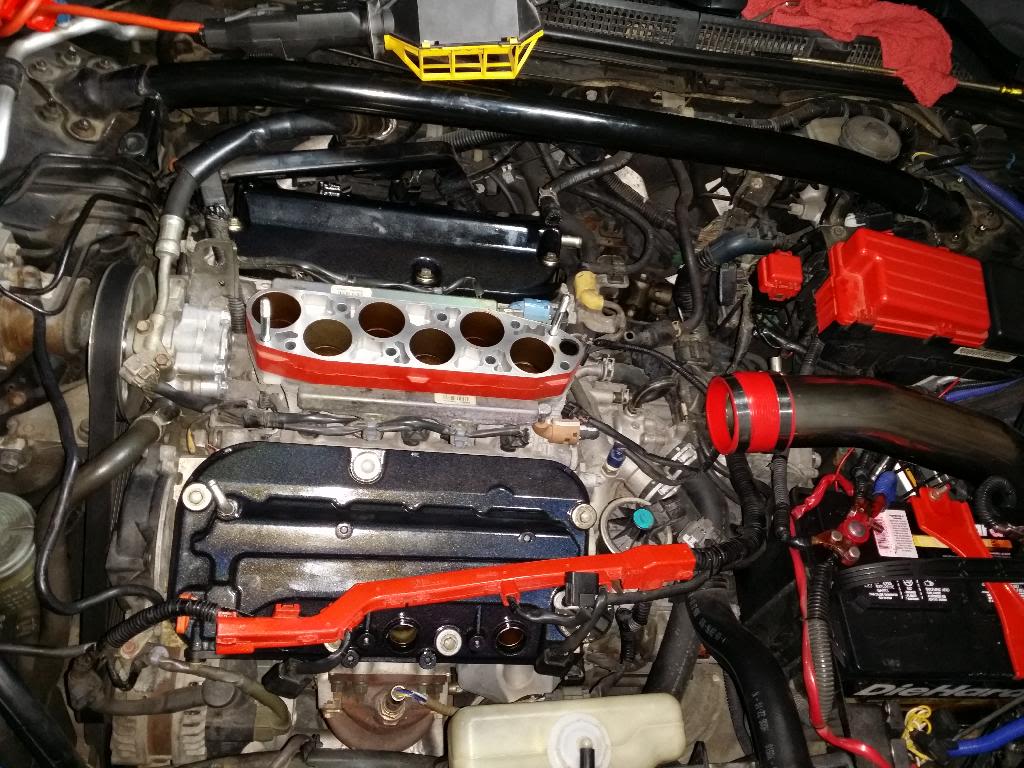
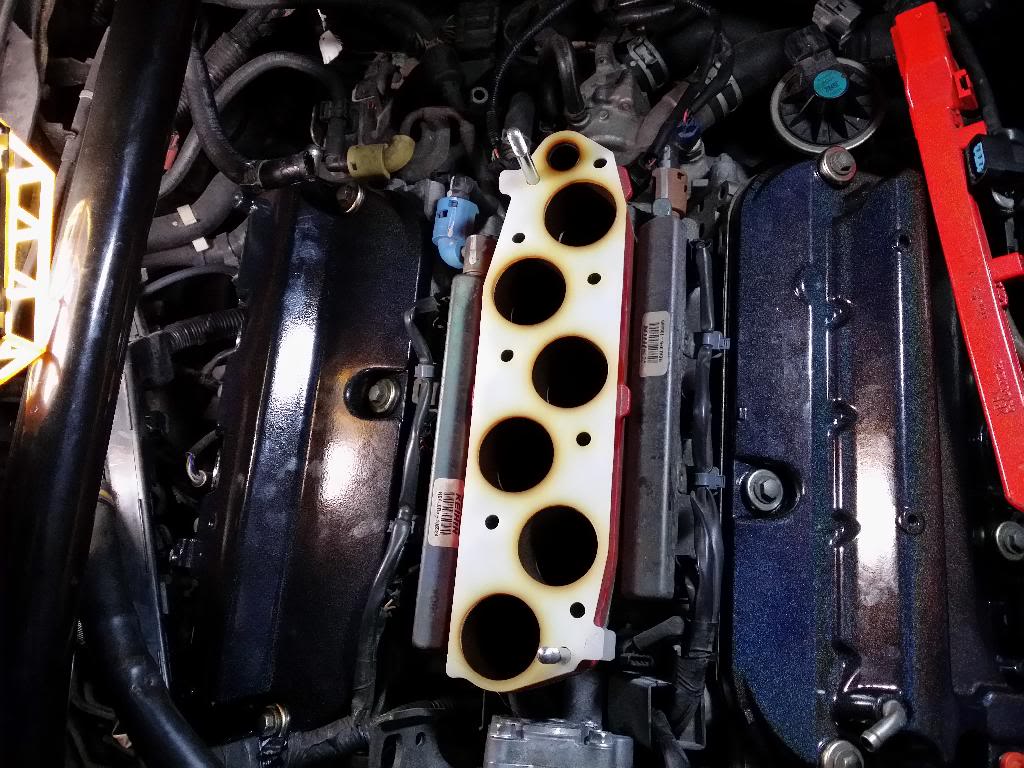
Intake manifold removed - showing the lower intake 'plenums':

Valve Cover Removed:

Close up of Valves:


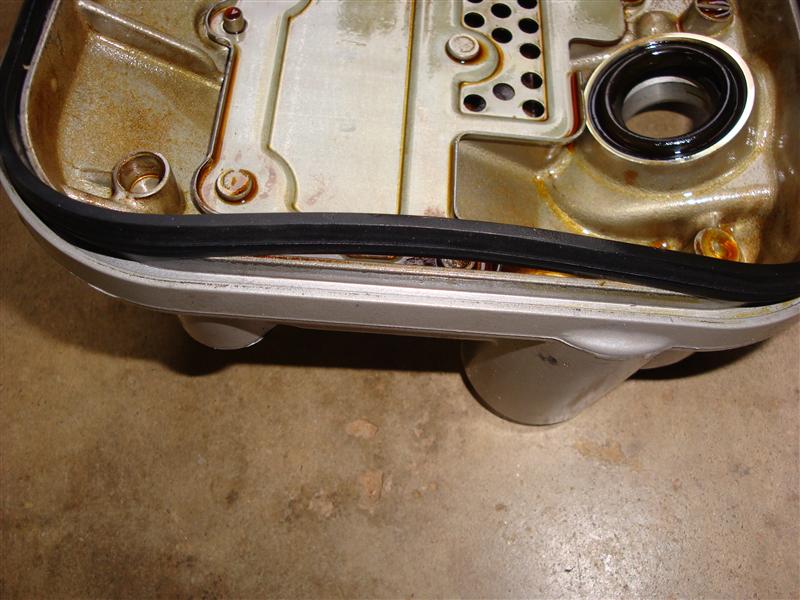
Bottom of Valve Cover, Gasket, and Bolts:


Lower Intake 'Plenem' with fuel line disconnected:

Front Intake Plenum removed and showing Knock Sensor wiring harness:


Lower intake plenums back on and clean. EGR passage is the small hole at all the way to the right side.

Upper Intake with cover gasket. EGR tube is the one to the right side with the 2 bolts holding it down inside the intake.

Shop Manual Pages Needed:


Good Luck
This is the first time I have done a valve adjustment on this engine so I do not consider myself an expert and do not want to misguide anyone.
However, in researching the procedure before starting the work, I found very little quality info on the subject - so I wanted to post this info for anyone else who needs quality pics and shop manual pages.
Here are a few things I learned through the process:
1. Do NOT overtighten the valve cover bolts - they will break. I used the recommended torque from the manual and broke one of the bolts and stretched a few others. Very disappointing when I was about 30 min from completing the job without any mistakes...you know how it goes sometimes.
2. I don't feel that replacing any of the gaskets was necessary on my particular engine - even though I did end up replacing them all since I had already ordered them and had them available. All of the gaskets are metal except for the valve cover gaskets - which are thick rubber and fit in a grove on the valve cover. Most people would probably recommend replacing the valve cover gaskets and not replacing the upper & lower intake's metal gaskets - I would agree. This is subject to debate and I'm sure different people will have different opinions.
3. The engine knock sensor wiring harness is very brittle and the wire sheathing broke on mine when I moved it around. I replaced it for $5 so that I wouldn't have to worry about going back in to get it later if it ever failed - it is way in there under the lower intakes.
4. I cleaned all the intake passages very will with B-12 carb cleaner. Special attention should be give to the EGR tube and passages. I think cleaning these is what smoothed my idle out drastically.
5. To remove the lower intake 'plenums' you must disconnect the fuel lines. This is done easily by removing the (brown or aqua) cover and then squeezing the fitting. I just put a rag around the fitting when I was doing it so that in case it squirted all over it wouldn't shoot me in the eye. Since the engine had been sitting over night, there was actually very little pressure.
6. There are some rumors that you need to remove the timing belt cover to see the alignment marks for setting TDC. This is incorrect advice. Leave the timing belt cover on and there is a little arrow inside the peep hole for aligning the cylinder to TDC on the pulley - the manual shows it correctly.
7. I got the special valve adjustment tool and it seemed to go really well. All of my valves required tightening of about 1/8 turn on the screw - this was not expected.
My valve train is now much quieter and the engine runs very smooth now. My car has 185,000 mi and the engine runs like new again.
So here's the pics/resources:
Complete engine (in case you can't figure out how something goes back together):
Intake cover removed with all the gunk:
Intake manifold removed - showing the lower intake 'plenums':
Valve Cover Removed:
Close up of Valves:
Bottom of Valve Cover, Gasket, and Bolts:
Lower Intake 'Plenem' with fuel line disconnected:
Front Intake Plenum removed and showing Knock Sensor wiring harness:
Lower intake plenums back on and clean. EGR passage is the small hole at all the way to the right side.
Upper Intake with cover gasket. EGR tube is the one to the right side with the 2 bolts holding it down inside the intake.
Shop Manual Pages Needed:
Good Luck

The following 17 users liked this post by scottn3:
03max6spd (02-02-2017),
05_NBP_TL (02-20-2013),
94eg! (04-16-2012),
bigwavedave25 (04-02-2020),
ggesq (02-08-2014),
and 12 others liked this post.
04-14-2012, 03:10 PM
#2
5th Gear

Join Date: Nov 2004
Location: Cal
Age: 45
Posts: 5
Likes: 0
Received 0 Likes
on
0 Posts
Excellent advice.
Is it really necessary to disconnect the fuel line? At least on the Odyssey service manual, there is no specific instruction to disconnect a fuel line and there is a picture on page 9-6 of removing the intake manifold and the fuel line appears not disturbed. Thanks.
See picture below.
Is it really necessary to disconnect the fuel line? At least on the Odyssey service manual, there is no specific instruction to disconnect a fuel line and there is a picture on page 9-6 of removing the intake manifold and the fuel line appears not disturbed. Thanks.
See picture below.
04-14-2012, 05:22 PM
#3
Yes, I should have clarified - disconnecting the fuel line is only necessary for removing the lower intake plenums for cleaning purposes. It is not necessary for removing the valve covers and the valve adjustment.
I felt it was a good idea to the extra time to clean out the intakes properly while in this deep.
I felt it was a good idea to the extra time to clean out the intakes properly while in this deep.
04-14-2012, 05:59 PM
#4
Burning Brakes

Just a few quick questions:
1. did any fuel spill out when you disconnect the fuel rail?
2. did you use new gaskets for every interconnecting piece of blocks you took off? The reason I asked this is because when I added the MDX intake manifold spacer, I didn't replace the upper cover gasket and I started getting oil mist leak
thanks
04-14-2012, 06:46 PM
#5
04-14-2012, 07:38 PM
#6
A little bit of fuel dripped out when I disconnected the lines but not much. I did replace all the gaskets but it did seem like a waste of money, especially for the metal lower intake gasket.
How did you know you were getting the leak at the upper cover gasket? So I'll know what to look out for...
How did you know you were getting the leak at the upper cover gasket? So I'll know what to look out for...
04-15-2012, 01:12 AM
#7
Race Director
Nice job on the pics.
Yeah, join the club. Those friggin valve cover bolts suck. I busted one of the center forward ones on the rear cover. Just left it and filled in with sealer.
The fuel line thing confused me at first because I was sure I didn't remove it.
Ditto on the gaskets, I returned my spark plug seals. I totally spaced on needing the manifold gaskets, so I just reused them. No issues.
All my valves were off by .001": exhaust were tight, intake loose.
Couldn't tell a bit of difference after the adjustment. Valve train/injectors/or whatever was just as noisy as before.
https://acurazine.com/forums/showpos...18&postcount=1
Trending Topics
04-16-2012, 10:01 AM
#9
Great write up. Once question... Did you completely remove the throttle body with the manifold, or did you just unbolt it and leave it in place? I've seen a video on an older V6's that shows it can stay behind while you lift the manifold up and slide it out.
09-24-2012, 04:13 PM
#11

Scottn3, i am looking to do my valve adjustment but i would like some guidance on locating a couple of items.
The service manual calls to remove the
1. intake manifold cover
2. remove the airintake duct
3. remove engine mount control solenoid vale, PCV hose, brake booster vac hose and vacuum hose
4. remove EVAP purge hose and water bypass hoses, then plug the water bypass hose (how do you plug the water bypass hoses?)
5. remove IAT, IAC, Trottle actuator connector (where is this located?) Map sensor, EVAP canister purge valve connector and IMRC solenoid valve connector ( how do you disconnect this?)
Remove cylinder head cover
and adjust valves according to specs on service manual.
09-24-2012, 05:08 PM
#12
Suzuka Master
nicely done
02-14-2013, 10:36 AM
#13
Delayed response...I completely removed the throttle body to get it out of the way and clean the butterfly area of all the gunk. Its not that hard to remove and cleaning it will give you smoother throttle response right off of idle.
02-14-2013, 01:24 PM
#14
Team Owner

I recently did mine too. I got one just a little loose and I know which one it is. Theres just a tiny little tap when the engine is cold and driven really easy. Just a couple spirited pulls, 0-50mph makes it go away completely, quiet as can be. It was an exhaust so in a bunch of miles it will go away even when cold.
The valvecover bolts have a positive stop so once you hit it you can stop. No need for a torque wrench. It makes sure the gasket has the correct compression, no way to screw it up.
The valvecover bolts have a positive stop so once you hit it you can stop. No need for a torque wrench. It makes sure the gasket has the correct compression, no way to screw it up.
02-14-2013, 04:17 PM
#15
takin care of Business in
iTrader: (5)
Join Date: Jan 2008
Location: Kansas City, MO
Age: 40
Posts: 30,994
Received 4,732 Likes
on
4,064 Posts
sub'd
I need to tackle this soon
I need to tackle this soon
 02-17-2013, 11:27 AM
#17
the overexplainer
02-17-2013, 03:33 PM
#18
Team Owner
I would go with around 105k or before if it's noisy. It's the quiet ones you have to look out for, they cause the damage.
02-19-2013, 11:14 PM
#19
4th Gear

Join Date: Feb 2013
Posts: 4
Likes: 0
Received 0 Likes
on
0 Posts
Excellent post - and more tips
Thanks for the great pics. I just sucessfully finished adjusting the valves on my 2004 Acura MDX, which has a similar engine. I learned a few things I'd like to pass on.
First, these videos from "Eric the car guy" helped a lot:
Second: Having the right tools makes the job a lot easier. Find the "Honda Valve Adjusting Tool" for about $10 and it will save lots of time. Similarly, if you can find a longer feeler guage for the exhausts, like the one Eric uses, it also helps - they're tricky to get to and adjust properly. I couldn't find them so I ended up removing the gauge from the set. I tied a string to the gauge and put a magnet on the other end so I could fish the guage up when I dropped it. I also found that an LED worklight that has a magnet on the back allows you to stick it where you need it and have light where you are working. Mine is only about 3 inches x 5 inches, so it could go almost anywhere
Third: On the Acura, there is a wiring harness attached to the rear valve cover gasket. To adjust the valves and put the valve cover back on easily, you need more clearance than is ordinarily available. I was able to get an inch or two more by removing the power steering pump, which allowed access to a channel that the harness goes through. Opening the channel allows you to move the harness more freely and get the extra room.
Fourth: I replaced the seals around the spark plug tubes. They're a little bit of a bugger to get out. I gently pried them out with a screwdriver (don't use the gasket suface as a leverage point) and tapped the new ones in with a soft rubber mallet. I lubricated the inside of the seals with oil so that they slipped on easily when I put the valve covers back on. Taking your time and a little care, and everything goes smootly.
Fifth: While you're in there, clean out the EGR ports if needed. Give them a look. I also took the opportunity to re-tape the wiring conduits where the electrical tape had become brittle. Make sure and use a good quality tape rated for higher temperatures.
Thanks again for the pics. They saved me quite a bit of time (although it was still a bit tedious).
02-08-2014, 04:48 PM
#21
My contribution
Noticed I have some oil on a bolt attached to the front of the valve covers so had to get a gasket kit. Figured while the valves are off I'll paint them too. The spark plug gaskets were a nightmare without special tools. Had
to pry them out. Then forgot how I the new ones go in,like which side is up. My first set of gaskets was off Ebay (same brand they had on rockauto) and I literally had to hammer the plug gaskets into place. While reseaching which way I started thinking "why not do a valve adjustment". Bad idea that caused a 2 week nightmare.
LETTING PAINT DRY further after Baking the valves
<BR>
BEFORE touching the valves
While waiting for something to load on the computer I pulled up Eric The Car guy's video
.
"How to adjust valve clearance on a 2003 Honda Accord v6 " was helpful too for the adjustment from a different guy who seems less professional.
I was very weary of doing it incase of a mess up but my wonderful girlfriend said it looked easy. We went out,got a feeler gauge and had at it. She took the tools and pretty much pushed me out of the way.lol.


I left the spark plugs in which was a mistake because it made it much harder to turn the crank to TDC. It got late so we called it a day with the valve covers off. Cylinder 1 is hard to see so had to take a pic to see it.
Next day put it all back together and BAM... loud ticking and CEL came on with in 2 minutes of driving. My heart dropped with racing thoughts of how much it will cost to fix. Pulled the front valve cover off and adjusted it
myself and the loudest ticket went away but the rears were chattering and CEL still on. Tore everything down again only to find one spark plug gasket tore so had to spend $36 at Autozone to get a kit a day later just for one gasket. Decided to get Lucas Oil additive too which I feel helped quite it down. I did clean the valve covers and manifold with carb cleaner.
REINSTALLING PARTS
Now with gaskets in hand I pulled the spark plugs and began turning the crank to TDC. Went much smoother turning. The autozone gaskets seemed flymsier but went in without having to hammer. They should go in as pictured below with the ridged part that has a weak inner ring goes down facing the valves. Triple checked all the lash settings and made the intakes a hair tigher that what I did last time and the exhaust a hair looser. Cranked the engine over about twice, checking the lash each time.

Next day put it all together. Let the spark plugs disconnected and turned the igntion to turn the engine over,listening to any funny sounds before spark plug ignition. Over all it sounds just alittle quieter than before I even started this project. So vavles are fixed but CEL remains. P0138 bank 1 sensor 2 oxygen sensor faulty.
Did days of research finding which one that is,getting part numbers,and tutorials on how to replace it. Was calling around and found Orielys had it on sale so jumped the gun and ordered it. Courious on how to remove it I checked under the car,found it and looked ok. Wanted to see where the cable went to checked under the hood. Looking at the plug it was sitting where it should have been but not clipped in. I started kicking myself because that was the one thing I forgot that I unplugged thinking it'll give me more space to work with. CEL fixed.
I plan on taking a video of how it sounds because I had a odd noise starting after I did the timing belt about a year ago and seems to have cleared up by now. Can't wait for spring so I can take pictures outside and not freeze.
FINISHED

Whole thing took about 2 weeks between letting paint dry,getting parts,and researching. I learned lots about how combustion,valves and how oxygen sensors worked. If you plan on trying this take your time and do it right the first round so you don't end up like me. Once you the get hang of adjusting it's really easy, my non mechanical girl friend can do this,you can too but recheck their work.lol
to pry them out. Then forgot how I the new ones go in,like which side is up. My first set of gaskets was off Ebay (same brand they had on rockauto) and I literally had to hammer the plug gaskets into place. While reseaching which way I started thinking "why not do a valve adjustment". Bad idea that caused a 2 week nightmare.
LETTING PAINT DRY further after Baking the valves

<BR>


BEFORE touching the valves

While waiting for something to load on the computer I pulled up Eric The Car guy's video
I was very weary of doing it incase of a mess up but my wonderful girlfriend said it looked easy. We went out,got a feeler gauge and had at it. She took the tools and pretty much pushed me out of the way.lol.


I left the spark plugs in which was a mistake because it made it much harder to turn the crank to TDC. It got late so we called it a day with the valve covers off. Cylinder 1 is hard to see so had to take a pic to see it.

Next day put it all back together and BAM... loud ticking and CEL came on with in 2 minutes of driving. My heart dropped with racing thoughts of how much it will cost to fix. Pulled the front valve cover off and adjusted it
myself and the loudest ticket went away but the rears were chattering and CEL still on. Tore everything down again only to find one spark plug gasket tore so had to spend $36 at Autozone to get a kit a day later just for one gasket. Decided to get Lucas Oil additive too which I feel helped quite it down. I did clean the valve covers and manifold with carb cleaner.
REINSTALLING PARTS


Now with gaskets in hand I pulled the spark plugs and began turning the crank to TDC. Went much smoother turning. The autozone gaskets seemed flymsier but went in without having to hammer. They should go in as pictured below with the ridged part that has a weak inner ring goes down facing the valves. Triple checked all the lash settings and made the intakes a hair tigher that what I did last time and the exhaust a hair looser. Cranked the engine over about twice, checking the lash each time.


Next day put it all together. Let the spark plugs disconnected and turned the igntion to turn the engine over,listening to any funny sounds before spark plug ignition. Over all it sounds just alittle quieter than before I even started this project. So vavles are fixed but CEL remains. P0138 bank 1 sensor 2 oxygen sensor faulty.
Did days of research finding which one that is,getting part numbers,and tutorials on how to replace it. Was calling around and found Orielys had it on sale so jumped the gun and ordered it. Courious on how to remove it I checked under the car,found it and looked ok. Wanted to see where the cable went to checked under the hood. Looking at the plug it was sitting where it should have been but not clipped in. I started kicking myself because that was the one thing I forgot that I unplugged thinking it'll give me more space to work with. CEL fixed.
I plan on taking a video of how it sounds because I had a odd noise starting after I did the timing belt about a year ago and seems to have cleared up by now. Can't wait for spring so I can take pictures outside and not freeze.
FINISHED


Whole thing took about 2 weeks between letting paint dry,getting parts,and researching. I learned lots about how combustion,valves and how oxygen sensors worked. If you plan on trying this take your time and do it right the first round so you don't end up like me. Once you the get hang of adjusting it's really easy, my non mechanical girl friend can do this,you can too but recheck their work.lol
 02-01-2017, 09:54 AM
#25
No. The thread starter deleted his pictures. Hate it when that happens. you google search a how-to and find all the pictures have been deleted so the links are broken. 
What brand gaskets did you guys go with for valve cover and intake manifold? I heard Victor Reinz was a good brand.
What brand gaskets did you guys go with for valve cover and intake manifold? I heard Victor Reinz was a good brand.
02-01-2017, 09:56 AM
#26
Senior Moderator
Oem
02-01-2017, 10:05 AM
#27
Team Owner
I too suggest OEM. They aren't cheap, but they will last a very long time. When it comes to gaskets of any kind for our cars, I highly suggest sticking with OEM.
02-01-2017, 11:27 AM
#28
Well my 08 has 77k miles. Having the timing belt job done/valves adjusted by a friend who is a Honda tech. Ordered a lot of stuff but haven't ordered the valve cover gaskets/intake gasket. Wasn't sure if there is an OEM quality gasket. Who makes the Acura gaskets? Is it like Aisin on the waterpumps which is pretty much Honda OEM?
Is this the right part for the valve cover? 2 needed correct https://www.acurapartsdiscount.com/o...dXRvbWF0aWM%3D
And the intake manifold?
https://www.acurapartsdiscount.com/o...9tYXRpYw%3D%3D
Is this the right part for the valve cover? 2 needed correct https://www.acurapartsdiscount.com/o...dXRvbWF0aWM%3D
And the intake manifold?
https://www.acurapartsdiscount.com/o...9tYXRpYw%3D%3D
02-03-2017, 10:53 AM
#29
Weird it won't let me edit my post. To edit information out.
https://www.acurapartsdiscount.com/o...9tYXRpYw%3D%3D Is the intake manifold gasket I need according to the local Acura dealer, not the one I have listed above. He said they are metal and never go bad and not to worry about replacing it.
https://www.acurapartsdiscount.com/o...9tYXRpYw%3D%3D Is the intake manifold gasket I need according to the local Acura dealer, not the one I have listed above. He said they are metal and never go bad and not to worry about replacing it.

Thread
Thread Starter
Forum
Replies
Last Post
IBankMouse
1G TSX (2004-2008)
8
06-13-2020 12:53 PM
rp_guy
Member Cars for Sale
9
07-16-2017 07:33 AM