
DIY: Carbon Fiber Overlay (real CF)
 11-14-2013, 08:36 PM
#1

DIY: Carbon Fiber Overlay (real CF)
I managed to wrap one of my engine bay trims, the only one I'll be using, in carbon fiber and thought I'd make a DIY in case anyone else cares to make the attempt.
It's not as difficult as a lot of people make it out to be, this was my first try and it came out very well - on a very curvy piece so don't be too afraid to attempt it.
The materials to get it all done and the amount of time it takes is consuming though, this project took about 6 days total, due to the curing windows of the epoxy.
Please note here, it's not cheap. The epoxy is expensive and all of the little bits add up. Expect to spend at least $150-$200, but that should get you enough materials to do quite a few parts.
So here's a rundown of what you'll need.
1 - Base Epoxy
If you're overlaying a plastic part I recommend West System Gflex, otherwise you can use your top coat epoxy here as well and just dye it black.
2 - Black epoxy dye
3 - Top Coat Epoxy
West System 105/207 is the stuff to use here, I read around on CF forums and while its expensive it's the best and it has some UV inhibitors formulated into it.
4 - Foam Applicators
5 - Mixing Stick
6 - Mixing Cups
7 - Sandpaper, 150 grit, 400 grit, 600 grit, 2000 grit & 3000 grit
8 - Rubbing Compound
9 - Buffer & Buffing Pad
10 - Clear Coat (optional)
I recommend Spraymax 2K Glamour Clear, it's a 2-part urethane clear coat with UV inhibiting properties and great chemical and weather resistance.
11 - Respirator w/ cartridges, nitrile gloves & goggles (respirator if you're using the clear coat & while working around the wet epoxy)
12 - Lego Blocks (the big ones)
13 - Bench, ventilation & space to work.
14 - Raw carbon fiber
It can be purchased in many colors and weights, for overlays most use the 3k twill weave. The 3k is going to conform better to contours.
15 - Painter's masking tape (the blue stuff works)
16 - Exacto Knife w/ extra blades
17 - Scissors
18 - Epoxy Syringes (optional)
19 - Dremel with cut-off wheel (optional)


To start off you're going to need to sand your piece, I used the 150 grit to accomplish this but it's actually recommended to go courser so you can use something like 80 grit if desired.
Also going to want to fill any holes or other parts that aren't going to be a part of your final piece. Since there were a few parts that I knew weren't going to be a part of my final piece - like some of the holes - I got rid of them. For the holes I sanded the edges under the holes I wanted to fill, washed the part off and placed some painter's tape underneath the holes.
Next I mixed some of the Gflex epoxy in a small mixing cup, make sure to scrape down the sides while mixing. Once the gflex is mixed add a small amount of black dye to the epoxy, it doesn't take much at all, and mix it further. If you add too much dye the epoxy may not cure.
Wipe off your mixing stick - so you can re-use it - while the epoxy is still wet. Make sure to remove it all if you plan to re-use the same stick.
Next fill an epoxy syringe with the epoxy and inject it into the areas that you want to fill. Let this cure 24 hours to harden and then sand the spots smooth and you should have something like this.
You can also trim parts off the piece that you're not going to need. If you notice I've removed some of this part where the other engine bay pieces would clip into. I don't have those installed and they'd get in the way of the wrap job for me.

Otherwise you can start with your sanded part, once it's been washed and cleaned from debris. I use dish soap to accomplish this after sanding. Don't forget to sand the backside where the carbon will wrap around. Any part you want the epoxy to hold carbon to needs to be sanded.

Once your part is ready for the overlay, you need to size up the overlay.
Roll out the sheet and size it up as so, make it a little bigger than your piece and cut it with the scissors. Be delicate, you can easily cause the weave to unthread and give yourself enough of a buffer for the parts that do unthread.

Now we need to mix more epoxy and dye it black again. This time mix enough to cover your piece in a thin layer of epoxy with one of the foam brushes.
Apply it to the part with the brush, get the edges too and the bottom where it'll be wrapped around, wear some gloves here.

Now you need to wait about an hour, depending on the temperature. The goal here is to allow the epoxy to come to a tack, to where it stays on the part but is still sticky. Test by touching it with a finger with a glove on. The Gflex will harden quickly and since I needed a lot of time to wrap the part I waited about 45 minutes and went ahead with applying the carbon while some of the epoxy was still coming off on my finger.
This is the difficult part, apply the carbon and wrap it around the edges then tape the edges down on the back side. Don't worry too much about the back side of the part, if your piece has one like this one does. Mine looked like slop, we can fix that later and trim to the edges. You don't want to distort the weave here and if it does and sticks to the epoxy it'll probably make it worse to try to fix it, you can really end up with a mess here. Be delicate with the carbon.
You're going to need the scissors here to cut it so you can wrap it around some of the contours, careful not to get the shreds of carbon fiber all over your piece.
You're also going to need to sort of temper your expectations and come up with creative solutions here. I ended up trimming the piece where the hood latch goes out in a later step using a dremel. Carbon simply isn't going to be able to wrap everything, but if you're creative enough you can come up with something that will work.
If you have experience wrapping vinyl on parts, the wrapping stage of this will be a bit easier. It's not an exact parallel, but its a similar process. The carbon is definitely a little more difficult to work with.

As you can see the 3k will conform to a really curvy piece. Once you've got the top sorted and the bottom taped off it's time to mix up some of the 105/207.
Mix it and apply it to the top of your part with another foam applicator. I did one fairly thick layer here, but if I did it again I would do several thin layers and wait about 30 minutes between applying a layer of epoxy. Try to get epoxy onto the bottom of the part as well where the carbon was wrapped around.
If you can't, like I couldn't, that just meant an extra day. I waited 24 hours for the top coat to cure then flipped the part over and applied epoxy to the parts on the bottom that were taped off. First I removed the tape though, that way I could trim it without having carbon flying all over the place.

Now we get to leave it alone for 24 hours before trimming.
The next step is to trim the carbon from any holes that you're going to need on the final part. Use an exacto knife for this. I also trimmed the edges on the bottom, since the epoxy on the top held it on fine I trimmed the bottom that was wrapped around right up to the edge all of the way around. I left the curved part so it has the appearance of being a molded carbon part.
Now sand with the 150 grit again. The idea here is to smoothen out the epoxy, since I didn't have enough on the surface I didn't sand too much. Careful here you don't want to sand through the carbon.
You can clean up imperfections on corners here, I had some stray carbon sticking out on the sharp edges and the wrap looked like ass at the point on the sides. I was able to clean it up and preserve the wrap, with the exacto knife and sandpaper.
Should have something like this, after cleaning again in dish soap and water, hopefully yours looks better at this stage.

The next step is to add more epoxy, add it to the surface in thin layers. Going to need a lot of mixing cups make sure you mix new epoxy for each layer.
Here it is after 4 more layers of epoxy, each 30 minutes inbetween.
After the final layer I waited about 30 minutes and went back to the piece with a clean foam brush and I leveled out some of the runs and cleaned off some of the drips. If you have these on the final part it's ok, it can be fixed, but it means more work later.
Here you can also see how I'm using the lego blocks to hold the part up. I was able to hold onto the large flat tabs that extend out of the bottom of this part while I was wrapping it.


Ok, now back to sanding. You can use the 150 grit again, but I took my time and did this work at 400 grit. About 4 hours of wet-sanding. After I was done I hit it with the 600 grit - this is to prepare the part for clear coat.
Alternatively if you want to fill imperfections with more epoxy then sand it at 150 grit again to make the surface smooth and go back to the previous step of adding more epoxy in thin layers and then back to sanding again. You can go back and forth here for a little while trying to get all the imperfections out. I didn't want to spend another 2 days on it, so I went ahead and prepared the part for clear coat.
You can see all of my imperfections here, spots where epoxy didn't fill in. But now it's even, thats the idea.


Once you've got a smooth part you have a few options. You can put more epoxy on it to get it glossy again in thin layers and try to keep it even or you can spray it with clear coat. If you're going to just leave your part finished with epoxy you should sand it at 150 grit. If you're going for clear coat 800 grit maximum. I stayed at 600 grit, if your part is too smooth the clear coat won't adhere, same for the epoxy.
Since I'm doing clear coat, after washing the part again in dish soap and water then allowing it to dry I took my whole setup outside.
I wiped the part down with a duplicolor prep wipe and then allowed it to evaporate, about 30 minutes.
Next you need to shake the spraymax 2k can for about 2 minutes.
Then activate it, remove the red button and put it on the bottom to activate the can and release the hardener.
Follow the instructions - another 2 minutes of mixing.
Next make sure you have some protective clothing, goggles, gloves and your respirator on with some new cartridges. The spraymax 2k contains ISOs, which are very hazardous to your health, follow the manufacturer's guidelines.
Next step is to spray the part, overlapping pattern.
First coat should be thin, it's a tack coat, if you go too thick it'll run.
Second coat can be light-medium I went ahead and put a medium coat on it.
Third coat should be medium.
That's all I got out of the can, it doesn't provide a lot of coverage and I won't spray the whole can over the part. The spraymax has a tendency to sputter when it starts to get empty and it'll throw big globs of the urethane out the nozzle. So I empty the last bits onto a block of wood and toss the can.
Here it is with clear coat on it.


If you used the spraymax you're going to notice it probably has some orange peel to it. Don't freak out, we can fix it later, but it needs 24 hours to cure first.
The next step is to remove the orange peel, bust out the hole again and this time the 2000 grit sandpaper.
Wet-sand away, careful around edges and don't over-do it you don't want to completely remove the clear coat that you put on just get rid of most of the orange peel - some will be ok it'll buff out later.
Next take the 3000 grit sandpaper and polish the part, it's still going to look a bit satin or not-really-glossy after sanding it at this level due to the thickness of the epoxy.
Next take out the buffer, put a new pad on it and buff the piece using your rubbing compound. You could skip the hand-sanding for polishing and just use different buffing pads and cutting compounds to remove the orange peel in steps that way as well.
I used meguiar's mirror glaze #7 since it's a polish and its safe for fresh paint or clear coat. My buffer is not a buffer at all - it's a random orbit sander. I used it on the lowest setting with those Surbuf pads and it worked out great. Picked them up at woodcraft, where you'll also find the 2000 grit sandpaper since thats pretty hard to find, the 3k sandpaper was available at an auto parts store (oreilly).
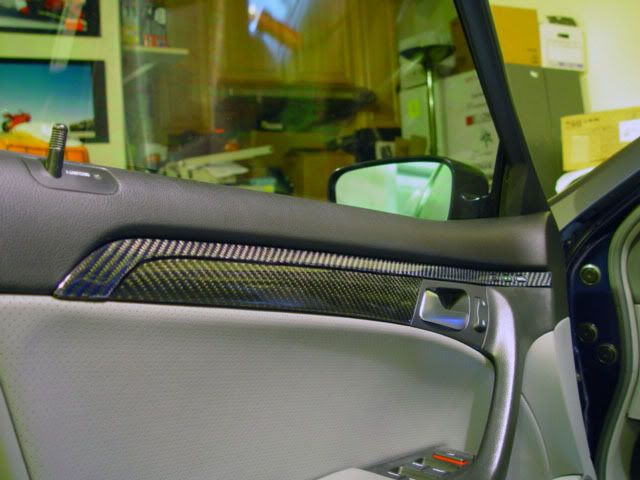
And here is the finished piece.


The epoxy & urethane clear coat is going to take about 7 days to reach a good cure and then it'll still be curing for the next 30-90 days or so. You don't want to put wax on the part until at least 30 days afterwards, so the epoxy and urethane can cure.
It's not as difficult as a lot of people make it out to be, this was my first try and it came out very well - on a very curvy piece so don't be too afraid to attempt it.
The materials to get it all done and the amount of time it takes is consuming though, this project took about 6 days total, due to the curing windows of the epoxy.
Please note here, it's not cheap. The epoxy is expensive and all of the little bits add up. Expect to spend at least $150-$200, but that should get you enough materials to do quite a few parts.
So here's a rundown of what you'll need.
1 - Base Epoxy
If you're overlaying a plastic part I recommend West System Gflex, otherwise you can use your top coat epoxy here as well and just dye it black.
2 - Black epoxy dye
3 - Top Coat Epoxy
West System 105/207 is the stuff to use here, I read around on CF forums and while its expensive it's the best and it has some UV inhibitors formulated into it.
4 - Foam Applicators
5 - Mixing Stick
6 - Mixing Cups
7 - Sandpaper, 150 grit, 400 grit, 600 grit, 2000 grit & 3000 grit
8 - Rubbing Compound
9 - Buffer & Buffing Pad
10 - Clear Coat (optional)
I recommend Spraymax 2K Glamour Clear, it's a 2-part urethane clear coat with UV inhibiting properties and great chemical and weather resistance.
11 - Respirator w/ cartridges, nitrile gloves & goggles (respirator if you're using the clear coat & while working around the wet epoxy)
12 - Lego Blocks (the big ones)
13 - Bench, ventilation & space to work.
14 - Raw carbon fiber
It can be purchased in many colors and weights, for overlays most use the 3k twill weave. The 3k is going to conform better to contours.
15 - Painter's masking tape (the blue stuff works)
16 - Exacto Knife w/ extra blades
17 - Scissors
18 - Epoxy Syringes (optional)
19 - Dremel with cut-off wheel (optional)
To start off you're going to need to sand your piece, I used the 150 grit to accomplish this but it's actually recommended to go courser so you can use something like 80 grit if desired.
Also going to want to fill any holes or other parts that aren't going to be a part of your final piece. Since there were a few parts that I knew weren't going to be a part of my final piece - like some of the holes - I got rid of them. For the holes I sanded the edges under the holes I wanted to fill, washed the part off and placed some painter's tape underneath the holes.
Next I mixed some of the Gflex epoxy in a small mixing cup, make sure to scrape down the sides while mixing. Once the gflex is mixed add a small amount of black dye to the epoxy, it doesn't take much at all, and mix it further. If you add too much dye the epoxy may not cure.
Wipe off your mixing stick - so you can re-use it - while the epoxy is still wet. Make sure to remove it all if you plan to re-use the same stick.
Next fill an epoxy syringe with the epoxy and inject it into the areas that you want to fill. Let this cure 24 hours to harden and then sand the spots smooth and you should have something like this.
You can also trim parts off the piece that you're not going to need. If you notice I've removed some of this part where the other engine bay pieces would clip into. I don't have those installed and they'd get in the way of the wrap job for me.
Otherwise you can start with your sanded part, once it's been washed and cleaned from debris. I use dish soap to accomplish this after sanding. Don't forget to sand the backside where the carbon will wrap around. Any part you want the epoxy to hold carbon to needs to be sanded.
Once your part is ready for the overlay, you need to size up the overlay.
Roll out the sheet and size it up as so, make it a little bigger than your piece and cut it with the scissors. Be delicate, you can easily cause the weave to unthread and give yourself enough of a buffer for the parts that do unthread.
Now we need to mix more epoxy and dye it black again. This time mix enough to cover your piece in a thin layer of epoxy with one of the foam brushes.
Apply it to the part with the brush, get the edges too and the bottom where it'll be wrapped around, wear some gloves here.
Now you need to wait about an hour, depending on the temperature. The goal here is to allow the epoxy to come to a tack, to where it stays on the part but is still sticky. Test by touching it with a finger with a glove on. The Gflex will harden quickly and since I needed a lot of time to wrap the part I waited about 45 minutes and went ahead with applying the carbon while some of the epoxy was still coming off on my finger.
This is the difficult part, apply the carbon and wrap it around the edges then tape the edges down on the back side. Don't worry too much about the back side of the part, if your piece has one like this one does. Mine looked like slop, we can fix that later and trim to the edges. You don't want to distort the weave here and if it does and sticks to the epoxy it'll probably make it worse to try to fix it, you can really end up with a mess here. Be delicate with the carbon.
You're going to need the scissors here to cut it so you can wrap it around some of the contours, careful not to get the shreds of carbon fiber all over your piece.
You're also going to need to sort of temper your expectations and come up with creative solutions here. I ended up trimming the piece where the hood latch goes out in a later step using a dremel. Carbon simply isn't going to be able to wrap everything, but if you're creative enough you can come up with something that will work.
If you have experience wrapping vinyl on parts, the wrapping stage of this will be a bit easier. It's not an exact parallel, but its a similar process. The carbon is definitely a little more difficult to work with.
As you can see the 3k will conform to a really curvy piece. Once you've got the top sorted and the bottom taped off it's time to mix up some of the 105/207.
Mix it and apply it to the top of your part with another foam applicator. I did one fairly thick layer here, but if I did it again I would do several thin layers and wait about 30 minutes between applying a layer of epoxy. Try to get epoxy onto the bottom of the part as well where the carbon was wrapped around.
If you can't, like I couldn't, that just meant an extra day. I waited 24 hours for the top coat to cure then flipped the part over and applied epoxy to the parts on the bottom that were taped off. First I removed the tape though, that way I could trim it without having carbon flying all over the place.
Now we get to leave it alone for 24 hours before trimming.
The next step is to trim the carbon from any holes that you're going to need on the final part. Use an exacto knife for this. I also trimmed the edges on the bottom, since the epoxy on the top held it on fine I trimmed the bottom that was wrapped around right up to the edge all of the way around. I left the curved part so it has the appearance of being a molded carbon part.
Now sand with the 150 grit again. The idea here is to smoothen out the epoxy, since I didn't have enough on the surface I didn't sand too much. Careful here you don't want to sand through the carbon.
You can clean up imperfections on corners here, I had some stray carbon sticking out on the sharp edges and the wrap looked like ass at the point on the sides. I was able to clean it up and preserve the wrap, with the exacto knife and sandpaper.
Should have something like this, after cleaning again in dish soap and water, hopefully yours looks better at this stage.
The next step is to add more epoxy, add it to the surface in thin layers. Going to need a lot of mixing cups make sure you mix new epoxy for each layer.
Here it is after 4 more layers of epoxy, each 30 minutes inbetween.
After the final layer I waited about 30 minutes and went back to the piece with a clean foam brush and I leveled out some of the runs and cleaned off some of the drips. If you have these on the final part it's ok, it can be fixed, but it means more work later.
Here you can also see how I'm using the lego blocks to hold the part up. I was able to hold onto the large flat tabs that extend out of the bottom of this part while I was wrapping it.
Ok, now back to sanding. You can use the 150 grit again, but I took my time and did this work at 400 grit. About 4 hours of wet-sanding. After I was done I hit it with the 600 grit - this is to prepare the part for clear coat.
Alternatively if you want to fill imperfections with more epoxy then sand it at 150 grit again to make the surface smooth and go back to the previous step of adding more epoxy in thin layers and then back to sanding again. You can go back and forth here for a little while trying to get all the imperfections out. I didn't want to spend another 2 days on it, so I went ahead and prepared the part for clear coat.
You can see all of my imperfections here, spots where epoxy didn't fill in. But now it's even, thats the idea.
Once you've got a smooth part you have a few options. You can put more epoxy on it to get it glossy again in thin layers and try to keep it even or you can spray it with clear coat. If you're going to just leave your part finished with epoxy you should sand it at 150 grit. If you're going for clear coat 800 grit maximum. I stayed at 600 grit, if your part is too smooth the clear coat won't adhere, same for the epoxy.
Since I'm doing clear coat, after washing the part again in dish soap and water then allowing it to dry I took my whole setup outside.
I wiped the part down with a duplicolor prep wipe and then allowed it to evaporate, about 30 minutes.
Next you need to shake the spraymax 2k can for about 2 minutes.
Then activate it, remove the red button and put it on the bottom to activate the can and release the hardener.
Follow the instructions - another 2 minutes of mixing.
Next make sure you have some protective clothing, goggles, gloves and your respirator on with some new cartridges. The spraymax 2k contains ISOs, which are very hazardous to your health, follow the manufacturer's guidelines.
Next step is to spray the part, overlapping pattern.
First coat should be thin, it's a tack coat, if you go too thick it'll run.
Second coat can be light-medium I went ahead and put a medium coat on it.
Third coat should be medium.
That's all I got out of the can, it doesn't provide a lot of coverage and I won't spray the whole can over the part. The spraymax has a tendency to sputter when it starts to get empty and it'll throw big globs of the urethane out the nozzle. So I empty the last bits onto a block of wood and toss the can.
Here it is with clear coat on it.
If you used the spraymax you're going to notice it probably has some orange peel to it. Don't freak out, we can fix it later, but it needs 24 hours to cure first.
The next step is to remove the orange peel, bust out the hole again and this time the 2000 grit sandpaper.
Wet-sand away, careful around edges and don't over-do it you don't want to completely remove the clear coat that you put on just get rid of most of the orange peel - some will be ok it'll buff out later.
Next take the 3000 grit sandpaper and polish the part, it's still going to look a bit satin or not-really-glossy after sanding it at this level due to the thickness of the epoxy.
Next take out the buffer, put a new pad on it and buff the piece using your rubbing compound. You could skip the hand-sanding for polishing and just use different buffing pads and cutting compounds to remove the orange peel in steps that way as well.
I used meguiar's mirror glaze #7 since it's a polish and its safe for fresh paint or clear coat. My buffer is not a buffer at all - it's a random orbit sander. I used it on the lowest setting with those Surbuf pads and it worked out great. Picked them up at woodcraft, where you'll also find the 2000 grit sandpaper since thats pretty hard to find, the 3k sandpaper was available at an auto parts store (oreilly).
And here is the finished piece.
The epoxy & urethane clear coat is going to take about 7 days to reach a good cure and then it'll still be curing for the next 30-90 days or so. You don't want to put wax on the part until at least 30 days afterwards, so the epoxy and urethane can cure.
Last edited by mzilvar; 11-14-2013 at 08:46 PM.

The following 9 users liked this post by mzilvar:
brian6speed (02-10-2014),
Corey_Straker (02-08-2014),
d1sturb3d119 (11-19-2013),
guitarplayer16 (11-15-2013),
Joneill44 (11-16-2013),
and 4 others liked this post.
 11-14-2013, 09:29 PM
#4
Yah it is expensive, but in contrast that $150-200 would get you enough materials to do just about all of the interior trim pieces (doors, dash aluminum trim & the big aluminum trim in the console).
There's a guy that has a website and does overlays on interior trim like that and he charges around $700 - over $1k for the work he does.
I know there was some CF trims in the blackmarket for a while that was going for $700 or so, I think the owner had paid over $1k for all of them to be done.
Now that I've done this piece I may give those parts a whirl at some later date, it's just having the car panels out and apart for that length of time is a bit much.
The epoxy is the most expensive part, the amount of epoxy in the image I posted is about $80 worth for the 105/207 if I remember right, then the Gflex is like another $20 or so.
I still have most of my epoxy left, it didn't take that much to do this, but I am almost out of gflex now I've been using that for other projects as well.

Trending Topics
11-14-2013, 10:19 PM
#8
I saw some in the blackmarket a long time ago, like I mentioned, but they were really expensive. They were done with black carbon and then black carbon & blue kevlar over the carbon inserts in the doors. It looked pretty good, but whoever did it had some serious skills to be able to lay two different pieces of carbon like that.
I've been trying to think of a way to replicate what he did, it's just expensive to have to replace one of those parts if you mess it up or frustrating to take all of the time to try to fix it.
11-15-2013, 03:42 AM
#12
The thin part where I trimmed out the hood latch area flexed quite a bit while I was sanding. The Gflex has essentially bonded the carbon fiber to the plastic making it a lot more like one piece.
That's actually why I went with Gflex for the base epoxy, most epoxies don't have very good adhesion when it comes to bonding to plastic, but gflex can be used to bond dissimilar parts in this way. If it wasn't sanded, cleaned, the wrong epoxy was used or the epoxy was mixed in the incorrect ratios and didn't properly cure the carbon could delaminate. The gflex is actually an orange in color if its not dyed too, so the dye is really necessary and only in very small amounts. Like a small drop will dye a large amount of epoxy.
I forgot to add to the post above, those pumps on the 105/207 aren't included with the resin and epoxy, they're sold separately. They ensure that the right amount of epoxy is pumped out to be mixed. Essentially one pump on the 105 and one pump on the 207 ensures a 3:1 mix, they sell it as a kit of a few pumps and you have to use the right ones for the epoxies you're using.
The Gflex needs to be eye-balled in a small plastic measuring cup for mixing epoxy to ensure a 1:1 mix or you could check data sheets and do it by weight, but the weights might not always be 1:1 if the resin or hardener is denser. By volume its 1:1 on the gflex though.
Last edited by mzilvar; 11-15-2013 at 03:48 AM.
11-15-2013, 08:22 AM
#13
I'm thinking the interior pieces, they're actually pretty simple compared to this piece.
I saw some in the blackmarket a long time ago, like I mentioned, but they were really expensive. They were done with black carbon and then black carbon & blue kevlar over the carbon inserts in the doors. It looked pretty good, but whoever did it had some serious skills to be able to lay two different pieces of carbon like that.
I've been trying to think of a way to replicate what he did, it's just expensive to have to replace one of those parts if you mess it up or frustrating to take all of the time to try to fix it.
Last edited by turtlecivic; 11-15-2013 at 08:26 AM.
11-15-2013, 08:29 AM
#14
Moderator
iTrader: (3)
Wow, excellent work and writeup.
11-15-2013, 08:56 AM
#16
Race Director
iTrader: (3)
Join Date: Feb 2012
Location: South Florida
Age: 30
Posts: 18,278
Received 3,824 Likes
on
2,847 Posts
Wow, that come out nicely! 
And at the Lego stands
And
at the Lego stands
11-15-2013, 09:02 AM
#17
Safety Car
Looks awesome
 11-15-2013, 04:32 PM
#23
Great job but one question. You clearly know how to do the work. Why waste good CF material on wrapping plastic when you can do the same with vinyl and clear coat it to get the same finish?
Plus you could essentially create your own CF quarter and hood and actually have a drop in weight. That way plastic parts could be cheaply wrapped and parts that need to be rigid would be the real deal.
Just a thought. I'm planning on creating the parts I want sometime when I can save up enough for the hood, quarter, trunk lid, sunroof and roof.
11-15-2013, 05:47 PM
#24
Great job but one question. You clearly know how to do the work. Why waste good CF material on wrapping plastic when you can do the same with vinyl and clear coat it to get the same finish?
Plus you could essentially create your own CF quarter and hood and actually have a drop in weight. That way plastic parts could be cheaply wrapped and parts that need to be rigid would be the real deal.
Just a thought. I'm planning on creating the parts I want sometime when I can save up enough for the hood, quarter, trunk lid, sunroof and roof.
Plus you could essentially create your own CF quarter and hood and actually have a drop in weight. That way plastic parts could be cheaply wrapped and parts that need to be rigid would be the real deal.
Just a thought. I'm planning on creating the parts I want sometime when I can save up enough for the hood, quarter, trunk lid, sunroof and roof.
11-15-2013, 06:02 PM
#25
Depends on what CF wrap you use I guess. 3M is pretty good but the painting part is right on. I was wondering if multiple paint coats could give it more depth.
I'm planning on working with fiberglass first before moving to creating cf parts. All n all exciting! Can't imagine all the stuff I could mold with that. Would be pretty cool to have that look.

Possibly to that level.
 11-15-2013, 07:22 PM
#26
My car is at a body shop right now, I won't have it back until next week.
Great job but one question. You clearly know how to do the work. Why waste good CF material on wrapping plastic when you can do the same with vinyl and clear coat it to get the same finish?
Plus you could essentially create your own CF quarter and hood and actually have a drop in weight. That way plastic parts could be cheaply wrapped and parts that need to be rigid would be the real deal.
Just a thought. I'm planning on creating the parts I want sometime when I can save up enough for the hood, quarter, trunk lid, sunroof and roof.
Plus you could essentially create your own CF quarter and hood and actually have a drop in weight. That way plastic parts could be cheaply wrapped and parts that need to be rigid would be the real deal.
Just a thought. I'm planning on creating the parts I want sometime when I can save up enough for the hood, quarter, trunk lid, sunroof and roof.
http://www.easycomposites.co.uk/Default.aspx
The instructional videos on their site:
http://www.easycomposites.co.uk/Learning.aspx
Here's some videos too.
11-15-2013, 07:38 PM
#27
If you're serious about making your own parts here's a website that sells everything you need to make your own hoods and such, they even have videos describing the process to use vacuum injection molding which should make you better parts than what you can currently purchase on the aftermarket for our cars.
11-15-2013, 07:40 PM
#28
Team Owner
iTrader: (2)
Join Date: Jan 2008
Location: Kansas City, MO (Overland Park, KS)
Posts: 36,545
Received 6,470 Likes
on
5,162 Posts
Love, love, love it!
11-15-2013, 08:56 PM
#29
Dry carbon is made using pre-impregnated carbon fiber. Essentially the sheet of carbon is pre-impregnated with the epoxy and then can be fit into an oven mold. The carbon then has to be auto-claved inside of the mold in order for the epoxy to cure, which ends up with a very light and strong part since there's no excess of epoxy and it's even.
I think next to dry carbon would be the epoxy infusion method for getting an even layer of epoxy throughout the part without the bubbles, pin-holes and such.
Excessive epoxy translates to a greater weight on the finished part and the epoxy and its thickness also effects the strength, flexibility and such of the final part.
11-17-2013, 10:25 PM
#31
Just remember to put enough epoxy on the edges. I had my entire engine bay CF overlayed on my 06 TL and when heat built up, the panel will warp. As it cools down it will goes back to its original form and when heat builts up again it will warp and causes to flex and you can see some discoloring on the edges and wills starts to crack over time. So just put enough epoxy. But flawless works!


 12-30-2013, 10:58 PM
#36
Really nice work just had a few questions...do you need to use the epoxy due if I'm doin the interior pieces? And also is the Gflex epoxy need for interior pieces?
Last edited by Steven Bell; 12-31-2013 at 02:50 PM. Reason: No need to quote the 1st post.
12-31-2013, 01:31 AM
#38
If you were going to do the interior pieces I'd practice on a piece you can afford to do without, in case it gets messed up and you're unhappy with the results.
Just want to re-state the clear-coat I used is extremely hazardous to your health, read the MSDS before-hand.
Last edited by Steven Bell; 12-31-2013 at 02:50 PM. Reason: Merged Posts
The following users liked this post:
Jz-tls (12-31-2013)
12-31-2013, 08:20 PM
#39
Ok thanks a lot! Is the epoxy dye needed?
The gflex will bond to plastic, thats why it was used its really hard to get anything to form a bond to plastic.
If you were going to do the interior pieces I'd practice on a piece you can afford to do without, in case it gets messed up and you're unhappy with the results.
Just want to re-state the clear-coat I used is extremely hazardous to your health, read the MSDS before-hand.
If you were going to do the interior pieces I'd practice on a piece you can afford to do without, in case it gets messed up and you're unhappy with the results.
Just want to re-state the clear-coat I used is extremely hazardous to your health, read the MSDS before-hand.