DIY - 6MT Shifter Cable Bushings
 11-16-2013, 10:56 PM
#1
Drifting
Thread Starter
iTrader: (1)
DIY - 6MT Shifter Cable Bushings
I wanted the feel of my shifter to be a bit more firm and after looking at the different types of shifter cable bushings available I decided to go with the Hybrid Racing ones from www.heeltoeauto.com (click here for more info). I am happy with the results, crisp shifts with minimal effort.
Fortunately the 4G TL has the same size as the 07-08 TL so I ordered those, but soon the site will be updated to show the the 4G as an option.
This is my first DIY so bear with me. I didn't figure out the socket sizes needed...just grabbed them until one fit and didn't take note. Fortunately all you need is a socket set, flathead screwdriver, and needle nose pliers to knock this out.
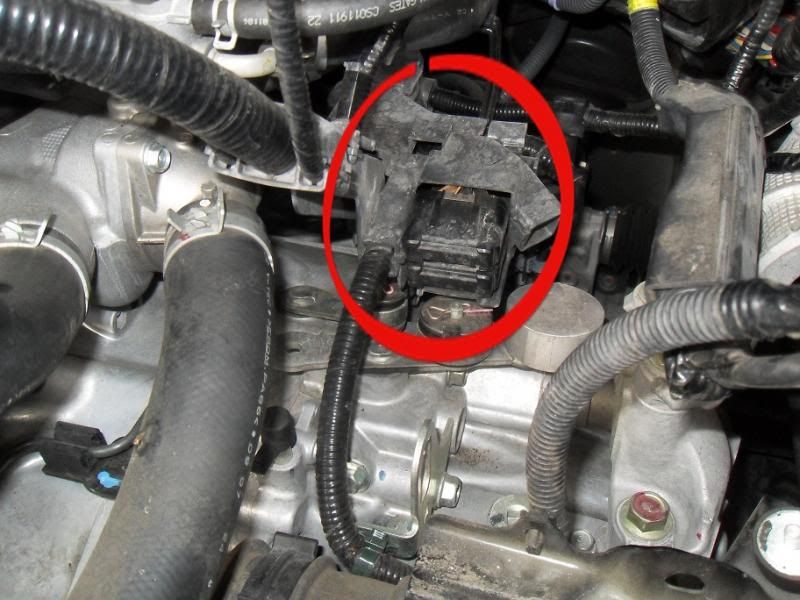
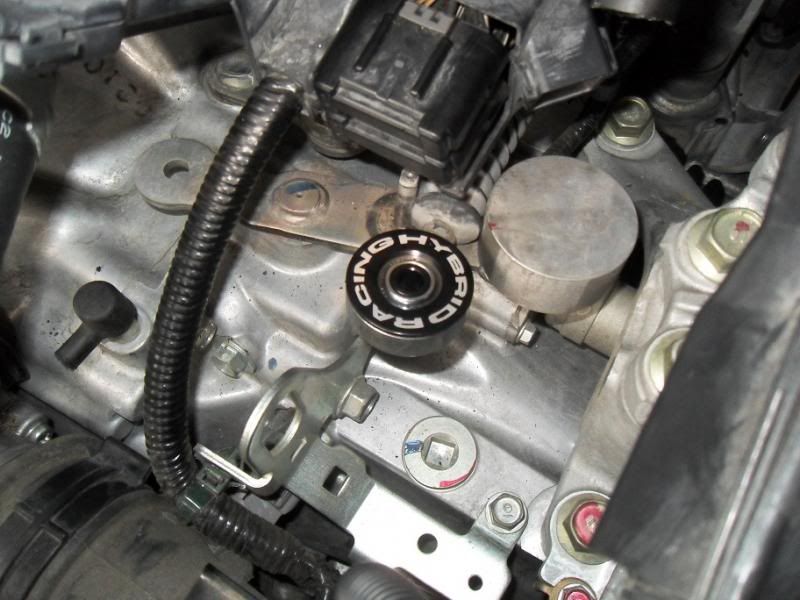
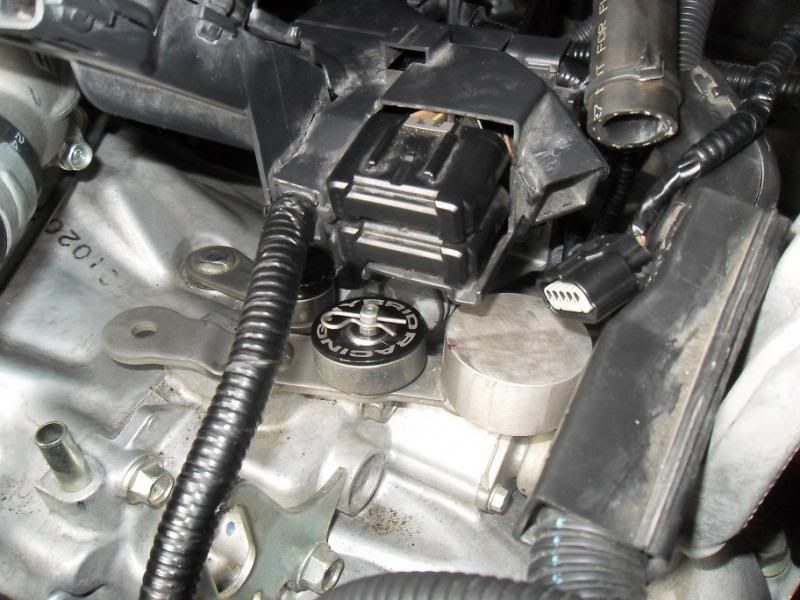
First, remove the engine covers. Here you can see the bigger stock bushing, just below the intake.

I removed the intake and battery. You definitely have to remove the intake and I can’t imagine being able to do it with the battery in.
This big black collection of wires makes the smaller bushing tough to get to...
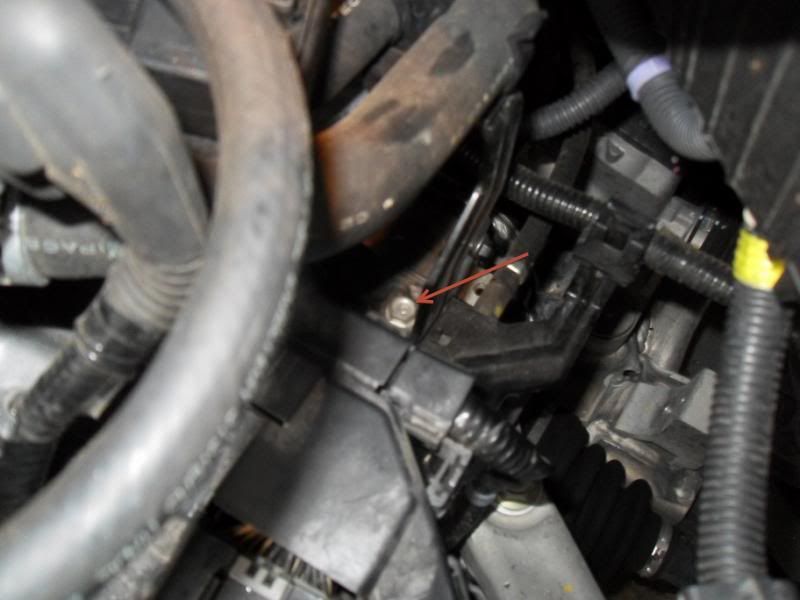
So behind it I took this bolt out and then pushed the green plastic clip out that sits by the battery. It at least allows you to move it out of the way a bit.
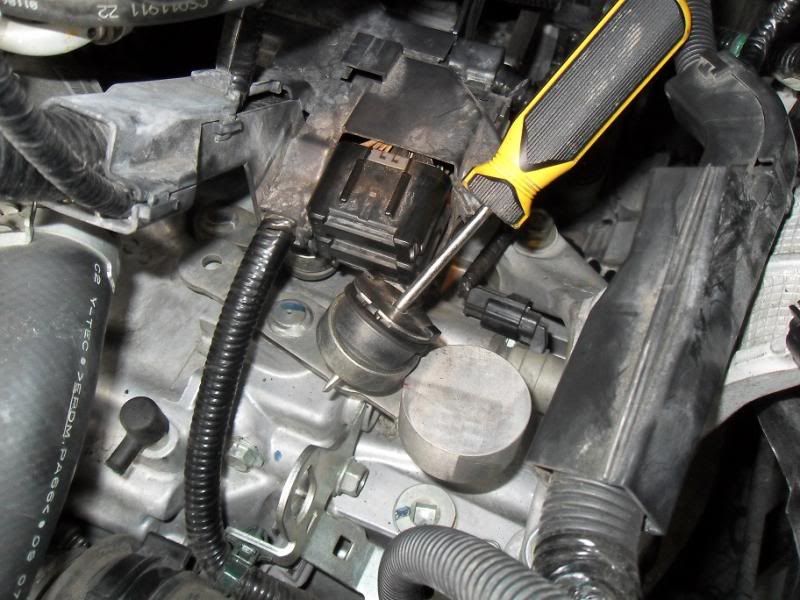
Remove the cotter pin and pull the bushing up, then use a screwdriver to pop it out.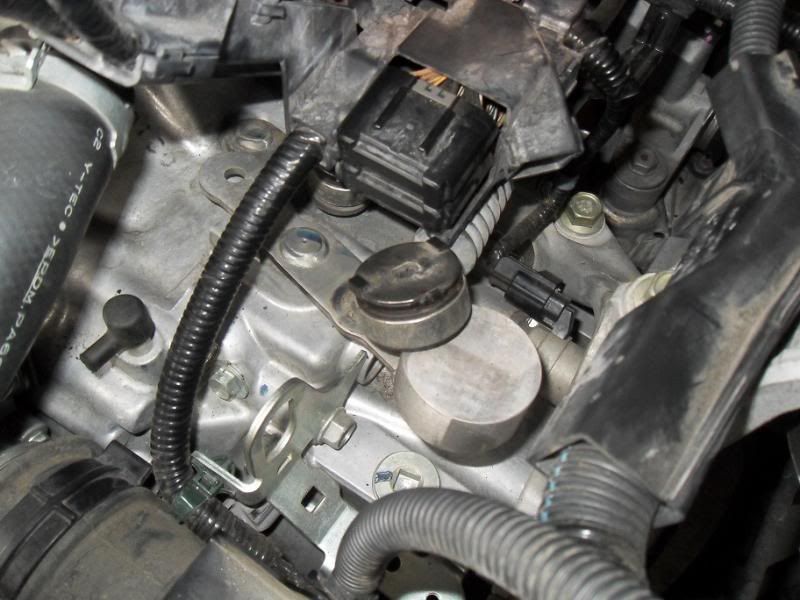
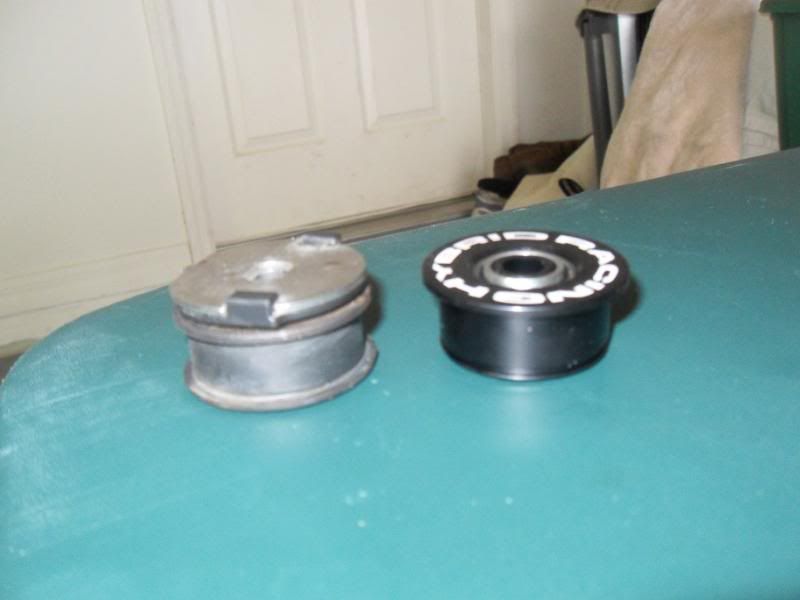
Here is OEM vs the Hybrid Racing. I think the fact OEM has the metal top adds rigidity so it seems better than some others I’ve seen. Because of that this mod won’t give you a night and day difference, though it is still noticeable.
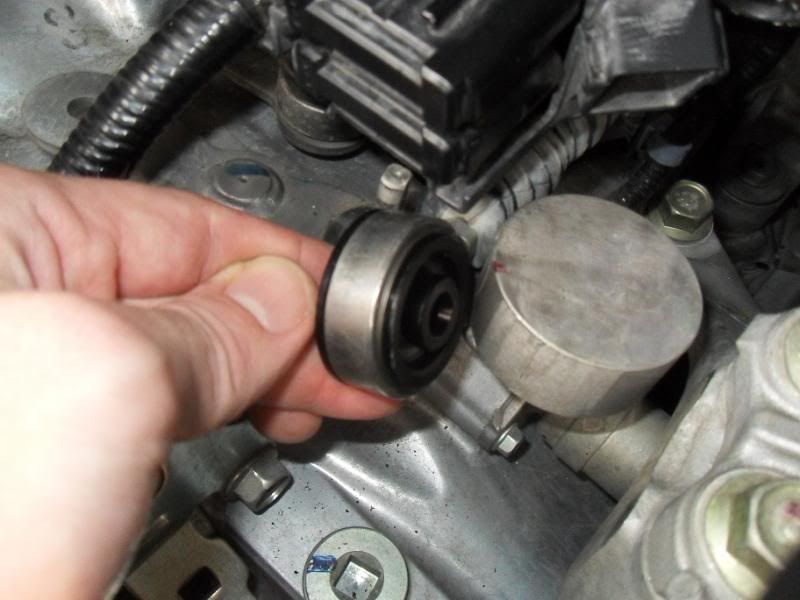
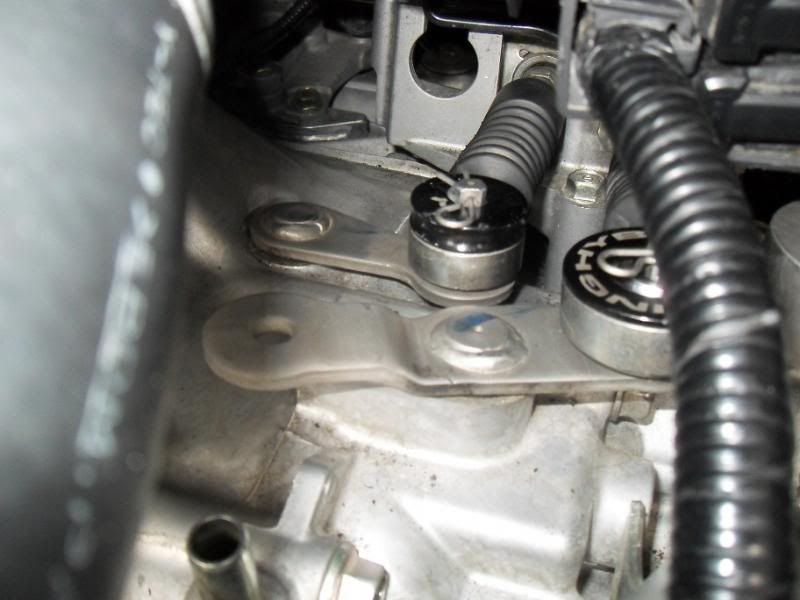
The big bushing goes on easy, though the retaining ring can be a bit tricky. I spread it apart and lined up the piece on the bottom first, then pulled to top part over.

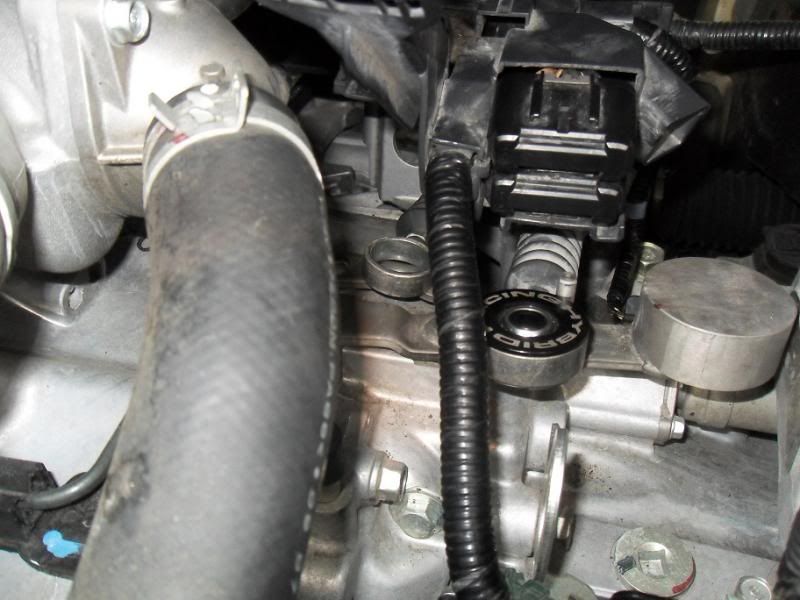
Here you can see it assembled.
Now the “fun” part begins. There is VERY LITTLE room to work when switching out the smaller bushing, and you can expect to have some cuts and bruises on your arms when you’re done. Having a second set of hands may help.
Try to keep everything above it out of the way while working and turn the shift lever on its side to get a better angle at the OEM bushing. Also, you may want to try a short screwdriver when popping it out.
Once it’s out the new one slips into shift lever easy. The retaining ring is difficult to get on due to limited space but be patient and use the method described above.
You’ll notice the inside hole of the Hybrid Racing bushing seems to be @ 1mm to small. The post it slides down on to will go in very little and get stuck, likely because you have to go at a slight angle. I ended up using a 10” extension and set it on the side of the bushing farthest away from the shift lever and gave it a couple light whacks with a hammer.
Then just install the cotter pin and you’re good to go.
If you’re like me and impatient you can row through the gears with the car off to get an idea of the new feel, before you re-install the intake and battery.
Fortunately the 4G TL has the same size as the 07-08 TL so I ordered those, but soon the site will be updated to show the the 4G as an option.
This is my first DIY so bear with me. I didn't figure out the socket sizes needed...just grabbed them until one fit and didn't take note. Fortunately all you need is a socket set, flathead screwdriver, and needle nose pliers to knock this out.
First, remove the engine covers. Here you can see the bigger stock bushing, just below the intake.

I removed the intake and battery. You definitely have to remove the intake and I can’t imagine being able to do it with the battery in.
This big black collection of wires makes the smaller bushing tough to get to...

So behind it I took this bolt out and then pushed the green plastic clip out that sits by the battery. It at least allows you to move it out of the way a bit.

Remove the cotter pin and pull the bushing up, then use a screwdriver to pop it out.


Here is OEM vs the Hybrid Racing. I think the fact OEM has the metal top adds rigidity so it seems better than some others I’ve seen. Because of that this mod won’t give you a night and day difference, though it is still noticeable.

The big bushing goes on easy, though the retaining ring can be a bit tricky. I spread it apart and lined up the piece on the bottom first, then pulled to top part over.


Here you can see it assembled.

Now the “fun” part begins. There is VERY LITTLE room to work when switching out the smaller bushing, and you can expect to have some cuts and bruises on your arms when you’re done. Having a second set of hands may help.
Try to keep everything above it out of the way while working and turn the shift lever on its side to get a better angle at the OEM bushing. Also, you may want to try a short screwdriver when popping it out.

Once it’s out the new one slips into shift lever easy. The retaining ring is difficult to get on due to limited space but be patient and use the method described above.
You’ll notice the inside hole of the Hybrid Racing bushing seems to be @ 1mm to small. The post it slides down on to will go in very little and get stuck, likely because you have to go at a slight angle. I ended up using a 10” extension and set it on the side of the bushing farthest away from the shift lever and gave it a couple light whacks with a hammer.
Then just install the cotter pin and you’re good to go.


If you’re like me and impatient you can row through the gears with the car off to get an idea of the new feel, before you re-install the intake and battery.
Last edited by Steven Bell; 11-18-2013 at 09:47 AM.

The following 7 users liked this post by ucf_bronco:
Ant$ (01-19-2014),
Art unique (11-17-2013),
bigwavedave25 (02-04-2020),
maddogtheta (11-29-2020),
narcotics (11-07-2020),
and 2 others liked this post.
 11-17-2013, 09:33 AM
#3
ufc,
Great write up, and thanks for taking pics of the procedure. It does not look too intimidating to do now that you walked us through step by step.
Can you confirm you got the bushing set listed for the 3G TL? I don't see one explicitly for the 4Gs on HeelToe, but it looks like the 3G and 4G use the same OEM shifter bushings on www.acuraoemparts.com.
http://www.heeltoeauto.com/hybrid-ra...roductid=65840
Also, have you considered putting in a weighted shift knob? I recently installed a 600g one from TWM Performance, and I feel I can get the shifter through the more troublesome gears (1st to 2nd, 5th to 6th, and neutral to reverse) a little easier now because of the extra mass behind each shift. There are a lot of cheaper weighted shift knobs out there (including Skunk2), but I chose TWM because I like the graphite color option they offer. I'm hopeful adding the Hybrid Racing shifter bushings make my shifting even better.
 11-17-2013, 03:05 PM
#5
Drifting
Thread Starter
iTrader: (1)
No problem everyone. I'm happy to finally give a little back to these boards. I've changed my oil, rear diff fluid, and MTF using DIY's from here.
Yeah, I bought the set for the 07-08 TL.
I haven't considered a weighted shift knob only because I've never found a knob that feels as solid as OEM. They always end up feeling loose and wobbly, but those were on previous cars and I never spent too much. Does yours stay tight like OEM?
It's honestly not a huge difference, but it is still noticeable. I'm more confident with my shifts and it's not as "notchy". I would definitely do it again.
It's hard to say how long it should take. I also changed my MTF and cleaned my air filter, and had major issues with the small bushing. At first the extension and hammer trick didn't work. I wasn't hitting very hard and was afraid to so I figured I'd remove it and drill the hole slightly bigger. I can officially say it's impossible to remove the small one once it's installed. I couldn't get the retaining clip off to save my life. Fortunately I went back to my original plan with a little more force and it worked.
Can you confirm you got the bushing set listed for the 3G TL? I don't see one explicitly for the 4Gs on HeelToe, but it looks like the 3G and 4G use the same OEM shifter bushings on www.acuraoemparts.com.
http://www.heeltoeauto.com/hybrid-ra...roductid=65840
Also, have you considered putting in a weighted shift knob?
http://www.heeltoeauto.com/hybrid-ra...roductid=65840
Also, have you considered putting in a weighted shift knob?
I haven't considered a weighted shift knob only because I've never found a knob that feels as solid as OEM. They always end up feeling loose and wobbly, but those were on previous cars and I never spent too much. Does yours stay tight like OEM?
It's hard to say how long it should take. I also changed my MTF and cleaned my air filter, and had major issues with the small bushing. At first the extension and hammer trick didn't work. I wasn't hitting very hard and was afraid to so I figured I'd remove it and drill the hole slightly bigger. I can officially say it's impossible to remove the small one once it's installed. I couldn't get the retaining clip off to save my life. Fortunately I went back to my original plan with a little more force and it worked.
11-17-2013, 06:05 PM
#6
Thanks for the confirmation 
It does since the knob comes with a threaded adapter. The instructions had me thread the adapter to the end of the TL shifter with a locknut. Once I got the height I wanted the knob at, I tightened the threaded adapter in place. Then I threaded the new shift knob onto the threaded adapter. In my opinion, the knob is on as tight as the OEM knob, and it has not loosened since I installed it last week. And it's not like some other replacement knobs like the Momo Race Air I had on my Civic years ago. That design had set screws that dug into the sides of the shifter but never held tight for long and eventually came loose.
Installation instructions for the TMW knob is shown below FYI. I plan to put together a DIY for 4G'ers who may be interested to swap out their OEM knob for something else.
http://www.twmshiftknobs.com/shiftkn...cal-manual.pdf
Installation instructions for the TMW knob is shown below FYI. I plan to put together a DIY for 4G'ers who may be interested to swap out their OEM knob for something else.
http://www.twmshiftknobs.com/shiftkn...cal-manual.pdf
Trending Topics
11-18-2013, 10:21 AM
#8
Thanks for the nice post there. We have now added the bushings to the site under the 09-14 TL category: http://www.heeltoeauto.com/product.php?productid=66719
Note that the smaller bushing will probably go on easier if you install it so the circlip goes on top. This is how I did mine and they don't bind up this way.
Note that the smaller bushing will probably go on easier if you install it so the circlip goes on top. This is how I did mine and they don't bind up this way.
The following users liked this post:
bigwavedave25 (02-04-2020)
11-18-2013, 10:33 AM
#9
Race Director
iTrader: (1)
^That.
And the Maven knobs are fantastic! The boot fix is an easy one. Just put a zip-tie high up on the lever, put the boot over, then the maven knob. The knob will tighten down the boot between the itself and the zip tie. Perfect. My maven knob on the 3G is even MORE solid that the stock knob. And so is the boot.
Again, IMO, doing the entire package is the key to getting the most out of each mod.
11-18-2013, 12:16 PM
#10
Drifting
Thread Starter
iTrader: (1)
Thanks for the nice post there. We have now added the bushings to the site under the 09-14 TL category: http://www.heeltoeauto.com/product.php?productid=66719
Note that the smaller bushing will probably go on easier if you install it so the circlip goes on top. This is how I did mine and they don't bind up this way.
Note that the smaller bushing will probably go on easier if you install it so the circlip goes on top. This is how I did mine and they don't bind up this way.
Good tip on installing the smaller bushing the other way. Hopefully that will help others when they attempt it.
^That.
And the Maven knobs are fantastic! The boot fix is an easy one. Just put a zip-tie high up on the lever, put the boot over, then the maven knob. The knob will tighten down the boot between the itself and the zip tie. Perfect. My maven knob on the 3G is even MORE solid that the stock knob. And so is the boot.
Again, IMO, doing the entire package is the key to getting the most out of each mod.
And the Maven knobs are fantastic! The boot fix is an easy one. Just put a zip-tie high up on the lever, put the boot over, then the maven knob. The knob will tighten down the boot between the itself and the zip tie. Perfect. My maven knob on the 3G is even MORE solid that the stock knob. And so is the boot.
Again, IMO, doing the entire package is the key to getting the most out of each mod.
The following users liked this post:
maharajamd (11-18-2013)
11-18-2013, 07:09 PM
#11
Thanks for the nice post there. We have now added the bushings to the site under the 09-14 TL category: http://www.heeltoeauto.com/product.php?productid=66719
Note that the smaller bushing will probably go on easier if you install it so the circlip goes on top. This is how I did mine and they don't bind up this way.
Note that the smaller bushing will probably go on easier if you install it so the circlip goes on top. This is how I did mine and they don't bind up this way.
Thanks for the clarification. Order has been placed!
11-20-2013, 11:15 PM
#12

I just installed my shifter bushings, as Marcus stated put the smaller bushing circlip side up (which is the smaller side). I put it on the post first, then I put the cable on it, although I still needed to tap it on with a long flat head screwdriver. I now have these bushings, a Maven shift knob and the CT short shifter from the 3rd gen, as it works on the 4th gen too. I am currently trying to have a SS clutch line made to complete the set up.
11-21-2013, 08:21 AM
#13
Drifting
Thread Starter
iTrader: (1)
^^^ Good tip!
Did you notice much of a difference with the short shifter? I read somewhere that the stock shifter has a very short throw compared to most other OEM setups so I never really considered one. Do you have any pics? I'm curious to see how much lower it sits.
Did you notice much of a difference with the short shifter? I read somewhere that the stock shifter has a very short throw compared to most other OEM setups so I never really considered one. Do you have any pics? I'm curious to see how much lower it sits.
11-21-2013, 08:29 AM
#14
Race Director
iTrader: (1)
Assuming the 4G is the same as the 3G, it is a noticeable difference.
However, I say it all the time over in the 3G section, while the throws are shorter they also become much more "mechanical". They are a little 'notchier'. This is where the weighted knob helps.
However, I say it all the time over in the 3G section, while the throws are shorter they also become much more "mechanical". They are a little 'notchier'. This is where the weighted knob helps.
01-19-2014, 06:01 PM
#15
ucf_bronco,
I installed my shift link bushings over the Thanksgiving weekend. The larger bushing was not a problem. The smaller bushing? Holy crap - that was a pain. The harness assembly was in the way the entire time even after taking out the battery and intake. I had to rig up some rope to pull the bundle out of the way a couple inches so I could have a little bit of working room. Also, your recommendation of using the extension handle to tap it onto the post helped a lot.
The first week after installation, the shifter had significantly less play in it, especially when it was in neutral. I also noticed that while the shifter engaged into each gate better than the stock bushings, it took a bit more force to shift through the gates. But after a week, it loosened up and now shifts smoother that stock in my opinion. The bushings definitely make driving more fun (I don't even mind stop-and-go traffic as much anymore) and was well worth the agony during installation.
The following 2 users liked this post by si1point6:
bigwavedave25 (02-04-2020),
CerberusKy (01-20-2014)
01-21-2014, 12:47 PM
#16
Drifting
Thread Starter
iTrader: (1)
^^^ Glad you got them installed successfully, and that the DIY helped a bit.
I'm still happy with mine as well and have yet to have the third gear popout that I experienced on occasion before the installation (though that may be partially tied to the fact I changed the MTF at the same time as the bushings).
I'm still happy with mine as well and have yet to have the third gear popout that I experienced on occasion before the installation (though that may be partially tied to the fact I changed the MTF at the same time as the bushings).

Thread
Thread Starter
Forum
Replies
Last Post
rp_guy
Member Cars for Sale
9
07-16-2017 07:33 AM
guyvelella
2G TL (1999-2003)
8
09-30-2015 11:02 PM